
Imagine sinking your spoon into a slice of pure bliss: a rich chocolate crust, a velvety, smooth coffee-infused filling, topped with a cloud of whipped cream, and a whisper of cocoa. This isn’t just dessert; it’s a symphony for your taste buds.
I remember the first time I whipped up a coffee cheesecake for a dinner party. My guests, usually quick to politely decline a second slice, practically wrestled for the last piece, showering me with compliments and demands for the recipe.
What Makes This Dessert Truly Special
This no-bake coffee cheesecake is a showstopper that effortlessly combines ease of preparation with gourmet appeal. Its unique flavor profile, a sophisticated blend of robust cold brew coffee and rich chocolate, sets it apart from typical cheesecakes. The stunning layered appearance, finished with elegant swirls of whipped cream and chocolate garnishes, ensures it’s a feast for the eyes as well as the palate. Plus, its versatility means it’s perfect for any occasion, from casual gatherings to elegant celebrations.
Ingredients
Here’s what you need for this delicious dish:
- **Chocolate Sandwich Cookies (cream removed), finely crushed:** These form the backbone of our cheesecake, creating a dark, sturdy crust that perfectly complements the coffee flavor. Choose your favorite brand, just remember to remove the cream!
- **Unsalted Butter, melted:** The glue that binds the crust together, providing a rich foundation for our creamy coffee cheesecake. Melting ensures it evenly coats the cookie crumbs.
- **Cream Cheese, softened:** This is the star ingredient for that incredibly **creamy** texture in The Ultimate Creamy Coffee Cheesecake Recipe. Ensure it’s at room temperature for a lump-free, silky smooth filling, as specified in the recipe notes.
- **Granulated Sugar:** Provides the perfect amount of sweetness, balancing the slight bitterness of the coffee and the tang of the cream cheese.
- **Cold Brew Coffee Concentrate:** The magic potion that infuses this dessert with its signature **coffee** flavor. Use a high-quality concentrate for optimal, deep, and mellow notes, as recommended in the recipe notes.
- **Vanilla Extract:** A touch of vanilla enhances all the other flavors, adding a warm, aromatic note that brings everything together beautifully.
- **Unflavored Gelatin Powder:** This essential ingredient gives our no-bake cheesecake its firm, sliceable texture without needing an oven. It’s the secret to a perfectly set dessert.
- **Hot Water:** Used to dissolve the gelatin powder, ensuring it incorporates smoothly into the filling.
- **Heavy Cream, cold (240ml for filling, 240ml for topping):** This is crucial for achieving the light, airy consistency in the filling and forming the stiff peaks for our luscious whipped cream topping. Keeping it cold is key for successful whipping.
- **Powdered Sugar:** Used for the topping, it dissolves easily into the heavy cream, creating a smooth and sweet whipped cream.
- **Cocoa Powder, for dusting:** Adds a beautiful visual finish and a subtle chocolatey aroma, echoing the crust and enhancing the coffee notes.
- **Chocolate Wafer Cookies or Chocolate Pieces, for garnish (optional):** These provide an elegant final touch, adding texture and a decorative flourish to your elegant coffee cheesecake.
All ingredients and quantities can be found directly in the recipe card below.
Step-by-Step Instructions
Simply follow these easy steps to prepare this delicious meal:
Step 1: **Prepare Your Dream Crust**
In a medium bowl, combine the finely crushed chocolate sandwich cookies (cream removed, of course – we’re all about that crunch!) and the perfectly melted unsalted butter. Mix these two delightful components until they’re thoroughly combined. Then, press this mixture evenly into the bottom of an 8-inch springform pan. This forms the essential base for our fantastic no-bake coffee cheesecake. Once pressed, chill this crust in the refrigerator for at least 30 minutes. This critical step ensures a firm foundation.
Step 2: **Activate the Gelatin Magic**
In a small heatproof bowl, sprinkle the unflavored gelatin powder over the hot water. Stir diligently until the gelatin is completely dissolved and the mixture appears clear. It is vital to get rid of any lumps. Set this aside to cool slightly; we don’t want to shock our cream cheese later!
Step 3: **Whip Up the Creamy Foundation**
In a large bowl, using an electric mixer, beat the softened cream cheese and granulated sugar together. Continue mixing for about 2-3 minutes until the mixture is beautifully smooth and creamy. Remember, room temperature cream cheese is your friend here for that lump-free filling, as noted in the tips for the perfect creamy coffee cheesecake.
Step 4: **Infuse with Coffee Goodness**
Now, for the flavor infusion! Gradually beat in the cold brew coffee concentrate and the vanilla extract. Mix until these liquid components are well combined and the entire mixture is smooth and evenly colored. The aroma is already starting to build!
Step 5: **Bind the Flavors with Gelatin**
With the mixer on low speed, slowly pour the slightly cooled gelatin mixture into the cream cheese and coffee mixture. Continue beating until the gelatin is fully incorporated and no streaks remain. This step is what helps the cheesecake set beautifully.
Step 6: **Create Lightness with Whipped Cream**
In a separate, cold bowl, whip the 240ml of cold heavy cream until it forms stiff peaks. You’ll know it’s ready when the peaks hold their shape firmly. Now, gently fold this glorious whipped cream into the prepared cream cheese mixture. Be careful not to deflate the air you’ve just incorporated; fold until no streaks remain and the filling is light and airy. This contributes significantly to the ‘creamy’ in The Ultimate Creamy Coffee Cheesecake Recipe.
Step 7: **Assemble Your Masterpiece**
Pour the cheesecake filling directly over the chilled crust in the springform pan. Use a spatula to smooth the top, ensuring an even layer across the entire surface.
Step 8: **The Waiting Game: Chill to Perfection**
Refrigerate the cheesecake for at least 6-8 hours. For the absolute best results and a cheesecake that is completely firm and impeccably set, it’s highly recommended to chill it overnight. Patience is a virtue, especially when crafting such an elegant coffee dessert.
Step 9: **Prepare the Whipped Topping**
Once the cheesecake is gloriously set, it’s time for the crowning glory. In another cold bowl, whip the remaining 240ml of cold heavy cream with the powdered sugar and the final teaspoon of vanilla extract until stiff peaks form. This luxurious topping will beautifully complement the creamy coffee cheesecake.
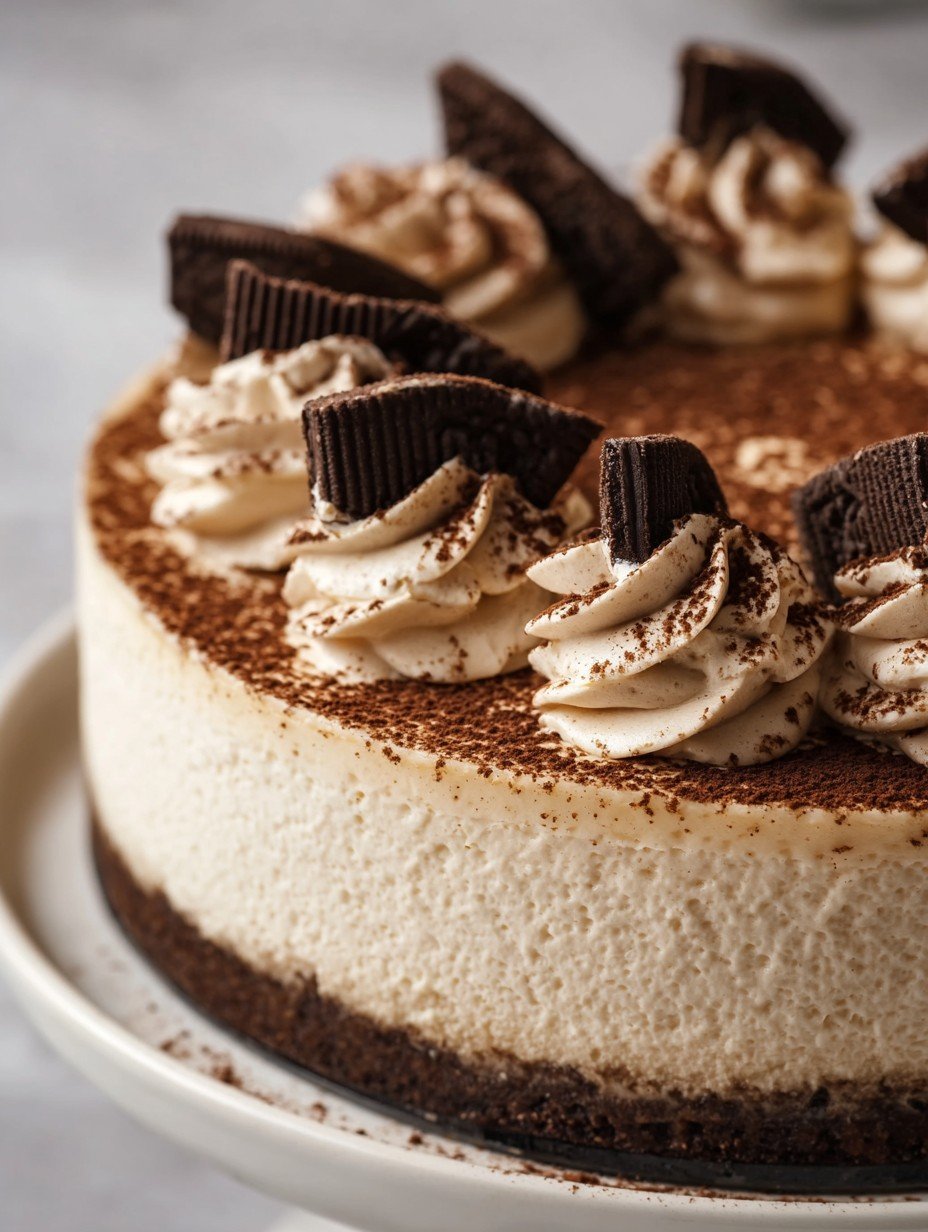
Step 10: **Decorate with Flair**
Carefully remove your perfectly set cheesecake from the springform pan. Now, get creative! Pipe or dollop the freshly whipped cream artfully around the top edge of the cheesecake. Dust generously with cocoa powder for that classic, sophisticated look. Finally, for an extra touch of elegance, garnish with chocolate wafer cookies or delicate chocolate pieces as desired.
Step 11: **Time to Indulge: Slice and Serve**
Your magnificent no-bake coffee dessert is ready! Slice and serve chilled. For clean, pristine slices, remember the chef’s secret: dip your knife in hot water and wipe it clean between each cut. This will ensure every slice of The Ultimate Creamy Coffee Cheesecake Recipe looks as good as it tastes. Enjoy the rich, creamy goodness!
Perfecting Your Coffee Cheesecake Experience
Crafting The Ultimate Creamy Coffee Cheesecake Recipe is genuinely straightforward, but a few expert tips can elevate your dessert from delicious to absolutely divine. For starters, ensuring your cream cheese is at room temperature before you begin is non-negotiable. This simple step guarantees a velvety, lump-free filling that melts in your mouth. There is nothing worse than lumpy cheesecake, trust me! The recipe notes also highlight the importance of high-quality cold brew coffee concentrate. Skimping here would be a disservice to the sophisticated coffee flavor we’re aiming for. A good concentrate provides a deep, mellow note without any bitterness, making every bite of this coffee cheesecake a true delight.
When it comes to the chilling process, resist the urge to peek or rush it. Refrigerating your cheesecake for at least 6-8 hours, or preferably overnight, is crucial for allowing the gelatin to fully set. This ensures your no-bake cheesecake holds its shape beautifully and provides that perfect firm-yet-creamy texture. I’ve made the mistake of cutting too soon, and let’s just say it looked more like coffee soup than a cheesecake! So, let it chill, go for a walk, read a book – anything to distract yourself from the delicious anticipation.
Beyond the Bake: Storage and Enjoyment
Once you’ve unveiled your masterpiece and the compliments start rolling in, you might wonder about keeping any leftovers (though, let’s be honest, that’s a big “if”). Good news! This creamy coffee cheesecake stores beautifully. Simply place any remaining slices in an airtight container and refrigerate them for up to 4 days. This ensures that every subsequent bite is as fresh and flavorful as the first, making it an ideal make-ahead dessert for busy hosts.
The beauty of this dessert lies not just in its incredible taste and stunning presentation, but also in its versatility. While the recipe for The Ultimate Creamy Coffee Cheesecake Recipe is fantastic on its own, you can always play with garnishes. A sprinkle of chocolate shavings, a few chocolate-covered coffee beans, or even a drizzle of chocolate sauce can add another layer of indulgence. It’s perfect for a celebratory dinner, a cozy coffee morning, or simply as a decadent treat to brighten your day.
This elegant coffee cheesecake recipe serves 8-10 people, making it ideal for sharing. Each delicious serving comes in at approximately 480 calories, with 7g of protein, 45g of carbohydrates, and 35g of fat. It’s a rich and satisfying treat that’s worth savoring. So, go ahead, gather your ingredients, follow these simple steps, and prepare to impress everyone with this truly unforgettable dessert. You might even find yourself fighting for the last slice!
Improving the Cooking Method
For optimal results with this delightful Tiramisu Cold Brew Coffee Cheesecake, soften your cream cheese to room temperature for a lump-free filling. Crucially, let the dissolved unflavored gelatin cool slightly before incorporating it. Finally, chill the assembled cheesecake overnight; this ensures an utterly firm and perfectly set dessert, making slicing a breeze.
Decorate Your Dish with Your Personal Touch
Elevate this beautiful coffee cheesecake with your personal flair. For the chocolate sandwich cookies, try a dark chocolate version for a richer crust. Instead of just chocolate pieces as a garnish, finely shave the chocolate for an elegant touch, or use crushed chocolate wafer cookies to echo the base.
Smart Tips for Storage and Reheating
To preserve the luxurious, firm texture of this coffee cheesecake, store any leftovers in an airtight container, refrigerated, for up to four days. If you’ve garnished with chocolate pieces, they will hold up well. For the freshest whipped cream topping, consider piping it just before serving if storing for extended periods.
Practical Chef Advice
My first attempt at this Tiramisu Cold Brew Coffee Cheesecake disappeared at a family gathering before I even got a second slice! The joy on everyone’s faces, savoring each creamy, coffee-infused bite, was truly unforgettable.
Final Thoughts
You’ve just unlocked the secret to a truly unforgettable dessert with this delightful Tiramisu Cold Brew Coffee Cheesecake. Imagine the luxurious blend of rich chocolate cookie crust meeting a velvety, coffee-infused cream, all crowned with airy whipped cream and a hint of cocoa. This no-bake marvel is not just easy to prepare but promises to be a stunning centerpiece and a feast for the senses. It’s the perfect way to bring that café-quality dessert experience right into your home. Don’t just dream about it – whip up this amazing coffee cheesecake today and savor every sublime bite!
Print
The Ultimate Creamy Coffee Cheesecake Recipe
- Total Time: 30 minutes
- Yield: 8-10 1x
Description
This Tiramisu Cold Brew Coffee Cheesecake offers a delightful fusion of classic Italian dessert flavors with a creamy, no-bake cheesecake texture. A rich chocolate cookie crust forms the base, supporting a smooth, velvety filling infused with the deep, mellow notes of cold brew coffee. The cheesecake is elegantly finished with swirls of light whipped cream, a dusting of cocoa powder, and delicate chocolate pieces, creating a sophisticated balance of coffee, chocolate, and cream in every bite.
Ingredients
- **For the Crust:**
- 200g chocolate sandwich cookies (cream removed), finely crushed
- 60g unsalted butter, melted
- **For the Cheesecake Filling:**
- 500g cream cheese, softened
- 150g granulated sugar
- 120ml cold brew coffee concentrate
- 1 teaspoon vanilla extract
- 2 teaspoons unflavored gelatin powder
- 60ml hot water
- 240ml heavy cream, cold
- **For the Topping:**
- 240ml heavy cream, cold
- 30g powdered sugar
- 1 teaspoon vanilla extract
- Cocoa powder, for dusting
- Chocolate wafer cookies or chocolate pieces, for garnish (optional)
Instructions
- **Prepare the Crust:** In a medium bowl, combine the finely crushed chocolate cookies and melted butter. Press the mixture evenly into the bottom of an 8-inch springform pan. Chill in the refrigerator for at least 30 minutes.
- **Prepare Gelatin:** In a small heatproof bowl, sprinkle the gelatin powder over the hot water. Stir until the gelatin is completely dissolved and clear. Set aside to cool slightly.
- **Make Cheesecake Filling:** In a large bowl, beat the softened cream cheese and granulated sugar with an electric mixer until smooth and creamy, about 2-3 minutes.
- **Add Flavors:** Gradually beat in the cold brew coffee concentrate and vanilla extract until well combined and smooth.
- **Incorporate Gelatin:** Slowly pour the cooled gelatin mixture into the cream cheese mixture, beating on low speed until fully incorporated.
- **Whip Cream:** In a separate cold bowl, whip the 240ml cold heavy cream until stiff peaks form. Gently fold the whipped cream into the cream cheese mixture until no streaks remain and the filling is light and airy.
- **Assemble Cheesecake:** Pour the cheesecake filling over the chilled crust in the springform pan. Smooth the top with a spatula.
- **Chill:** Refrigerate the cheesecake for at least 6-8 hours, or preferably overnight, until it is completely firm and set.
- **Prepare Topping:** Once the cheesecake is set, in a cold bowl, whip the remaining 240ml cold heavy cream with the powdered sugar and vanilla extract until stiff peaks form.
- **Decorate:** Carefully remove the cheesecake from the springform pan. Pipe or dollop the whipped cream around the top edge of the cheesecake. Dust generously with cocoa powder. Garnish with chocolate pieces as desired.
- **Serve:** Slice and serve chilled.
Notes
Ensure cream cheese is at room temperature for a smooth, lump-free filling.
For best results and a fully set cheesecake, chill overnight.
Use a high-quality cold brew coffee concentrate for optimal flavor.
To achieve clean slices, dip your knife in hot water and wipe clean between each cut.
Store leftover cheesecake in an airtight container in the refrigerator for up to 4 days.
- Prep Time: 30 minutes
Nutrition
- Calories: 480
- Fat: 35g
- Carbohydrates: 45g
- Protein: 7g
FAQs
How do I ensure the gelatin dissolves completely and correctly?
Properly dissolving the gelatin is crucial for the cheesecake to set beautifully. To do this, always sprinkle the unflavored gelatin powder evenly over the hot water. Avoid dumping it all in one spot, as this can lead to clumps. After sprinkling, stir the mixture continuously until the gelatin is completely dissolved and the liquid appears clear. It’s important to allow this mixture to cool slightly before incorporating it into the cream cheese filling, as adding hot gelatin could affect the texture of your cheesecake. This careful step ensures a smooth, stable filling.
Is it really important for the cream cheese to be softened?
Absolutely! Using softened cream cheese is a key factor in achieving the smooth, creamy, and lump-free texture that defines a perfect cheesecake filling. If your cream cheese is cold and firm, it won’t blend as easily with the granulated sugar and other ingredients, potentially leaving small, unmixed bits in your final product. To ensure the best results, remember to take your cream cheese out of the refrigerator well in advance, allowing it to reach room temperature before you begin making the cheesecake filling.
Why is an extended chilling time so essential for this no-bake cheesecake?
The generous chilling time, ideally 6-8 hours or even overnight, is incredibly important for this Tiramisu Cold Brew Coffee Cheesecake to achieve its desired firm and stable consistency. Because this is a no-bake recipe, the gelatin needs ample time in the cold to properly set and bind the filling ingredients. Rushing this step could result in a cheesecake that is too soft or doesn’t hold its shape when sliced. Patience truly pays off here, ensuring a beautifully firm and easily sliceable dessert.
Can I substitute regular brewed coffee for the cold brew coffee concentrate?
While it might be tempting to use regular brewed coffee, this particular cheesecake recipe specifically calls for cold brew coffee concentrate for optimal flavor. Cold brew concentrate tends to have a smoother, less acidic, and naturally sweeter coffee flavor compared to traditionally brewed coffee, which significantly enhances the overall taste profile of the creamy coffee cheesecake filling. Using a high-quality cold brew concentrate will infuse your dessert with those deep, mellow notes that truly define this Tiramisu-inspired treat.