
Imagine biting into a cloud-soft bun, its tender interior yielding to a cascade of smooth, sweet vanilla icing, all crowned with a vibrant cherry. Pure bliss! My grandmother always said the best memories are made in the kitchen, especially when those memories involve stealing a warm, sticky bun right off the cooling rack. Oops, my secret’s out!
This recipe for these delightful sweet glazed buns perfect for the holidays isn’t just easy, it’s a game-changer! Its unique flavor profile balances tender dough with creamy vanilla, creating an unforgettable experience that evokes warmth and celebration. Visually stunning with their vibrant maraschino cherry crowns, these festive treats are also incredibly versatile—perfect for breakfast, a charming dessert, or a heartfelt, homemade gift.
The journey to perfect holiday buns begins long before the oven even preheats. It starts with a feeling, a craving for that unmistakable aroma of freshly baked goods wafting through your home. For me, holiday baking is less about precision and more about the joy of the process, the simple pleasure of transforming basic ingredients into something truly magical. There’s something deeply satisfying about kneading dough, watching it come alive, and anticipating the moment those golden sweet rolls emerge, ready to be adorned with a luscious glaze. Whether you are a seasoned baker or just dipping your toes into the wonderful world of yeasted breads, this recipe for incredible sweet glazed buns is designed to guide you with ease and a little bit of fun. Forget complicated techniques and endless ingredient lists; we are making joy, one tender bun at a time. It’s the kind of recipe that begs for a cozy morning, a cup of coffee, and perhaps a mischievous little hand reaching for a warm bun while you are not looking. These sweet glazed buns are truly perfect for the holidays, bringing smiles to every face.
Essential Ingredients for Irresistible Sweet Glazed Buns
Here’s what you need for this delicious dish:
- **Warm Milk:** This is the gentle wake-up call for your yeast, crucial for helping your buns rise into airy, tender perfection. Ensure it’s at the right temperature—think lukewarm, like a cozy bath for your fingers—to avoid harming the yeast.
- **Yeast:** The unsung hero of our fluffy buns, this active dry yeast will do all the heavy lifting, transforming your dough into something wonderfully light. Fresh, active yeast is key to a good rise.
- **Granulated Sugar:** Not just for sweetness, this sugar also provides essential food for the yeast, helping it activate properly and lending that gorgeous golden crust to your baked goods. It helps build the “Sweet” in our sweet glazed buns.
- **Egg:** This ingredient adds richness, moisture, and structure to the dough, giving your buns a beautiful golden hue and an irresistible tender crumb. It’s like the secret to a perfectly soft texture.
- **Melted Butter:** Infusing every bite with a luxurious, buttery flavor and contributing to the dough’s incredible tenderness, the melted butter makes these rolls truly decadent.
- **Salt:** A tiny but mighty ingredient that balances the sweetness and enhances all the other flavors in the dough, preventing your sweet glazed buns from tasting flat.
- **Flour:** The foundational ingredient, giving our buns their shape and satisfying chewiness. All-purpose flour is your go-to here for consistent results.
- **Powdered Sugar:** The magical base for our silky-smooth, creamy glaze. Its fine texture ensures a lump-free, dreamy topping that cascades beautifully. This ingredient is central to the “Glazed” characteristic.
- **Vanilla Extract:** This fragrant liquid infuses the glaze with a classic, comforting aroma and flavor, elevating the overall sweetness and making the topping utterly irresistible. It greatly contributes to the “Sweet” profile.
- **Maraschino Cherry:** The vibrant, festive crown for each bun, adding a delightful pop of color and a touch of fruity sweetness that makes these sweet glazed buns truly perfect for the holidays.
All ingredients and quantities can be found directly in the recipe card below.
Step-by-Step Instructions to Bake Your Dream Holiday Treats
Simply follow these easy steps to prepare this delicious meal:
Step 1: Awaken the Yeast and Mix the Dough’s Heart
First, in a large bowl, combine the warm milk, yeast, and 1 teaspoon of the granulated sugar. Give it a gentle stir and then let it sit undisturbed for 5-10 minutes. You’re looking for a foamy surface, which tells you your yeast is alive and ready for action. Next, add the remaining granulated sugar, the egg, melted butter, and salt to this bubbly yeast mixture. Whisk everything together until it’s well combined and smooth. Now, gradually add 3 cups of the flour, mixing it with a sturdy wooden spoon until a shaggy, somewhat rough dough forms. Turn this dough out onto a lightly floured surface. Knead the dough for 8-10 minutes, using a rhythmic push and fold motion. If the dough feels too sticky, add a tablespoon of flour at a time, but be careful not to over-flour; a slightly tacky dough makes a more tender bun. Continue kneading until it becomes smooth and elastic, a joy to work with.
Step 2: The First Rise and Gentle Shaping
Lightly grease a clean, large bowl with a little oil or butter. Place your beautifully kneaded dough in the bowl, turning it once to ensure it’s lightly coated all over. Cover the bowl securely with plastic wrap or a clean kitchen towel. Now, find a cozy, warm spot in your kitchen—perhaps near a sunny window or a pilot light—and let the dough rise for 1-1.5 hours, or until it has visibly doubled in size. This is where the magic happens! Once it’s perfectly puffed, gently punch down the dough to release the air. Divide the dough into 12 equal pieces. For the neatest buns, use a kitchen scale for precision, but eyeballing it is perfectly fine for homemade charm. Shape each piece into a smooth, round roll by tucking the edges underneath and gently rolling it against your palm or the counter.
Step 3: The Second Ascent and Golden Bake
Carefully place the shaped rolls on a parchment-lined baking sheet, making sure to leave some space between each one to allow for their final rise. Loosely cover the rolls again with plastic wrap or a clean kitchen towel and let them rise for another 30-45 minutes, or until they look noticeably puffy and plump. While your rolls are enjoying their final nap, preheat your oven to 375°F (190°C). Once the rolls have risen beautifully and the oven is hot, bake them for 15-20 minutes. Keep an eye on them; they are done when they are gloriously golden brown. Remove the baked sweet buns from the oven and immediately transfer them to a wire rack. It’s crucial that they cool completely here before the grand finale.
Step 4: The Grand Finale: Icing and Cherry Crown
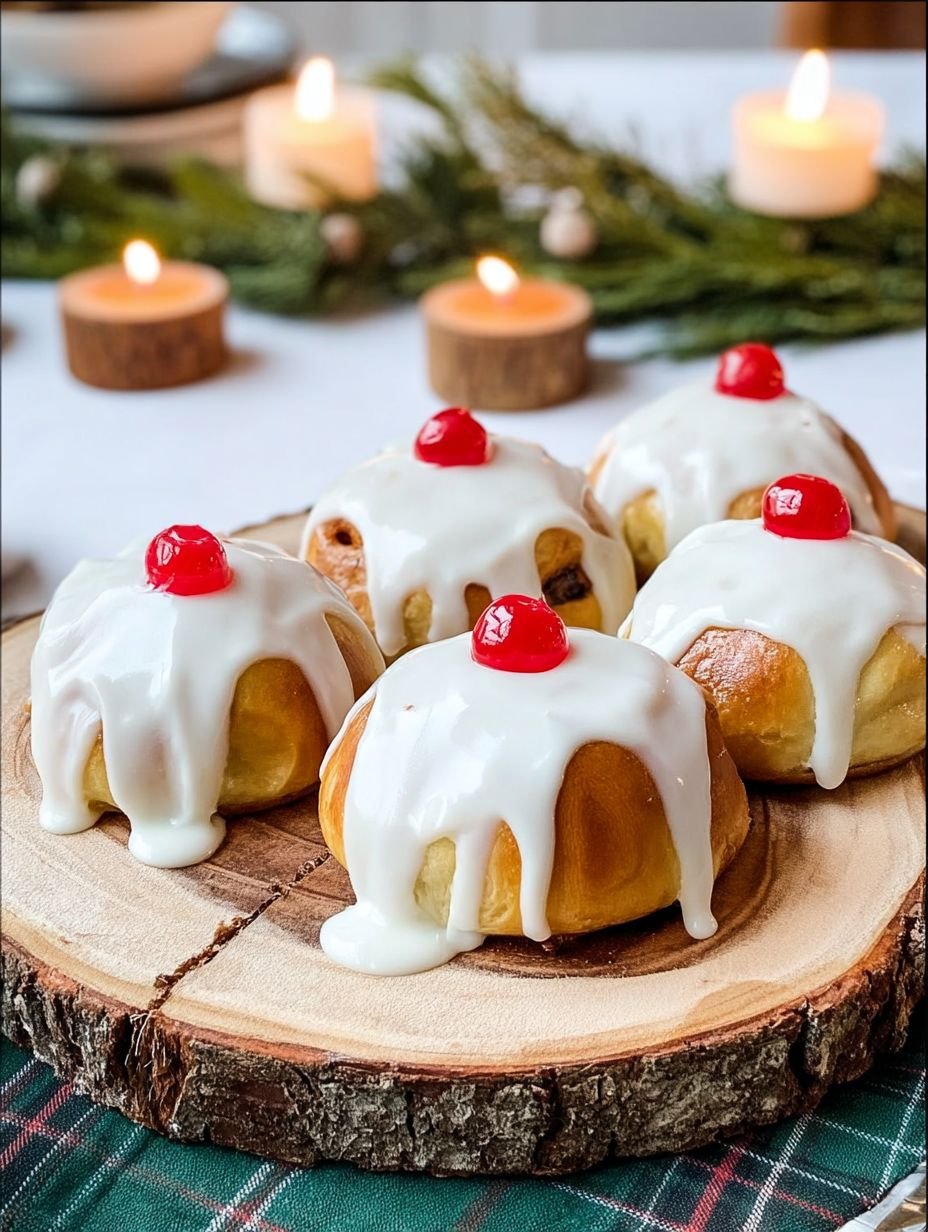
While your golden buns are cooling down, it’s time to whip up that luscious icing! In a medium bowl, whisk together the powdered sugar, 3 tablespoons of milk or cream, and a splash of vanilla extract until you achieve a wonderfully smooth consistency. If you prefer a thinner glaze that drips more dramatically, simply add more milk or cream, a teaspoon at a time, until it reaches your desired flow. Patience is key here: once the rolls are completely cool—and I mean completely, otherwise your icing will melt into a sad puddle—generously spoon the prepared icing over each roll. Let it cascade beautifully down the sides, creating those signature glazed trails. To add a festive flourish, place one drained maraschino cherry on top of each perfectly iced roll. Serve these delightful sweet glazed buns immediately to enjoy the perfect combination of soft bun and the incredibly sweet, creamy glaze.
Tips for Baking the Best Sweet Glazed Buns
Achieving bakery-worthy sweet glazed buns at home is all about paying attention to a few crucial details. First, the temperature of your milk for activating the yeast is paramount. Think Goldilocks: it needs to be just right. If the milk is too hot, it will unfortunately kill the yeast, and your buns won’t rise. If it’s too cold, the yeast will be sluggish, and the rise will be incredibly slow. Aim for warm, but not scalding.
Next, resist the urge to over-flour your dough during the kneading process. It can be tempting to keep adding flour when the dough feels sticky, but a slightly tacky dough is actually your friend here. Over-flouring will result in dense, tough rolls, and we are aiming for tender, pillowy sweet buns that practically melt in your mouth. Embrace the slight stickiness!
Another golden rule for these exquisite holiday treats is patience. It is absolutely essential to allow the rolls to cool completely before you even think about spooning on that glorious icing. If the buns are even slightly warm, the icing will melt instantly, becoming thin and transparent, losing its beautiful, creamy texture and vibrant appearance. So, grab a cup of tea, distract yourself, and let those buns chill out.
For those who enjoy an extra layer of decadence, consider a simple swap in the icing. While milk works wonderfully, using heavy cream instead will yield an even richer, more luxurious icing. It’s a small change that makes a noticeable difference in the creamy mouthfeel of your sweet glaze, elevating these holiday buns even further.
Finally, while these sweet glazed buns perfect for the holidays are truly at their absolute best when enjoyed fresh from the oven, any leftovers can be stored. Simply place them in an airtight container at room temperature, where they will remain delightfully fresh for up to two days. However, I have a feeling they won’t last that long!
Why These Sweet Glazed Buns are Perfect for the Holidays
The holidays are a time for comfort, joy, and, let’s be honest, incredible food that makes you feel warm inside. These sweet glazed buns encapsulate all of that. They bring a festive elegance to any holiday table, whether it is a Christmas morning breakfast, a festive brunch, or a simple afternoon treat shared with loved ones. Their golden hue, the creamy white glaze, and the bright cherry pop make them visually stunning, instantly signaling celebration. Beyond their appearance, the flavor profile of these sweet glazed buns is pure holiday magic. The tender, subtly sweet dough pairs perfectly with the rich vanilla icing, creating a harmonious symphony of flavors that appeals to everyone. It is a recipe that not only produces delicious results but also creates lasting memories, tying together the scents, tastes, and laughter of the season. Making these delicious holiday buns is a tradition waiting to happen, or perhaps a new staple in your festive repertoire. They are truly the sweet glazed buns perfect for the holidays.
Nutritional Snapshot
Servings: 12 rolls. Per roll: Calories: 280 kcal, Protein: 5g, Carbs: 55g, Fat: 5g.
Ready to Bake Your Holiday Magic?
There you have it—a recipe for sweet glazed buns that promises to bring warmth, flavor, and a whole lot of cheer to your holiday season. Dive into your kitchen, embrace the joy of baking, and create these delightful treats. I promise, your home will smell incredible, and your taste buds will thank you. Don’t forget to share your baking triumphs in the comments below; I’d love to hear how your holiday buns turn out!
Improving the Cooking Method
Achieving ideal sweet glazed buns means precise timing. Confirm yeast is actively foamy before adding other liquids. Knead just enough to create an elastic dough, avoiding over-flouring for tenderness. Most importantly, ensure rolls are fully cooled before icing, guaranteeing the smooth, creamy glaze adheres perfectly to your holiday treats.
Decorate Your Dish with Your Personal Touch
Give your sweet glazed buns a signature twist! Instead of a maraschino cherry, try a different festive candied fruit, or a sprinkle of colorful nonpareils. For a richer, more decadent vanilla icing, simply swap the regular milk for lush heavy cream. These simple changes make your holiday treats truly unique.
Smart Tips for Storage and Reheating
To keep these delightful sweet glazed buns tasting their best, store them in an airtight container at room temperature for up to two days. Ensure they are completely cool before sealing to prevent condensation, which can soften the texture of the bun and thin the lovely vanilla icing. Enjoy them fresh for optimal deliciousness.
Practical Chef Advice
Grandma’s sweet glazed buns were holiday magic. The aroma pulled us from bed, eager for those tender, cherry-topped treats. A truly cherished memory, perfect for the holidays.
Final Thoughts
The irresistible aroma of freshly baked goods, coupled with the visual delight of glistening vanilla icing and a bright maraschino cherry, makes these sweet glazed buns a truly special treat. With their tender texture and balanced sweetness, these buns are designed to bring joy to any occasion, especially for the holidays. They offer a comforting indulgence that feels both classic and festive. Imagine the smiles when you present these delightful rolls, ready to be savored. Don’t wait to create this magic in your own kitchen; bring these amazing sweet rolls to your table and make your celebrations even more memorable.
Print
Sweet Glazed Buns Perfect for the Holidays
- Total Time: 50 minutes
- Yield: 12 rolls 1x
Description
These delightful sweet rolls feature a tender, golden-baked dough, generously coated with a smooth, creamy vanilla icing that cascades down the sides. Each roll is elegantly crowned with a vibrant maraschino cherry, adding a touch of fruity sweetness and a festive visual appeal. The soft texture of the bun complements the rich, sweet glaze, creating a balanced and satisfying treat.
Ingredients
- 3 Tassen Mehl
- 1 Teelöffel Kristallzucker
- 1 Ei
- 3 Esslöffel Milch oder Sahne
- 12 Maraschino-Kirschen
Instructions
- In a large bowl, combine the warm milk, yeast, and 1 teaspoon of the granulated sugar. Stir gently and let sit for 5-10 minutes until foamy.
- Add the remaining granulated sugar, egg, melted butter, and salt to the yeast mixture. Whisk until well combined.
- Gradually add 3 cups of the flour, mixing with a wooden spoon until a shaggy dough forms.
- Turn the dough out onto a lightly floured surface and knead for 8-10 minutes, adding more flour a tablespoon at a time if the dough is too sticky, until it is smooth and elastic.
- Lightly grease a clean bowl. Place the dough in the bowl, turning once to coat. Cover with plastic wrap or a clean kitchen towel and let rise in a warm place for 1-1.5 hours, or until doubled in size.
- Once risen, gently punch down the dough. Divide it into 12 equal pieces. Shape each piece into a smooth, round roll.
- Place the rolls on a parchment-lined baking sheet, leaving some space between them. Cover loosely and let rise again for 30-45 minutes, or until visibly puffy.
- Preheat oven to 375°F (190°C). Bake the rolls for 15-20 minutes, or until golden brown.
- Remove from oven and transfer to a wire rack to cool completely before icing.
- While the rolls cool, prepare the icing: In a medium bowl, whisk together the powdered sugar, 3 tablespoons of milk or cream, and vanilla extract until smooth. Add more milk/cream a teaspoon at a time if a thinner consistency is desired.
- Once the rolls are completely cool, generously spoon the icing over each roll, allowing it to drip down the sides.
- Place one drained maraschino cherry on top of each iced roll. Serve immediately or store in an airtight container.
Notes
Ensure your milk is at the correct temperature for yeast activation; too hot will kill it, too cold will slow it down.
Do not over-flour the dough during kneading; a slightly sticky dough will result in a more tender roll.
Allow the rolls to cool completely before icing to prevent the icing from melting and becoming too thin.
For an extra rich flavor, use heavy cream instead of milk in the icing.
These rolls are best enjoyed fresh, but can be stored at room temperature in an airtight container for up to 2 days.
- Prep Time: 30 minutes
- Cook Time: 20 minutes
Nutrition
- Calories: 280 kcal
- Fat: 5g
- Carbohydrates: 55g
- Protein: 5g
FAQs
How can I ensure my dough rises successfully?
Successful dough rising starts with correctly activating the yeast. Combine warm milk, yeast, and a teaspoon of granulated sugar, then let it sit for 5-10 minutes until it becomes foamy. This shows the yeast is active. For the first rise, place the dough in a lightly greased bowl, cover it, and let it rest in a warm spot for 1 to 1.5 hours, or until it has doubled in size. Remember, your milk’s temperature is crucial for yeast; ensure it’s not too hot, which can kill the yeast, nor too cold, which will slow its activity.
What’s the best way to store these sweet glazed buns?
These tender rolls are truly best enjoyed fresh to appreciate their soft texture and creamy icing. If you happen to have any leftovers, you can store them at room temperature. Simply place the completely cooled and iced buns in an airtight container. They will maintain their delicious quality for up to two days. Beyond that, the texture might begin to change. Always ensure they are cooled completely before storing to prevent condensation from affecting the icing.
Why is it important to cool the buns completely before adding the icing?
Cooling the buns completely before icing is a crucial step for achieving the perfect finish. If you apply the vanilla icing to warm rolls, the heat will cause the icing to melt and become runny. This results in a thin, translucent layer that doesn’t properly coat the bun or provide the desired creamy texture. Allowing the rolls to cool ensures the icing sets beautifully, creating that generous, smooth layer that cascades appealingly down the sides, just as intended in the recipe.
Can I adjust the consistency of the vanilla icing for these sweet rolls?
Yes, you can easily adjust the consistency of the vanilla icing to suit your preference. The recipe instructs you to whisk together powdered sugar, three tablespoons of milk or cream, and vanilla extract until smooth. If you find the icing too thick for your liking and desire a thinner, more pourable consistency, simply add more milk or cream. Do this one teaspoon at a time, mixing well after each addition, until you achieve your desired smoothness and flow. For an extra rich flavor, you can also use heavy cream instead of milk in the icing.