Imagine biting into a soft, pillowy cloud that’s subtly sweet, delightfully chewy, and bursting with tropical flavor. These are the textures and tastes awaiting you.
I remember my first encounter with a similar treat during a particularly disastrous potluck where my own dessert attempt collapsed. These banana mochi rolls were a revelation, a delicious rescue that taught me simplicity can be truly extraordinary.
What Makes This Recipe Special
This recipe stands out for its incredible ease of preparation, making it perfect for even the most novice home cook who wants to create something impressive without the fuss. It boasts a unique flavor profile, blending the comforting sweetness of ripe bananas with the exotic aroma of coconut, all wrapped in that irresistible chewy mochi texture. The finished product is stunningly beautiful, with vibrant colors (if you choose to add food coloring) and a delicate coconut coating that makes each bite an experience. Plus, it is surprisingly versatile; while the core recipe is a masterpiece, you can easily adapt it with different fruit fillings or toppings to suit any occasion.
Ingredients
Here’s what you need for this delicious dish:
- **Glutinous Rice Flour (Mochiko)** This is the magical ingredient responsible for the wonderfully chewy texture of these mochi rolls. It is crucial for achieving that signature soft, pliable consistency that makes mochi so unique and satisfying.
- **Granulated Sugar** To achieve the desired sweetness in your mochi, granulated sugar is added. You can adjust the quantity to your preference, especially since ripe bananas already contribute natural sweetness, ensuring the finished product is perfectly balanced.
- **Water (or Coconut Milk for Richer Flavor)** Essential for hydrating the flour and creating the mochi dough. Opting for coconut milk instead of water will infuse your mochi with an even richer, more profound tropical flavor, complementing the other ingredients beautifully.
- **Vanilla Extract (optional)** A hint of vanilla can deepen the overall flavor profile, adding a warm, aromatic note that subtly enhances the sweetness of the bananas and coconut.
- **Purple or Pink Food Coloring (optional, for aesthetic)** For those who love a visually appealing dessert, a few drops of food coloring can transform the mochi into vibrant, eye-catching treats, making them even more delightful to serve and eat.
- **Ripe but Firm Bananas, peeled and sliced into 1-inch pieces** These provide the core banana flavor and creamy interior that defines our banana mochi. Selecting ripe yet firm bananas is key, as they offer the best balance of sweetness and texture, holding their shape perfectly when wrapped.
- **Shredded Unsweetened Coconut, for coating** This ingredient is vital for adding a delicate, flaky texture and an unmistakable tropical aroma to the exterior of the mochi rolls, providing a lovely contrast to the soft interior.
- **Cornstarch, for dusting** A secret weapon against stickiness, cornstarch is absolutely essential for dusting your work surface and hands. It prevents the incredibly sticky mochi dough from adhering to everything, making the shaping process manageable and enjoyable.
All ingredients and quantities can be found directly in the recipe card below.
Step-by-Step Instructions
Simply follow these easy steps to prepare this delicious meal:
Step 1: Prepare the Mochi Batter
In a microwave-safe bowl, combine the glutinous rice flour and granulated sugar. Whisk these dry ingredients thoroughly before incorporating the water (or coconut milk if you’re going for extra richness), vanilla extract (if using), and a few drops of food coloring (if you desire a pop of color). Continue to whisk until the mixture is completely smooth, ensuring there are no lumps remaining for a consistently textured mochi.
Step 2: Microwave the Mochi Dough
Cover the bowl containing your smooth mochi batter with plastic wrap, making sure to leave a small vent for steam to escape during cooking. Place the bowl in your microwave and cook on high for exactly 1 minute. After this initial minute, carefully remove the bowl and, using a wet spatula, stir the mixture vigorously until it is well combined and starting to thicken.
Step 3: Continue Cooking Until Translucent
Return the covered bowl to the microwave and cook again on high for another 1 minute. Remove and stir thoroughly once more. You will repeat this process, microwaving for 1 minute intervals and stirring in between, an additional 2 to 3 times. Continue until the mochi dough transforms into a translucent, sticky, and distinctly chewy consistency. The total microwave cooking time should be approximately 4 to 5 minutes, depending on the power of your specific microwave. As an alternative, if you prefer, you can steam the mixture in a steamer basket for 15 to 20 minutes until it is cooked through and reaches the desired texture.
Step 4: Cool and Prepare for Shaping
Once the mochi dough is cooked, carefully remove the hot, sticky dough from its bowl. Transfer it onto a clean work surface that you have generously dusted with cornstarch. This crucial step prevents the mochi from sticking. Allow the dough to cool slightly until it is warm enough for you to comfortably handle without burning your hands.
Step 5: Flatten and Cut the Mochi Dough
Dust your hands generously with cornstarch to prevent the sticky mochi dough from adhering to them. Gently begin to flatten the warm mochi dough into a rectangular shape, aiming for a thickness of about 1/4-inch. Once flattened, use a knife or a bench scraper to cut the mochi dough into individual squares or rectangles. Each piece should be large enough to comfortably wrap around one of your pre-sliced banana pieces.
Step 6: Assemble the Banana Mochi Rolls
Take one of your prepared mochi pieces and place a single 1-inch slice of ripe banana directly in its center. Carefully bring the edges of the mochi dough up and around the banana slice, folding and pinching the seams together firmly to completely seal the banana inside. Gently form it into a neat, small roll, ensuring the banana is fully encased within the chewy mochi.
Step 7: Coat with Coconut and Chill
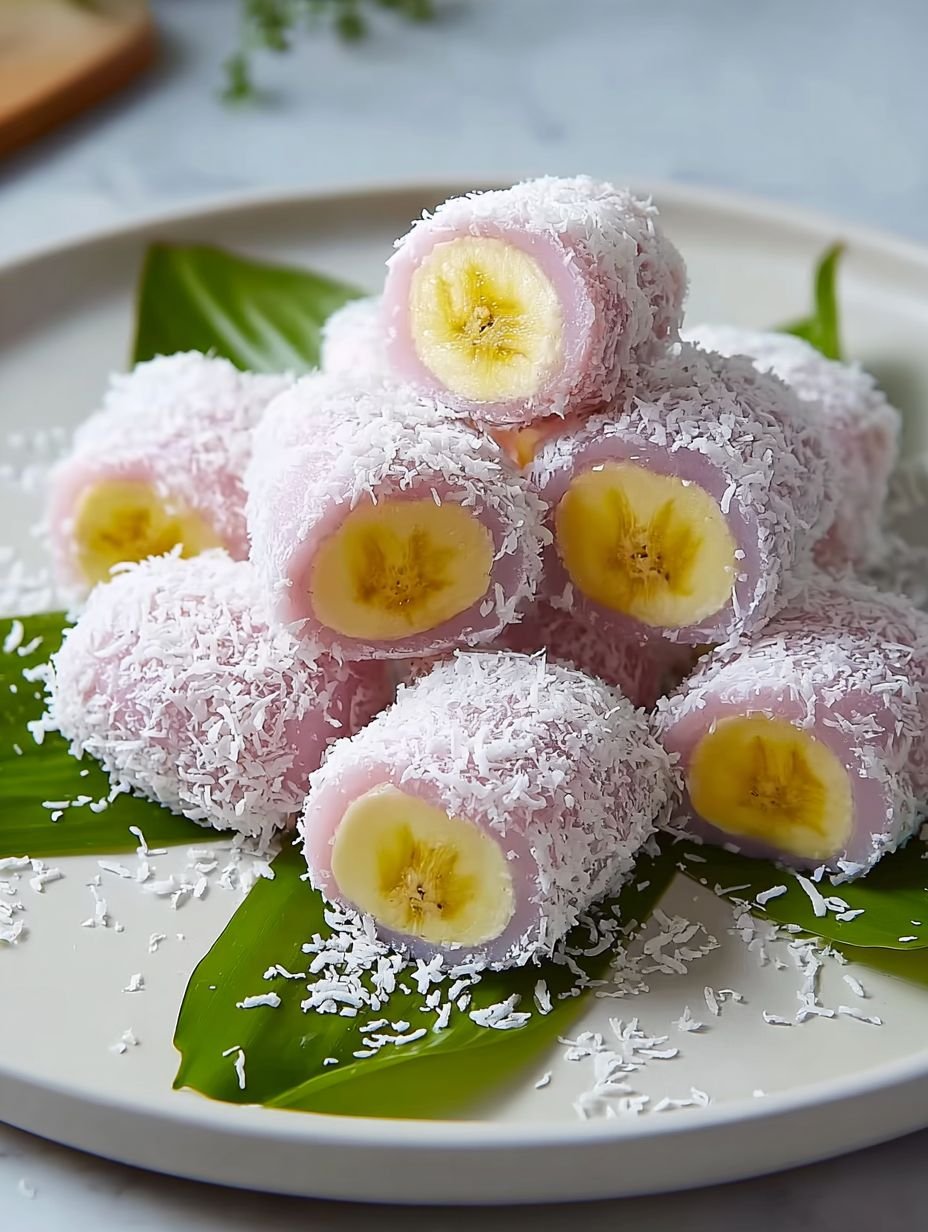
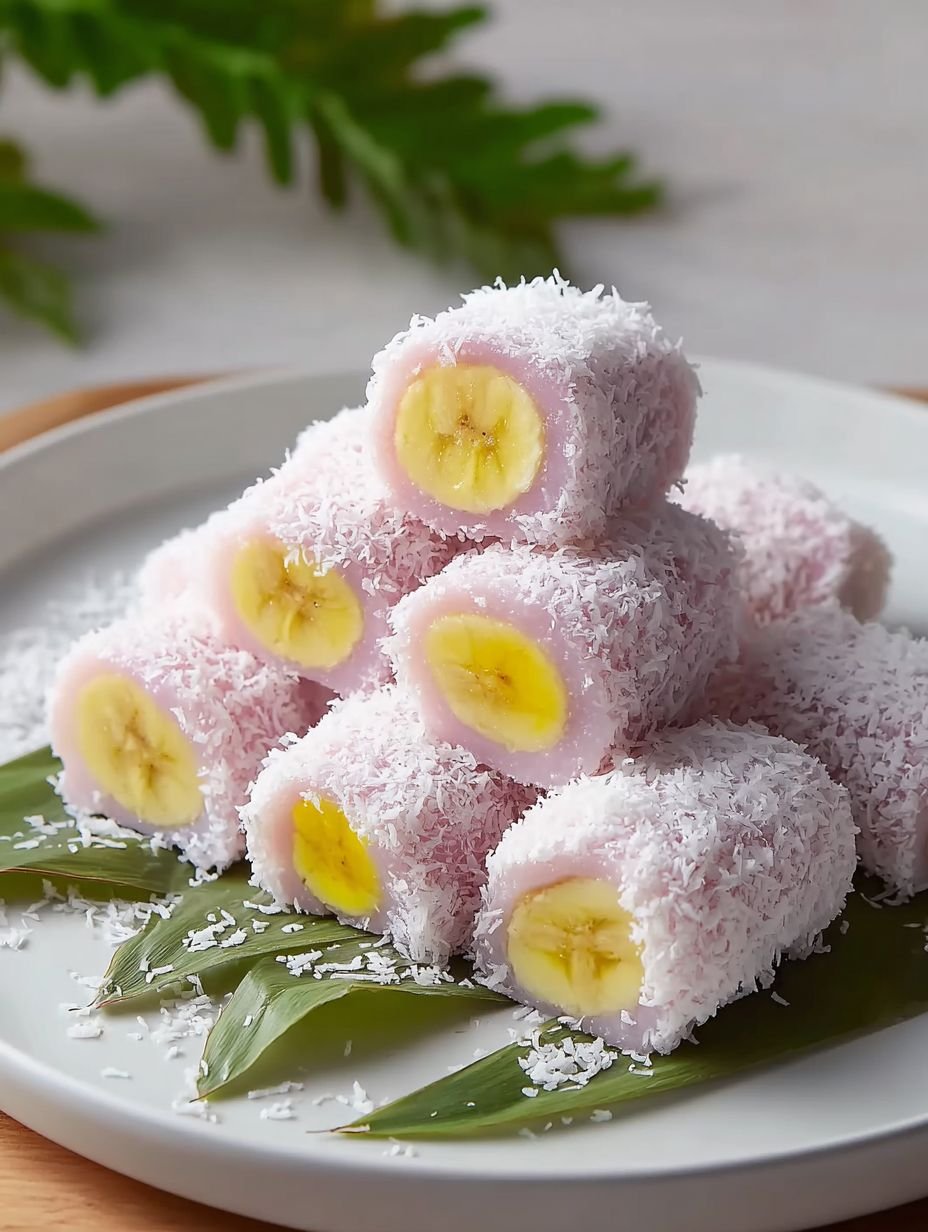
Roll each individual banana mochi piece, ensuring the seams are sealed, in the shredded unsweetened coconut until its entire surface is generously and evenly coated. Arrange all the finished banana mochi rolls on a plate. Place the plate in the refrigerator and chill them for at least 30 minutes. Serve these delightful treats chilled to fully enjoy their soft, chewy, and refreshing qualities.
Why You’ll Fall for These Chewy Banana Delights
These sweet and chewy banana mochi rolls with coconut are more than just a dessert; they are a little taste of paradise, a delightful escape from the everyday. They manage to be both satisfyingly exotic and wonderfully comforting at the same time. The experience of making them is surprisingly therapeutic, transforming simple ingredients into something truly special. There’s a certain magic in watching the glutinous rice flour transform into that signature pliable mochi, and then creating these elegant little parcels. The natural sweetness of the banana perfectly complements the subtle chewiness of the mochi and the tropical fragrance of the coconut. Each bite offers a harmonious blend of textures and flavors that will transport you to a sun-drenched beach, even if you are just sitting in your kitchen. They are truly a testament to how humble ingredients can create extraordinary moments.
Pro Tips for Perfect Mochi Rolls
Achieving the perfect sweet and chewy banana mochi rolls with coconut is all about mastering a few key techniques. Firstly, always use ripe bananas that are still firm. Overly soft bananas will be difficult to wrap and may become mushy, while underripe ones lack the essential sweetness. The firm texture helps them maintain their shape beautifully inside the mochi. Secondly, cornstarch is your best friend when working with mochi dough. Dusting your hands and work surface generously and frequently is crucial. This super sticky dough can be incredibly frustrating if not properly handled, so do not skimp on the cornstarch! If your mochi dough becomes too stiff to manipulate easily during the shaping process, a quick 5 to 10 second zap in the microwave can gently warm and soften it, making it pliable again. Lastly, remember that these treats are best enjoyed fresh. While they store reasonably well, their texture is at its peak shortly after preparation.
Frequently Asked Questions About Banana Mochi
Do you have burning questions about perfecting your sweet and chewy banana mochi rolls with coconut? Let’s dive into some common queries. Many people ask if they can use different types of flour. For authentic mochi texture, glutinous rice flour (mochiko) is non-negotiable. Regular rice flour will not give you the same elasticity and chewiness. Another frequent question concerns sugar adjustments. Yes, you can absolutely adjust the amount of granulated sugar to suit your taste preference. Since ripe bananas inherently contribute sweetness, feel free to reduce the sugar slightly if you prefer a less sweet dessert. Some readers wonder about the best way to store leftovers. While mochi is truly best enjoyed fresh, you can store any remaining banana mochi in an airtight container at room temperature for up to one day, or in the refrigerator for up to two days. However, be aware that the texture may firm up slightly when chilled, but it will still be delicious.
Exploring Delicious Variations
While the classic sweet and chewy banana mochi rolls with coconut are absolutely divine as is, there is always room to get creative in the kitchen! Imagine swapping out the banana for other firm fruits like mango or even slices of ripe strawberry for a different fruity twist. These adaptations allow you to explore a spectrum of flavors while maintaining the delightful mochi texture. For an extra layer of flavor, consider infusing your mochi dough with different extracts. A hint of almond extract could add a nutty undertone, or a touch of pandan extract could introduce an exotic, vanilla-like aroma. Furthermore, instead of just shredded coconut, you could roll the finished mochi in toasted sesame seeds for a savory crunch, or finely crushed nuts for added texture and richness. The beauty of this recipe lies in its adaptability; once you master the basic technique, the possibilities for customization are almost endless, allowing you to create your signature sweet banana mochi variation.
Nutritional Snapshot of Your Treat
Indulging in these delightful sweet and chewy banana mochi rolls with coconut is a treat you can feel good about enjoying in moderation. Each serving, which typically yields 8 to 10 delicious pieces, offers a balanced profile of energy and nutrients. Per serving, you are looking at approximately 180 kcal, providing a satisfying boost without being overly heavy. With 2g of protein, these rolls contribute a small amount of this essential macronutrient. The primary energy source comes from carbohydrates, totaling 38g per serving, which fuels your body and satisfies your sweet cravings. Furthermore, each serving contains a modest 3g of fat. This nutritional breakdown makes these tropical mochi rolls a perfectly permissible sweet indulgence that can fit into a balanced diet, offering a wonderful taste experience without excessive calorie counts.
Conclusion: A Sweet Escape
There you have it, folks, the definitive guide to crafting your very own sweet and chewy banana mochi rolls with coconut. This recipe isn’t just about mixing ingredients; it’s about creating a moment of pure, unadulterated joy in your kitchen. From the simple whisking of the batter to the satisfying pliability of the finished mochi, every step is a testament to the magic of home cooking. These delightful treats are perfect for sharing with friends, as a unique dessert for a special occasion, or simply as a well-deserved personal indulgence. Go on, embrace the stickiness, dust that cornstarch, and treat yourself to the wonderfully soft, chewy, and tropical goodness of these homemade mochi rolls. Your taste buds will thank you, and your inner chef will be beaming with pride. Happy cooking!
Perfecting the Cooking Process
Whisk well in Step 1 to avoid lumps, ensuring a perfectly smooth mochi. When microwaving, stir thoroughly after each minute to develop that desired translucent, chewy texture evenly. Don’t rush cooling the dough in Step 4; it becomes easier to handle when slightly warm and won’t tear.
Add Your Personal Touch
Want to elevate the flavor of these delightful mochi treats? Swap the water for coconut milk in Step 1 for an extra layer of tropical richness. Feel free to skip the vanilla extract if you prefer a pure banana essence, or experiment with different food coloring shades for a vibrant presentation.
Storage & Reheating
To maintain the mochi’s delightful chewiness, store any leftover Sweet & Chewy Banana Mochi Rolls with Coconut in an airtight container at room temperature for up to a day. For longer storage, refrigerate for up to two days, but remember they are truly best enjoyed fresh.
Helpful Chef Tips
I remember the first time I made these mochi rolls; the kids squealed with delight at the vibrant colors and irresistible chew. It was a sweet, sticky moment of pure joy, cementing these tropical treats as a family favorite.
Final Thoughts
As you take that first bite of these delightful mochi treats, you’ll be transported by the soft, yielding texture and the sweet surprise of ripe banana. The delicate coconut coating adds a tropical flourish, making each morsel a truly satisfying experience. This recipe for Sweet & Chewy Banana Mochi Rolls with Coconut is not just a dessert; it’s a moment of culinary joy you can create in your own kitchen. Don’t hesitate to whisk up a batch – your taste buds will thank you for this delightful, homemade indulgence!
Print
Sweet & Chewy Banana Mochi Rolls with Coconut
- Total Time: 35 minutes
- Yield: 8-10 pieces
Description
This delightful dessert features a soft, chewy mochi exterior, subtly sweet and tender. Encased within is a slice of ripe banana, offering a creamy texture and natural sweetness. Each piece is generously rolled in shredded coconut, adding a delicate, flaky texture and a tropical aroma that complements the other elements beautifully. The mochi is typically prepared by steaming or microwaving, resulting in its characteristic pliable consistency.
Ingredients
- * 1 cup glutinous rice flour (mochiko)
- * 1/4 cup granulated sugar
- * 1 cup water (or coconut milk for richer flavor)
- * 1/2 teaspoon vanilla extract (optional)
- * A few drops of purple or pink food coloring (optional, for aesthetic)
- * 2 ripe but firm bananas, peeled and sliced into 1-inch pieces
- * 1 cup shredded unsweetened coconut, for coating
- * Cornstarch, for dusting
Instructions
- In a microwave-safe bowl, whisk together the glutinous rice flour, sugar, water, vanilla extract (if using), and food coloring (if using) until smooth and no lumps remain.
- Cover the bowl with plastic wrap, leaving a small vent. Microwave on high for 1 minute. Stir the mixture well with a wet spatula.
- Cover and microwave again for 1 minute. Stir thoroughly. Repeat this process 2-3 more times, or until the mochi dough is translucent, sticky, and has a chewy consistency. The total microwave time will be approximately 4-5 minutes, depending on your microwave's power. Alternatively, you can steam the mixture for 15-20 minutes until cooked through.
- Once cooked, carefully remove the hot mochi dough from the bowl and place it onto a surface generously dusted with cornstarch. Allow it to cool slightly until it is warm enough to handle.
- Dust your hands with cornstarch to prevent sticking. Gently flatten the mochi dough into a rectangle, about 1/4-inch thick.
- Cut the mochi dough into squares or rectangles large enough to wrap around a banana slice.
- Place one banana slice in the center of each mochi piece. Carefully fold the mochi around the banana, pinching the seams to seal and forming a small roll.
- Roll each banana mochi piece in the shredded coconut until fully coated.
- Arrange the finished banana mochi on a plate and chill in the refrigerator for at least 30 minutes before serving.
Notes
* For best results, use ripe bananas that are still firm to maintain their shape when wrapped.
* Dusting your hands and work surface generously with cornstarch is crucial to prevent the sticky mochi dough from adhering.
* If the mochi dough becomes too stiff to work with, you can gently warm it in the microwave for a few seconds to soften it again.
* Store leftover banana mochi in an airtight container at room temperature for up to one day, or in the refrigerator for up to two days. Mochi is best enjoyed fresh.
* Adjust the amount of sugar to your preference; ripe bananas add natural sweetness.
- Prep Time: 25 minutes
- Cook Time: 10 minutes
Nutrition
- Calories: 180 kcal
- Fat: 3g
- Carbohydrates: 38g
- Protein: 2g
FAQs
Can I steam the mochi dough instead of microwaving it?
Yes, absolutely! The recipe provides an alternative steaming method for the mochi dough. After whisking all your ingredients together in a bowl, you can steam the mixture for approximately 15 to 20 minutes instead of using the microwave. You’ll know it’s ready when the dough becomes wonderfully translucent, sticky, and develops its signature chewy consistency. Both methods achieve the perfect texture for creating these delightful banana mochi rolls, so feel free to choose whichever suits your kitchen best.
How do I prevent the mochi dough from sticking to everything?
Working with mochi dough can be quite sticky, but a simple trick will make it much easier to handle. The recipe advises generously dusting your work surface with cornstarch before placing the cooked mochi dough onto it. It’s also crucial to dust your hands with cornstarch when you begin to flatten the dough and wrap the banana slices. This creates a non-stick barrier. If at any point the dough becomes too stiff to manage, you can gently warm it in the microwave for a few seconds to regain its pliability, making it easier to work with again.
What kind of bananas are best for these rolls?
For the best results when making these Sweet & Chewy Banana Mochi Rolls with Coconut, the recipe specifically recommends using ripe but firm bananas. Bananas that are ripe will offer a natural sweetness that perfectly complements the mochi, enhancing the overall flavor without needing too much added sugar. Importantly, using firm bananas ensures they maintain their shape beautifully when you slice them and wrap them within the delicate mochi dough. This prevents them from becoming too mushy during the wrapping process, resulting in a more appealing and texturally satisfying treat.
How should I store leftover banana mochi rolls?
To keep your delightful mochi rolls fresh, store any leftovers in an airtight container. They can be kept at room temperature for up to one day. If you need to store them for longer, place the airtight container in the refrigerator, where they will remain fresh for up to two days. While these rolls are delicious chilled, it’s worth noting that mochi is truly best enjoyed fresh, when its chewy texture is at its peak. So, try to enjoy them soon after preparation for the optimal taste and texture experience.