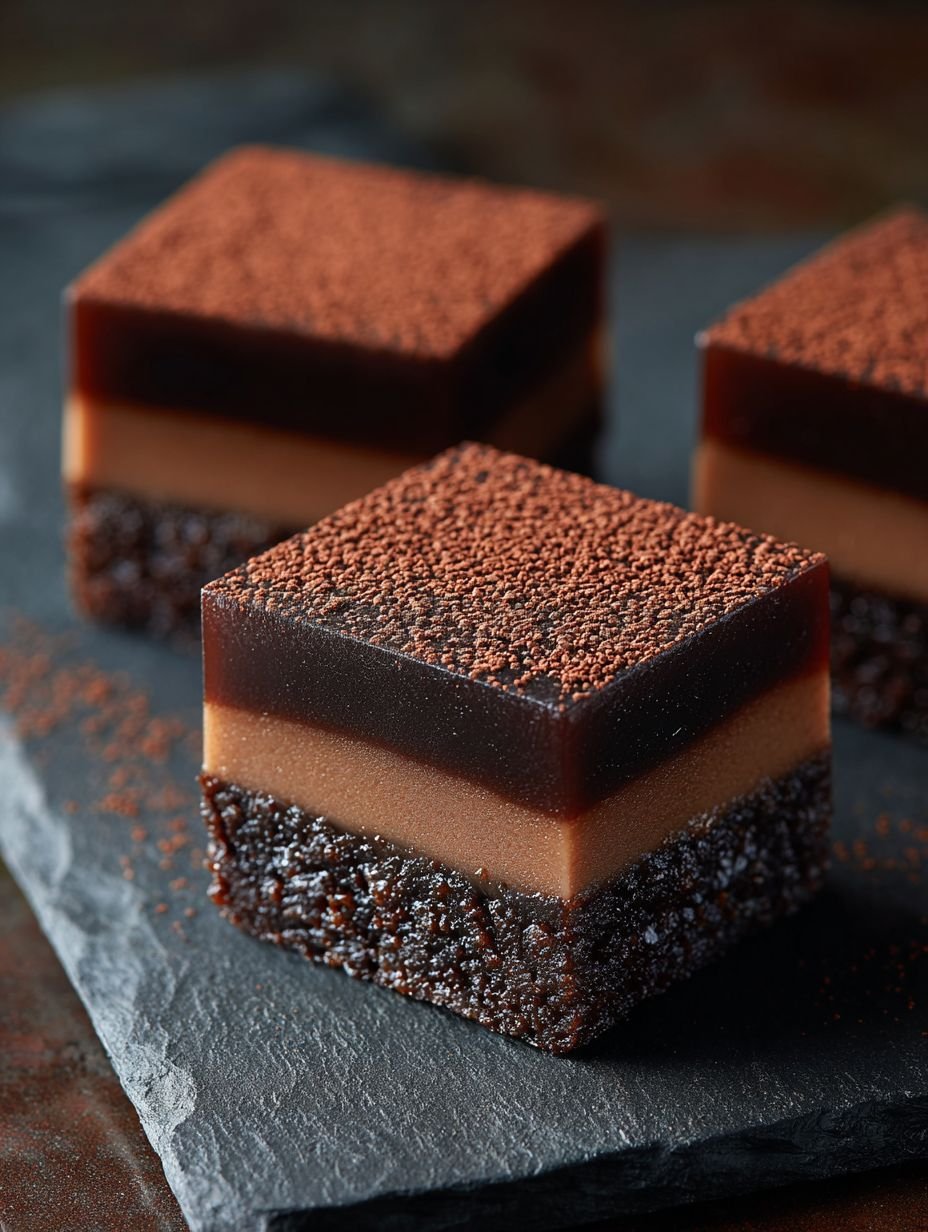
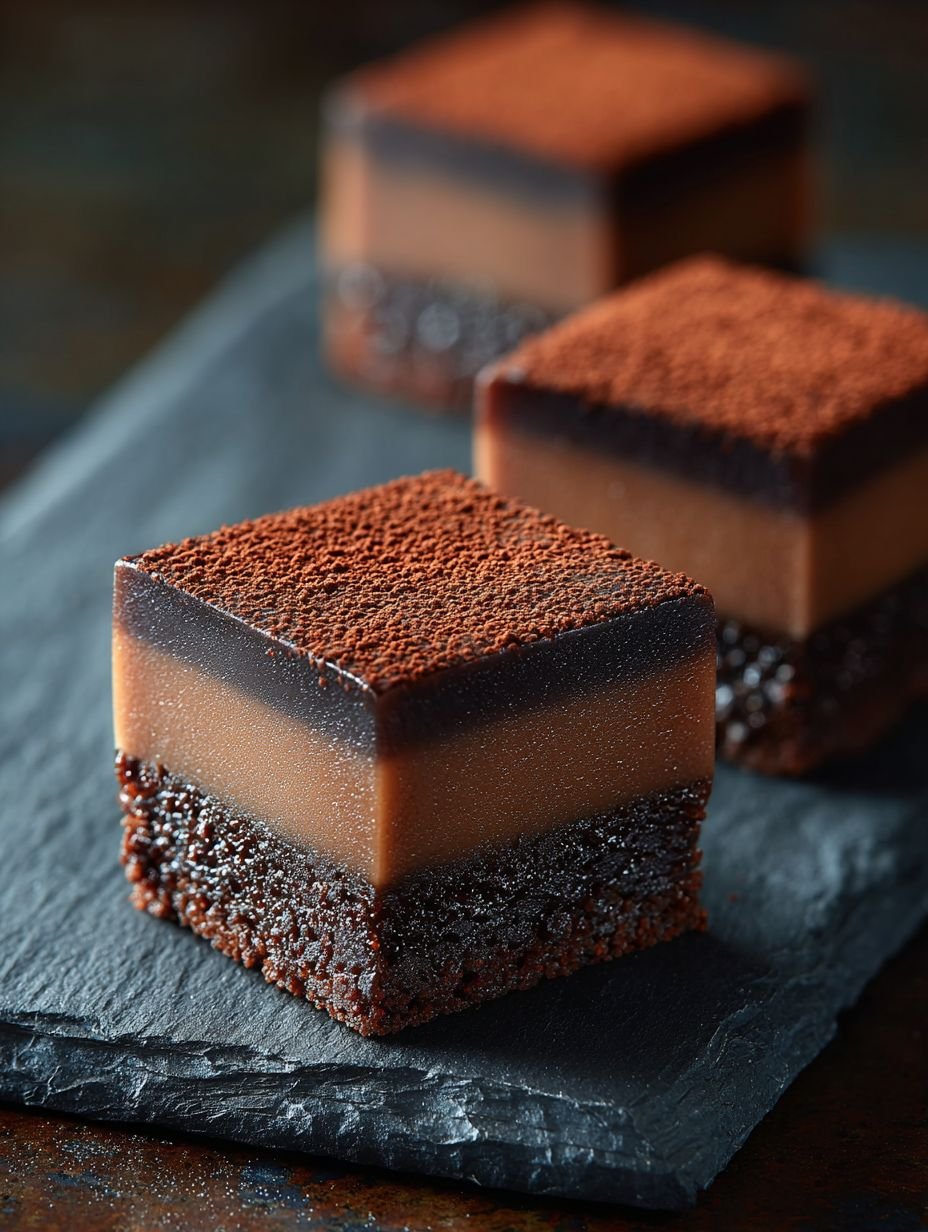
Imagine a dessert that delivers a symphony of textures and tastes, where the deep richness of chocolate meets the invigorating kick of coffee, all perfectly set into elegant, distinct layers. These Layered Chocolate Coffee Jelly Squares Recipe creations are truly a marvel.
I distinctly remember the time I tried to make a similar dessert without proper chilling – it looked more like a delightful, albeit messy, chocolate-coffee swamp. Trust me, the extra patience for this recipe is absolutely worth it for those beautifully firm layers!
What Makes This Recipe Special
This layered chocolate and coffee delight is more than just a dessert; it’s an experience. Its effortless preparation belies its sophisticated appearance, making it perfect for both seasoned bakers and kitchen novices alike. The unique flavor profile, a masterful blend of sweet chocolate and bold coffee, offers a refreshing departure from traditional treats. Each square is a visual stunner, with its distinct, beautifully defined layers that are as pleasing to the eye as they are to the palate. Plus, the foundational concepts are versatile, offering a canvas for your own creative twists once you master this exquisite base.
Ingredients
Here’s what you need for this delicious dish:
- **1 ½ cups chocolate sandwich cookies (cream removed), crushed:** These form the irresistible, dense, and moist chocolate crumb base for our squares. Removing the cream ensures a firmer base that holds together beautifully.
- **½ cup unsalted butter, melted:** Essential for binding the cookie crumbs, providing richness, and creating that perfect slightly chewy base texture. Make sure it’s fully melted for easy mixing.
- **1 cup heavy cream:** The backbone of our creamy, smooth chocolate mousse layer, contributing to its luxurious texture and rich mouthfeel.
- **½ cup whole milk:** Adds to the lusciousness of the chocolate mousse, helping to create a perfectly balanced consistency.
- **¼ cup granulated sugar:** Sweetens both the chocolate mousse and the coffee jelly, ensuring each layer has a delightful balance against the other flavors.
- **4 ounces dark chocolate (60-70% cacao), finely chopped:** This is the heart of our chocolate mousse, delivering a deep, sophisticated chocolate flavor. Finely chopping it ensures it melts smoothly and integrates perfectly into the cream mixture.
- **1 tablespoon unflavored gelatin powder:** The magical ingredient responsible for the firm, yet tender, texture of our coffee jelly and the creamy set of our chocolate mousse. For those seeking a plant-based alternative, agar-agar powder can be substituted; always follow package instructions for equivalent setting power.
- **¼ cup cold water:** Used to “bloom” the gelatin powder, allowing it to hydrate and dissolve properly, which is crucial for achieving that desired jelly and mousse consistency.
- **1 ½ cups strong brewed coffee, cooled:** The star of the coffee jelly layer, providing a robust and aromatic coffee essence that perfectly complements the chocolate. Brewing it strong and allowing it to cool before use is key for optimal flavor and temperature control.
- **2 tablespoons unsweetened cocoa powder:** The finishing flourish, providing a subtle bitterness and elegant appearance when dusted over the finished Layered Chocolate Coffee Jelly Squares.
All ingredients and quantities can be found directly in the recipe card below.
Step-by-Step Instructions
Simply follow these easy steps to prepare this delicious meal:
Step 1: Crafting the Chocolate Crumb Base
Begin by lining an 8×8 inch square baking pan with parchment paper. Ensure you leave an overhang on two sides; this thoughtful detail will become your best friend later for effortless removal of the entire dessert. In a medium bowl, combine your crushed chocolate sandwich cookies with the melted unsalted butter. Stir these two ingredients thoroughly until the cookie crumbs are uniformly moistened. Next, press this mixture firmly and evenly into the bottom of the prepared pan. Once compacted, transfer the pan to the refrigerator and chill for at least 15 minutes, allowing the base to set and become wonderfully firm.
Step 2: Preparing the Velvety Chocolate Mousse Layer
In a small, separate bowl, sprinkle the unflavored gelatin powder over ¼ cup of cold water. Let this mixture sit undisturbed for 5-10 minutes; this critical step, known as “blooming,” allows the gelatin to hydrate and prepare for dissolution. Meanwhile, combine the heavy cream, whole milk, and ¼ cup of granulated sugar in a medium saucepan. Heat this mixture over medium heat, stirring occasionally, until the sugar completely dissolves and the liquid is warm to the touch but definitely not boiling. Remove the saucepan from the heat. Add the finely chopped dark chocolate and stir continuously until it is completely melted, creating a luxuriously smooth and glossy chocolate mixture. Now, stir in the bloomed gelatin until it is fully dissolved into the warm chocolate cream. Set this mixture aside at room temperature to cool slightly.
Step 3: Pouring the Smooth Chocolate Mousse Layer
Once the chocolate mousse mixture has cooled a bit and your cookie base is firm from its refrigeration, carefully retrieve the pan. Gently pour the cooled chocolate mousse mixture directly over the chilled cookie base, ensuring an even layer. With the mousse in place, return the pan to the refrigerator. Allow it to chill for at least 1-2 hours, or until the chocolate mousse layer is firm to the touch, preventing any mixing with the next layer.
Step 4: Making the Robust Coffee Jelly Layer
As you did for the mousse, prepare another small bowl by sprinkling the remaining 1 tablespoon of unflavored gelatin powder over ¼ cup of cold water. Let it bloom for 5-10 minutes. In a separate medium saucepan, combine the cooled strong brewed coffee and the remaining ¼ cup of granulated sugar. Heat this mixture over medium heat, stirring occasionally, until the sugar dissolves and the coffee mixture is warm. Remove the saucepan from the heat. Stir in the bloomed gelatin until it is completely dissolved, leaving no granules. Allow this coffee jelly mixture to cool completely to room temperature before proceeding.
Step 5: Setting the Final Coffee Jelly Layer
Once the chocolate mousse layer is thoroughly firm, gently retrieve your pan from the refrigerator. Very carefully, pour the cooled coffee jelly mixture over the firm mousse layer. Take your time with this step to maintain distinct separation between the layers. Return the pan to the refrigerator for its final chill. This layer requires at least 3-4 hours to set completely, though for the best, most robust set, chilling it overnight is highly recommended. All layers should be completely firm before moving on.
Step 6: Presenting Your Elegant Layered Chocolate Coffee Jelly Squares
Once all layers are completely set and firm, use the parchment paper overhang to gently lift the entire dessert from the pan. Transfer it to a clean cutting board. For a truly elegant presentation, dust the top generously with unsweetened cocoa powder. Now, for the cutting: using a sharp knife, slice the dessert into your desired number of squares. For perfectly neat edges that make each square look professionally crafted, wipe the knife clean with a warm, damp cloth after each cut. Serve these delightful layered chocolate coffee jelly squares immediately to enjoy their exquisite blend of flavors and textures.
The Art of Pristine Presentation
Achieving those beautifully crisp lines in your Layered Chocolate Coffee Jelly Squares isn’t just about a sharp knife; it’s a tiny secret known to seasoned pastry chefs. Dipping your knife in hot water and wiping it dry before each slice ensures the cleanest, most precise cuts, creating perfectly defined individual squares. This small detail elevates the entire serving experience, transforming simple squares into miniature works of art that are almost too pretty to eat – almost!
Expert Tips for Success
Creating these elegant squares is straightforward, but a few pro tips can guarantee perfection every time. The most important rule to remember is patience; ensure each layer is adequately chilled and firm before you even think about adding the next. This simple practice is crucial to prevent the layers from mixing, preserving their beautiful, distinct definition. For those who crave an even bolder flavor in their Layered Chocolate Coffee Jelly Squares, consider intensifying the coffee layer. You can achieve this by using a high-quality espresso instead of regular brewed coffee, or by dissolving a teaspoon of instant espresso powder directly into your strong brewed coffee mixture. These small adjustments can dramatically enhance the coffee notes, adding an extra layer of depth to your delightful dessert.
Storing Your Sweet Creations
The good news is, these delightful Layered Chocolate Coffee Jelly Squares are not just for immediate enjoyment! They store exceptionally well, making them a fantastic make-ahead dessert for parties or simply to satisfy future cravings. Once cut into individual squares, transfer them to an airtight container. They will happily reside in your refrigerator for up to 3-4 days, maintaining their perfect texture and exquisite flavor. This means you can prepare them in advance, freeing up your time on the day you plan to serve them, or simply have a luxurious treat waiting for you whenever the mood strikes.
Nutrition Information (Per Serving)
For those keeping an eye on their intake, here’s a general breakdown for these delightful squares, calculated per serving (based on 9-16 squares):
- **Calories:** 280-320
- **Protein:** 5-7g
- **Carbs:** 28-38g
- **Fat:** 18-22g
These values offer a helpful guide to the nutritional content of this rich and satisfying dessert.
Indulge in Layered Perfection
These Layered Chocolate Coffee Jelly Squares Recipe treats are truly a triumph of flavor and form, offering a sophisticated dessert experience that’s both deeply satisfying and surprisingly simple to achieve. From the crisp chocolate crumb base to the smooth chocolate mousse and the firm, aromatic coffee jelly, each bite is a testament to perfectly balanced indulgence. Whether you’re preparing them for a special gathering or simply treating yourself to a moment of quiet decadence, this recipe promises to deliver on all fronts. So, gather your ingredients, follow these clear steps, and prepare to impress everyone (including yourself!) with these stunning, delicious squares. They’re a reminder that sometimes, the most elegant desserts are born from the simplest of processes, combined with a little love and a dash of kitchen patience.
Mastering the Secrets of Cooking
Achieving perfect layered chocolate coffee jelly squares recipe results hinges on patience. Ensure each delicious layer is truly firm before adding the next. This prevents any unwelcome blending, keeping those distinct coffee, chocolate mousse, and crumb base lines razor-sharp for a visually stunning and texturally pleasing dessert experience.
Make Your Recipe Unique
Elevate your layered chocolate coffee jelly squares recipe by customizing key ingredients. For an even bolder coffee kick, swap out the strong brewed coffee for espresso or dissolve some instant espresso powder in your brew. Alternatively, if you’re exploring vegetarian options, consider substituting the unflavored gelatin powder with agar-agar powder, adjusting quantities according to its specific package instructions for similar setting power.
Smart Storage & Reheating
To keep your layered chocolate coffee jelly squares recipe at their best, store them in an airtight container in the refrigerator. This method helps preserve their distinct textures, ensuring the jelly remains tender, the mousse creamy, and the base moist. Enjoy these delightful treats chilled directly from the fridge for up to three to four days.
The Chef’s Golden Tips
My grandmother once served a similar layered dessert, claiming it held the secret to eternal happiness. While I’m still working on the eternal happiness part, these layered chocolate coffee jelly squares recipe certainly bring a smile to my face, one delicious bite at a time.
Final Thoughts
As you savor the last bite of these exquisite squares, you’ll undoubtedly appreciate the thoughtful blend of textures and tastes. From the satisfying crunch of the chocolate crumb base to the velvety smoothness of the chocolate mousse and the refreshing firmness of the coffee jelly, each element plays its part. This elegant dessert is not just a treat for the palate; it’s a feast for the eyes, promising a sophisticated end to any meal or a delightful afternoon indulgence. Don’t wait to bring this delightful creation into your kitchen. Gather your ingredients, follow the simple steps, and prepare to impress yourself and your guests with this truly remarkable layered dessert.
Print
Layered Chocolate Coffee Jelly Squares Recipe
- Total Time: 45 minutes
- Yield: 9-16 squares 1x
Description
These elegant squares feature distinct layers that offer a sophisticated dessert experience. A rich, firm coffee jelly layer sits atop a creamy, smooth chocolate mousse, which in turn rests on a dense, moist chocolate crumb base. Each square is delicately dusted with cocoa powder, providing a subtle bitterness that complements the sweet and deep flavors of coffee and chocolate. The varied textures, from the tender jelly to the soft mousse and the slightly chewy base, create a harmonious and satisfying treat.
Ingredients
- For the Chocolate Crumb Base:
- 1 ½ cups chocolate sandwich cookies (cream removed), crushed
- ½ cup unsalted butter, melted
- For the Chocolate Mousse Layer:
- 1 cup heavy cream
- ½ cup whole milk
- ¼ cup granulated sugar
- 4 ounces dark chocolate (60-70% cacao), finely chopped
- 1 tablespoon unflavored gelatin powder
- ¼ cup cold water
- For the Coffee Jelly Layer:
- 1 ½ cups strong brewed coffee, cooled
- ¼ cup granulated sugar
- 1 tablespoon unflavored gelatin powder
- ¼ cup cold water
- For Dusting:
- 2 tablespoons unsweetened cocoa powder
Instructions
- **Prepare the Base:** Line an 8×8 inch square baking pan with parchment paper, allowing an overhang on two sides for easy removal. In a medium bowl, combine the crushed chocolate cookies and melted butter until well mixed. Press this mixture evenly into the bottom of the prepared pan. Refrigerate for at least 15 minutes to set.
- **Prepare Chocolate Mousse Layer:** In a small bowl, sprinkle the gelatin powder over ¼ cup cold water and let it bloom for 5-10 minutes. In a medium saucepan, combine the heavy cream, milk, and ¼ cup granulated sugar. Heat over medium heat, stirring occasionally, until the sugar dissolves and the mixture is warm but not boiling. Remove from heat. Add the chopped dark chocolate and stir until it is completely melted and the mixture is smooth. Stir in the bloomed gelatin until it is fully dissolved. Allow the mixture to cool slightly at room temperature.
- **Pour Chocolate Mousse Layer:** Carefully pour the cooled chocolate mousse mixture over the chilled cookie base. Return the pan to the refrigerator and chill for at least 1-2 hours, or until the layer is firm to the touch.
- **Prepare Coffee Jelly Layer:** In a separate small bowl, sprinkle the gelatin powder over ¼ cup cold water and let it bloom for 5-10 minutes. In a medium saucepan, combine the cooled strong brewed coffee and ¼ cup granulated sugar. Heat over medium heat, stirring occasionally, until the sugar dissolves and the mixture is warm. Remove from heat. Stir in the bloomed gelatin until it is fully dissolved. Allow the mixture to cool to room temperature.
- **Pour Coffee Jelly Layer:** Once the chocolate mousse layer is firm, carefully pour the cooled coffee jelly mixture over it. Return the pan to the refrigerator and chill for at least 3-4 hours, or preferably overnight, until all layers are completely set.
- **Serve:** Once fully set, use the parchment paper overhang to lift the dessert from the pan. Place it on a clean cutting board. Dust generously with unsweetened cocoa powder. Using a sharp knife, cut into desired squares. For neat edges, wipe the knife clean with a warm, damp cloth after each cut.
Notes
Ensure each layer is adequately chilled and firm before adding the next to prevent the layers from mixing.
For an intensified coffee flavor, consider using espresso or dissolving instant espresso powder in the brewed coffee.
To achieve perfectly clean cuts, dip your knife in hot water and wipe it dry before each slice.
These squares can be stored in an airtight container in the refrigerator for up to 3-4 days.
For a vegetarian alternative, substitute gelatin with agar-agar powder, following the package instructions for equivalent setting power.
- Prep Time: 45 minutes
Nutrition
- Calories: 280-320
- Fat: 18-22g
- Carbohydrates: 28-38g
- Protein: 5-7g
FAQs
How can I prevent the distinct layers from mixing when making these squares?
To ensure your layers remain beautifully separate, adequate chilling time for each layer is critical. The recipe instructs you to refrigerate the chocolate crumb base for at least 15 minutes before adding the mousse mixture. For the chocolate mousse layer, allow it to chill for 1-2 hours, or until it is completely firm to the touch, before carefully pouring the coffee jelly. Similarly, make sure the coffee jelly mixture has cooled to room temperature before it is added. Patiently allowing each layer to set fully will result in those elegant, distinct strata that make this Layered Chocolate Coffee Coffee Jelly Squares Recipe so visually appealing.
How far in advance can I prepare these chocolate coffee jelly squares, and how should I store them?
These delightful squares are perfect for making ahead, offering convenience for any occasion. Once all layers are fully set, you can store them in an airtight container in the refrigerator. They will maintain their quality and deliciousness for up to 3-4 days. This makes them an excellent choice for dinner parties, brunches, or simply having an elegant treat ready to enjoy throughout the week. Always remember to keep them chilled until serving to maintain their firm, appealing texture and prevent any softening.
What if I want a more intense coffee flavor in the coffee jelly layer?
If you desire a more pronounced coffee taste in the coffee jelly layer, there’s an excellent tip to enhance it. Instead of just strong brewed coffee, you can consider using espresso to make your coffee jelly. Alternatively, dissolving instant espresso powder directly into your strong brewed coffee before heating it with the granulated sugar will also significantly intensify the flavor. This simple adjustment will elevate the coffee notes, making the coffee jelly layer even bolder and more aromatic, perfectly complementing the rich chocolate mousse and crumb base in this Layered Chocolate Coffee Jelly Squares Recipe.
Can I make these squares suitable for a vegetarian diet?
Yes, you can absolutely adapt this Layered Chocolate Coffee Jelly Squares Recipe to be suitable for vegetarians! The unflavored gelatin powder used in both the chocolate mousse and coffee jelly layers can be substituted. For a vegetarian alternative, replace the gelatin with agar-agar powder. When making this substitution, it is important to follow the specific package instructions for the agar-agar powder to ensure you use the correct equivalent amount for proper setting. This simple swap allows everyone to enjoy the distinct layers and delightful textures of this elegant dessert.