
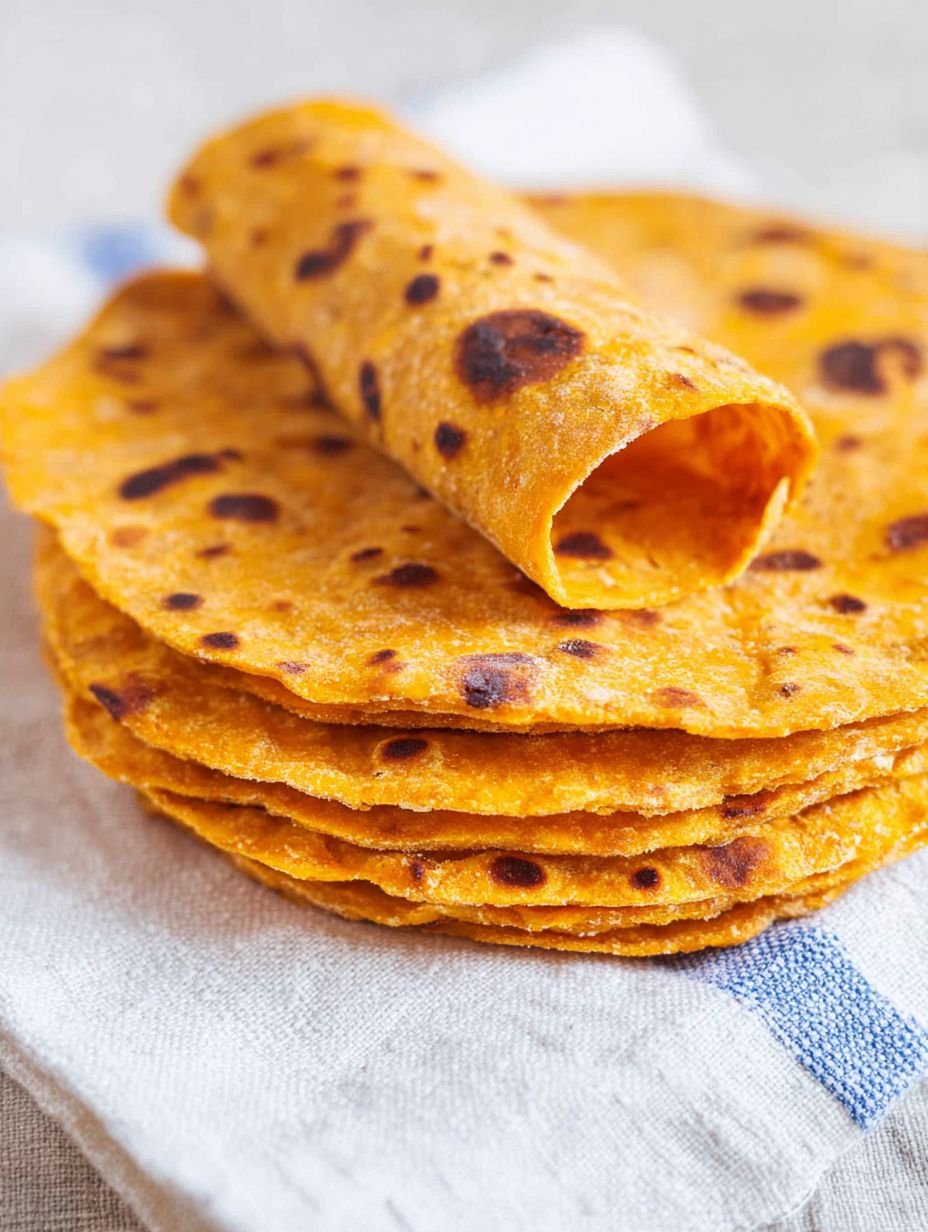
Imagine sinking your teeth into a soft, tender flatbread, subtly sweet and earthy, perfectly pliable, ready to cradle your favorite fillings. These vibrant sweet potato tortillas are exactly that, a delightful dance of flavor and texture that transforms any meal.
My journey with homemade tortillas began years ago, a sticky, flour-dusted battlefield where my dreams of perfect wraps often crumbled. But then I discovered the magic of sweet potatoes in dough, and suddenly, my kitchen transformed into a haven of golden, pliable deliciousness.
What Makes This Recipe Special
These homemade flatbreads are a true kitchen hero, combining incredibly easy preparation with a truly unique flavor profile that sets them apart from anything store-bought. Their naturally vibrant, golden appearance is stunning, adding a cheerful pop of color to any plate, and their remarkable versatility means you can use them for everything from savory tacos and wraps to a simple, delightful side for soups and stews.
Why You’ll Adore These Vegan Sweet Potato Tortillas
There’s something incredibly satisfying about making tortillas from scratch. It’s a culinary journey that feels deeply rooted and rewarding, yet surprisingly simple. Forget bland, store-bought options; these sweet potato tortillas bring a whole new level of freshness and a beautiful, subtle sweetness that elevates any meal. They are inherently wholesome, packed with the goodness of sweet potatoes, and perfectly suited for a plant-based diet, proving that delicious food doesn’t need to be complicated or involve animal products.
I often find myself whipping up a batch of these on a lazy Sunday afternoon, the aroma of sweet potato and warm flour filling the kitchen. There’s a calming rhythm to kneading the dough, a simple pleasure in rolling out each round, and an undeniable joy in watching them puff up on the skillet. It’s a moment of culinary meditation, resulting in a stack of golden discs ready for whatever creative fillings come to mind. Whether you’re a seasoned home cook or just starting your journey into homemade bread, creating these vibrant sweet potato flatbreads is an experience that promises both satisfaction and incredible flavor. They are not just food; they are an invitation to slow down, create, and enjoy the simple, delicious things in life.
Gathering Your Simple Provisions
Creating these delightful plant-based sweet potato tortillas requires just a handful of straightforward ingredients. Each component plays a crucial role in developing the soft texture, vibrant color, and earthy-sweet flavor that defines these homemade flatbreads. It’s a testament to how humble pantry staples can come together to create something truly extraordinary. Preparing your ingredients correctly is the first step toward tortilla triumph, so let’s delve into what you’ll need and how to best select and prepare each one.
Here’s what you need for this delicious dish:
- **1 medium sweet potato (about 200g), peeled and cooked** This is the star ingredient that gives these tortillas their distinctive flavor, beautiful orange hue, and tender texture. Ensure it’s cooked until very tender and mashed completely smooth, without any lumps, for a consistent dough.
- **2 cups all-purpose flour, plus more for dusting** The foundation of our flatbreads, providing the necessary structure for a pliable dough. Have extra on hand for dusting your work surface and rolling pin, preventing sticking as you roll out each round.
- **1/2 teaspoon salt** A crucial flavor enhancer that balances the sweetness of the sweet potato and brings out the best in all the ingredients.
- **2 tablespoons olive oil, plus more for cooking** This adds richness to the dough, contributing to its softness and pliability. A little extra is used when cooking to ensure the tortillas achieve a beautiful golden-brown finish on the griddle.
- **1/4 to 1/2 cup warm water (as needed)** The binding agent that brings the dough together. Start with the smaller amount and add gradually, as the exact quantity will depend on the moisture content of your cooked sweet potato and the humidity in your kitchen.
All ingredients and quantities can be found directly in the recipe card below.
Crafting Your Homemade Sweet Potato Wraps: A Step-by-Step Guide
Making your own sweet potato tortillas is a remarkably rewarding process, and surprisingly easy once you get the hang of it. From mashing the vibrant sweet potato to watching the flatbreads puff up on the skillet, each step brings you closer to a stack of warm, pliable goodness. Follow these precise instructions carefully, and you’ll be enjoying these fantastic homemade treats in no time.
Step 1: Preparing the Star Ingredient
First, cook the medium sweet potato until it is very tender. You can achieve this by boiling it, steaming it, or even baking it. Once thoroughly cooked, peel the sweet potato if you haven’t already, then mash it completely until it is smooth, ensuring there are absolutely no lumps remaining. After mashing, allow the sweet potato to cool slightly before proceeding to the next step. This crucial preparation ensures a consistent and smooth texture for your dough.
Step 2: Combining the Dry and Wet Ingredients
In a large mixing bowl, begin by combining the 2 cups of all-purpose flour and the 1/2 teaspoon of salt. Stir these dry ingredients together thoroughly. Next, add the mashed sweet potato and the 2 tablespoons of olive oil to the flour and salt mixture. These elements will begin to form the base of your rich, vibrant dough.
Step 3: Forming the Perfect Dough
Gradually start adding the warm water to the mixture. Begin with 1/4 cup of warm water, mixing it into the ingredients. Continue adding water, a tablespoon at a time, until the mixture comes together and forms a shaggy dough. Keep mixing and adding small amounts of water until the dough is soft but crucially, not sticky to the touch. The exact amount of water needed can vary, so adjust as necessary.
Step 4: Kneading for Elasticity
Once your dough has formed, transfer it from the bowl to a lightly floured surface. Knead the dough consistently for 5 to 7 minutes. This kneading process is vital for developing the gluten in the flour, which will result in a smooth, elastic dough that is easy to roll out and yields soft, pliable tortillas.
Step 5: The All-Important Rest
After kneading, place the smooth, elastic dough back into the large mixing bowl. Cover the bowl with a clean kitchen towel. Allow the dough to rest at room temperature for at least 30 minutes. This resting period is essential because it allows the gluten to relax, which will make the dough much easier to roll out into thin, perfect rounds later on.
Step 6: Portioning for Perfection
Once the dough has rested, transfer it back to a lightly floured surface. Divide the entire rested dough into 8 to 10 equal pieces. After dividing, take each piece and roll it into a smooth, uniform ball. These individual balls will become your perfectly portioned flatbreads.
Step 7: Rolling Out Thin Rounds
On your lightly floured surface, take one of the dough balls. Using a rolling pin, roll out each dough ball into a thin, round tortilla. Aim for a diameter of about 6 to 8 inches. It’s important to roll them thin to ensure they cook quickly and remain pliable. Dust with a little more flour if needed to prevent sticking.
Step 8: Heating Your Cooking Surface
Heat a dry cast-iron skillet or a non-stick pan over medium-high heat. Allow the pan to heat sufficiently until it is hot but not smoking. A properly heated pan is crucial for achieving those beautiful golden-brown spots and the characteristic puff of homemade tortillas.
Step 9: Griddle-Cooking Your Tortillas
Once your pan is hot, carefully place one rolled-out tortilla into the dry pan. Cook the tortilla for 1 to 2 minutes per side. You’ll know it’s ready when golden brown spots appear on the surface and the tortilla begins to puff up slightly, indicating it’s cooking through evenly.
Step 10: Keeping Them Warm and Tender
As each tortilla finishes cooking, remove it from the pan. Immediately place the cooked tortilla into a clean kitchen towel or a dedicated tortilla warmer. Stack the cooked tortillas in the towel; this helps to trap the steam, keeping them wonderfully soft and warm while you continue to cook the remaining ones. Serve these warm, pliable sweet potato tortillas immediately, perhaps filled with your favorite ingredients, or as a delightful side.
Tips for Tortilla Triumph
Mastering the art of homemade sweet potato tortillas is all about a few key details that can elevate your results from good to absolutely fantastic. One of the most important aspects is ensuring the sweet potato is mashed very smoothly; any lumps can disrupt the consistency of your dough, making it harder to roll and resulting in an uneven texture in the final flatbread. Pay close attention to the dough’s feel as you’re mixing. The amount of warm water you need can vary significantly depending on the natural moisture content of your cooked sweet potato and even the type of flour you’re using, so adjust it gradually until your dough is soft but not sticky.
When you’re cooking these beautiful flatbreads, avoid the temptation to overcook them. Overcooking can lead to stiff, less enjoyable tortillas that lose their desirable pliability. They should remain soft and flexible, even with those delightful golden-brown spots. As you pull each one off the hot pan, make sure to stack your cooked tortillas promptly in a clean kitchen towel or a specialized tortilla warmer. This simple trick is a game-changer for keeping them wonderfully warm and soft until you’re ready to serve. For any leftovers, they can be stored in an airtight container at room temperature for up to two days, or refrigerated for up to five days, always ready for a quick snack or meal.
Creative Ways to Enjoy Your Sweet Potato Tortillas
Now that you’ve mastered how to make vegan sweet potato tortillas, the real fun begins: enjoying them! These vibrant, tender wraps are incredibly versatile and can elevate almost any meal. Their subtle sweetness pairs beautifully with both savory and slightly sweet fillings, making them a fantastic alternative to traditional corn or flour tortillas.
For a delicious breakfast or brunch, consider filling them with scrambled tofu, black beans, and a generous dollop of avocado. The flavors blend seamlessly with the sweet potato base. Lunch can be transformed into a vibrant affair with a wrap packed with roasted vegetables like bell peppers, zucchini, and onions, along with some hummus and fresh greens. The soft texture of the sweet potato tortillas makes them perfect for holding all those delicious components without tearing.
Dinner options are endless! Use them as the foundation for creative plant-based tacos, perhaps with seasoned lentils or spiced chickpeas, topped with a zesty slaw. They also make an excellent base for quesadillas, simply layered with your favorite vegan cheese and some sautéed mushrooms or spinach, then lightly browned until the cheese is melted and gooey. Beyond wraps and tacos, these homemade sweet potato flatbreads are fantastic simply as a side dish to a hearty chili or a vibrant salad, perfect for scooping up every last bit of flavor. You could even turn them into sweet treats by spreading them with a little nut butter and banana slices for a unique dessert.
Common Questions About Vegan Sweet Potato Tortillas
Making new recipes can sometimes bring up a few questions, especially when you’re aiming for perfection. Let’s address some common inquiries about preparing these delightful sweet potato tortillas.
One frequent question is about making them ahead of time. Absolutely! These flatbreads are fantastic for meal prep. Once cooked and cooled, you can store them in an airtight container at room temperature for up to two days. If you need them to last longer, pop them in the refrigerator, and they’ll keep well for up to five days. To reheat, a quick warm-up in a dry skillet for about 30 seconds per side, or a few seconds in the microwave, will bring back their tender texture.
Another common concern is about dough consistency. What if your dough is too sticky or too dry? This often comes down to the moisture in your sweet potato and even the humidity in your kitchen. If your dough feels too sticky after kneading, gently add a tiny bit more flour, a teaspoon at a time, until it reaches that soft, non-sticky consistency. Conversely, if it feels too dry and crumbly, add a few drops of warm water, kneading it in until the dough becomes pliable. Remember the “as needed” note for water in the recipe; it’s there for a reason! Trust your senses and adjust gradually.
Some home cooks wonder if they can use different flours. While all-purpose flour provides the best elasticity and texture for these specific sweet potato tortillas, experimenting with a portion of whole wheat flour can add a nuttier flavor and extra fiber, though it might make the tortillas a little less tender. Always ensure your sweet potato is mashed thoroughly smooth, as this is key to the dough’s consistency regardless of your flour choice.
Final Thoughts and Enjoyment
There’s a unique satisfaction that comes from creating something so versatile and delicious with your own hands. These vegan sweet potato tortillas aren’t just a recipe; they’re an invitation to infuse your meals with wholesome goodness, vibrant color, and incredible flavor. From the meditative process of kneading the dough to the delightful moment they puff up on the skillet, every step is a testament to the joy of homemade cooking.
Whether you’re crafting savory tacos, building a hearty wrap, or simply enjoying them alongside a comforting bowl of soup, these homemade sweet potato flatbreads are guaranteed to impress. They are simple, practical, and utterly delicious, proving that plant-based cooking can be both accessible and exciting. So, gather your ingredients, set aside a little time, and embark on this wonderful culinary adventure. Your taste buds, and anyone lucky enough to share them, will thank you. Now go forth and conquer your kitchen with these incredible sweet potato tortillas!
Improving the Cooking Method
For flawless results, ensure your sweet potato is utterly lump-free before mixing. Let the dough truly relax for 30 minutes after kneading; this makes rolling a dream. When cooking, don’t rush; golden spots are your cue. Immediately transfer each hot tortilla to a towel to keep them wonderfully soft and pliable.
Decorate Your Dish with Your Personal Touch
Give your delicious vegan sweet potato tortillas a personal touch! For a vibrant visual, consider using a purple sweet potato. You could also swap a quarter of the all-purpose flour for whole wheat flour, creating a slightly heartier texture in these delightful homemade wraps. Simplicity often shines brightest!
Smart Tips for Storage and Reheating
Keep your vegan sweet potato tortillas perfectly soft and pliable by storing them in an airtight container. They last up to 2 days at room temperature, or 5 days refrigerated. To restore their tender texture, simply warm them gently in a dry skillet before serving.
Practical Chef Advice
I remember my first batch of these sweet potato tortillas; they vanished instantly at brunch! My niece, usually picky, even asked for seconds, proving that a little sweet potato magic truly wins everyone over.
Final Thoughts
As the last tortilla sizzles, you’ll soon have a stack of warm, pliable flatbreads. These vibrant sweet potato creations bring a delightful earthy sweetness to your table. Simple ingredients prove they can yield extraordinary results. Making these homemade tortillas from scratch is incredibly rewarding. Your kitchen will fill with an inviting aroma. Imagine wrapping your favorite fillings in their soft embrace. Or simply enjoy them alongside a savory dish. Don’t wait to experience this satisfying taste and texture. Gather your ingredients and discover how to make vegan sweet potato tortillas today! These fresh, simple flatbreads will be a wholesome addition to your culinary repertoire.
Print
How to Make Vegan Sweet Potato Tortillas
- Total Time: 45 minutes
- Yield: 8-10 tortillas 1x
Description
These vibrant sweet potato tortillas offer a naturally sweet and earthy flavor profile. Crafted from a simple dough of mashed sweet potato and flour, they are cooked on a hot griddle until lightly browned and pliable. The resulting texture is soft and tender, making them ideal for wraps, tacos, or as a versatile accompaniment to various meals.
Ingredients
- 1 medium sweet potato (about 200g), peeled and cooked
- 2 cups all-purpose flour, plus more for dusting
- 1/2 teaspoon salt
- 2 tablespoons olive oil, plus more for cooking
- 1/4 to 1/2 cup warm water (as needed)
Instructions
- Cook the sweet potato until very tender. This can be done by boiling, steaming, or baking. Once cooked, mash it thoroughly until smooth, ensuring no lumps remain. Let it cool slightly.
- In a large mixing bowl, combine the all-purpose flour and salt. Add the mashed sweet potato and olive oil.
- Gradually add warm water, starting with 1/4 cup, mixing until a shaggy dough forms. Continue adding water, a tablespoon at a time, until the dough comes together and is soft but not sticky.
- Transfer the dough to a lightly floured surface and knead for 5-7 minutes until smooth and elastic.
- Place the dough back in the bowl, cover with a clean kitchen towel, and let it rest for at least 30 minutes at room temperature. This allows the gluten to relax, making the dough easier to roll.
- Divide the rested dough into 8-10 equal pieces. Roll each piece into a smooth ball.
- On a lightly floured surface, roll out each dough ball into a thin, round tortilla, about 6-8 inches in diameter.
- Heat a dry cast-iron skillet or non-stick pan over medium-high heat. Once hot, place one tortilla in the pan.
- Cook for 1-2 minutes per side, or until golden brown spots appear and the tortilla puffs up slightly.
- Remove the cooked tortilla from the pan and place it in a clean kitchen towel or tortilla warmer to keep it soft and warm while you cook the remaining tortillas.
Notes
Ensure the sweet potato is mashed very smoothly for a consistent dough texture.
Adjust water quantity based on the moisture content of your sweet potato and flour type.
Do not overcook the tortillas, as they can become stiff. They should remain pliable.
Stack cooked tortillas in a towel to keep them warm and soft.
Leftover tortillas can be stored in an airtight container at room temperature for up to 2 days or refrigerated for up to 5 days.
- Prep Time: 20 minutes
- Cook Time: 25 minutes
Nutrition
- Calories: 150 kcal
- Fat: 3g
- Carbohydrates: 28g
- Protein: 4g
FAQs
How smooth should the mashed sweet potato be for the dough?
For the best results when making these sweet potato flatbreads, it is crucial that the cooked sweet potato is mashed very thoroughly until completely smooth. Any lumps remaining can disrupt the texture of the dough, making it inconsistent and potentially difficult to roll out evenly. Achieving a smooth mash ensures that the dough comes together beautifully, leading to pliable and soft tortillas. Take your time during this initial step to ensure a fine consistency, which is key for a successful batch of these homemade treats. This attention to detail will greatly enhance the final product.
What is the best way to adjust the water content for the dough?
When preparing the dough for these versatile sweet potato tortillas, the amount of warm water needed can vary. Start by adding 1/4 cup of water as specified, then incorporate it gradually, a tablespoon at a time. The goal is to achieve a dough that is soft to the touch but not sticky. Factors like the moisture content of your cooked sweet potato and the type of flour you use can influence how much water is absorbed. Pay attention to the dough’s feel as you mix, adding just enough water until it comes together smoothly. This careful approach ensures the ideal consistency for kneading and rolling.
How can I prevent the tortillas from becoming stiff after cooking?
To ensure your sweet potato tortillas remain soft and pliable rather than turning stiff, proper cooking and storage are essential. Cook each tortilla for 1-2 minutes per side on a medium-high heat skillet until golden brown spots appear and it puffs slightly. Avoid overcooking, as this is the primary cause of stiffness. Immediately after removing each cooked tortilla from the pan, place it in a clean kitchen towel or a dedicated tortilla warmer. Stacking them in this way traps steam and warmth, keeping them wonderfully soft until ready to serve. This simple technique makes all the difference.
How long can leftover sweet potato tortillas be stored?
These delicious sweet potato tortillas can be stored to enjoy later, making meal preparation a breeze. If you have any leftovers, ensure they are cooled completely before transferring them to an airtight container. At room temperature, these homemade flatbreads will stay fresh for up to two days. For extended freshness, you can refrigerate them for up to five days. When you are ready to enjoy them again, a quick warm-up in a skillet or microwave will bring back their soft texture. Always ensure proper airtight storage to maintain their quality and flavor.