Imagine biting into a fluffy cloud of perfectly seasoned rice, yielding to a burst of savory tuna, creamy scrambled egg, and sweet corn, all hugged by a crisp strip of nori. It’s a symphony of textures and tastes that truly brightens any day.
My earliest memory of these delightful little pockets of joy involves a frantic morning, a forgotten lunch, and a last-minute dash to a Japanese convenience store that saved my entire afternoon. It was love at first triangle.
Why You’ll Love This Recipe
This recipe is a true game-changer for anyone seeking an effortless yet incredibly satisfying meal or snack. Its easy preparation means you can whip up these delectable treats even on your busiest days, making it perfect for quick lunches or healthy on-the-go fuel. The unique flavor profile, a harmonious blend of tender tuna, fluffy egg, sweet corn, and subtly seasoned rice, offers a delightful departure from everyday fare. Visually stunning with their neat shapes and vibrant garnishes, these onigiri are as pleasing to the eye as they are to the palate. Plus, their inherent versatility allows for endless customization, ensuring they never get boring.
Ingredients
Here’s what you need for this delicious dish:
- **Sushi Rice** Select a short-grain sushi rice for its ideal stickiness and texture, which is crucial for shaping the onigiri without them falling apart. This type of rice absorbs the seasoning beautifully, forming the perfect base for your rice balls.
- **Water** Essential for cooking the rice to that fluffy, tender perfection. Use clean, filtered water for the best taste.
- **Rice Vinegar** A key ingredient for seasoning the rice, providing a subtle tang that balances the savory filling and is characteristic of traditional sushi rice.
- **Sugar** Just a touch to balance the acidity of the vinegar and enhance the overall sweetness of the rice seasoning.
- **Salt** Crucial for bringing out the flavors of the rice and the filling, ensuring every bite is perfectly seasoned.
- **Canned Tuna** Opt for tuna packed in water, drained well, as this forms the core of the savory filling, providing protein and a delicious umami depth that makes these tuna onigiri so satisfying.
- **Mayonnaise** The creamy binder for the tuna, adding richness and helping to create a smooth, luscious filling.
- **Soy Sauce** A splash of soy sauce enhances the savory notes of the tuna filling, adding an extra layer of authentic flavor.
- **Eggs** Fresh eggs, whisked and cooked into fine scrambled pieces, contribute a creamy texture and mild richness to the filling, complementing the tuna beautifully.
- **Corn Kernels** Whether fresh, frozen (thawed), or canned (drained), sweet corn kernels add a pop of sweetness and a delightful crunch, brightening the filling.
- **Nori Seaweed** These thin, crisp sheets of dried seaweed are vital for wrapping the onigiri, adding a distinct oceanic flavor and a pleasant textural contrast to the soft rice.
- **Toasted Sesame Seeds** Used as a garnish, these tiny seeds add a nutty aroma and a delicate crunch, elevating both the presentation and the flavor.
- **Green Onion** Sliced finely, green onion provides a fresh, pungent garnish that adds a vibrant color and a mild oniony bite, completing the healthy recipe for these tuna onigiri.
The complete ingredient list, including quantities, can be found directly under the recipe card.
Step-by-Step Instructions

Follow these simple steps to prepare this delicious dish:
The Foundation: Preparing Your Perfect Sushi Rice
The journey to delightful tuna onigiri begins with perfectly prepared rice. First, take your sushi rice and rinse it thoroughly under cold running water. This process removes excess starch, which is vital for achieving that desirable fluffy, non-gummy texture that holds its shape beautifully. Continue rinsing until the water draining from the rice runs completely clear. Once rinsed, combine the prepared rice and water in a medium saucepan. Bring this mixture to a rolling boil over medium-high heat. As soon as it boils, immediately reduce the heat to its lowest setting, cover the saucepan tightly with a lid, and allow it to simmer undisturbed for 15 to 20 minutes, or until every last drop of water has been absorbed by the rice. The key here is patience and discipline: do not, under any circumstances, lift the lid during this critical cooking phase, as it releases precious steam necessary for proper cooking. After the cooking time, remove the saucepan from the heat, but keep it covered. Let the rice stand for an additional 10 minutes. This resting period allows the steam to redistribute, resulting in even fluffier grains. While the rice rests, in a small separate bowl, whisk together the rice vinegar, sugar, and salt until they are completely dissolved. This creates the quintessential seasoning that elevates plain rice into the perfect base for your healthy recipe for tuna onigiri. Once rested, transfer the warm, cooked rice to a large, shallow bowl. Drizzle the prepared vinegar mixture evenly over the rice. With a rice paddle or a flat spatula, gently fold the seasoning into the rice using a cutting and folding motion. The goal is to evenly coat the grains without mashing them. This step also helps cool the rice slightly, making it easier to handle for shaping your quick tuna onigiri.
Crafting the Savory Tuna and Egg Filling
With your perfectly seasoned rice ready, the next step in making your quick tuna onigiri is to prepare the star-studded filling. In a separate, medium-sized bowl, combine the thoroughly drained canned tuna with the creamy mayonnaise and a teaspoon of soy sauce. Ensure the tuna is well-drained to prevent your filling from becoming watery. Mix these ingredients together until they are well combined and the tuna is evenly coated, creating a rich and savory mixture. Next, prepare the scrambled eggs, which add a wonderful creaminess and extra protein to this healthy recipe. Whisk your eggs vigorously in a small bowl until the yolks and whites are fully incorporated. Heat a non-stick pan over medium heat and pour in the whisked eggs. Cook, stirring occasionally, until the eggs are just set and fluffy. Be careful not to overcook them, as they should remain tender. Once cooked, remove the eggs from the pan and chop them finely. This ensures they integrate seamlessly into the onigiri without creating large, awkward chunks. Set aside the tuna mixture, chopped egg, and corn kernels, which will be added separately during the assembly stage. This careful preparation of ingredients is what makes these tuna onigiri not only delicious but also a quick and efficient meal to put together.
The Art of Shaping Your Onigiri Masterpiece
Now comes the fun part: shaping your onigiri! To prevent the seasoned rice from sticking stubbornly to your hands, lightly wet your hands with a little water. This simple trick is a game-changer for smooth and effortless shaping. Take about half a cup of the seasoned rice and gently form it into a loose ball in the palm of your hand. It doesn’t need to be perfect at this stage, just a foundational shape. Next, using your thumb or a finger, make a small indentation right in the center of the rice ball. This creates a cozy pocket for your delicious filling. Into this indentation, carefully place a small amount of the prepared tuna mixture. Follow this with a small amount of the finely chopped scrambled egg and then a sprinkle of the sweet corn kernels. Don’t overfill, as you need space to properly enclose the ingredients. Once the filling is nestled inside, take another small amount of seasoned rice and gently place it over the filling, effectively covering it. Now, with both hands, gently press and shape the rice. You can opt for the traditional triangular shape, which is iconic for onigiri, or a simple round ball, whichever you find easier or more aesthetically pleasing. The crucial goal here is to ensure that the delicious filling is fully enclosed within the rice, creating a neatly packaged, self-contained treat. Keep your hands damp throughout the shaping process if the rice starts to stick. Remember, practice makes perfect, and even slightly imperfect shapes will taste just as wonderful. This step is key to making a truly satisfying quick tuna onigiri.
The Final Touches: Wrapping and Garnish
With your perfectly shaped rice balls ready, it’s time for the finishing touches that bring your healthy recipe for tuna onigiri to life, both in flavor and presentation. Take a strip of crisp nori seaweed. Carefully wrap this strip around the base or the side of each rice ball. The nori not only adds a distinctive umami flavor and a wonderful textural contrast but also provides a convenient handle for eating, keeping your fingers clean. The natural moisture from the rice will help the nori adhere. Once wrapped, it’s time to add a final flourish. Garnish the top of each onigiri with a sprinkle of toasted sesame seeds. These tiny seeds add a delightful nutty aroma and a subtle crunch that complements the soft rice and savory filling. Finish with a scattering of thinly sliced green onion, which provides a fresh, vibrant color and a mild, peppery bite that cuts through the richness of the tuna and egg, elevating the overall flavor profile. And there you have it! Your Quick Tuna Onigiri Rice Balls are complete. These delightful handheld treats are ready to be enjoyed. Serve them immediately to savor their freshness, or if you’re planning ahead, they can be stored for later.
Nurturing Your Onigiri: Tips for Perfection and Storage
Crafting the perfect onigiri is an art form, but one that is remarkably easy to master with a few helpful pointers. As you’ve learned, keeping your hands damp while shaping is perhaps the most crucial tip to prevent the seasoned rice from becoming a sticky adversary. For those who prefer a more uniform look or find freehand shaping a bit tricky, consider using plastic wrap or a dedicated onigiri mold. Simply line the mold with plastic wrap, press in half the rice, add your filling, top with the remaining rice, and then press to shape. If using plastic wrap for freehand shaping, place the rice on the wrap, add filling, cover with more rice, and then twist the wrap to form your desired shape. These methods not only simplify the process but also help maintain hygiene, especially when making quick tuna onigiri for lunchboxes or picnics.
While these delightful rice balls are truly at their peak when enjoyed fresh, sometimes life calls for a little meal prepping. You can store your onigiri in an airtight container at room temperature for a few hours, perfect for a short trip or a morning snack. For longer storage, up to one day, refrigerate them in an airtight container. Be aware that the rice may firm up slightly when chilled, and the nori might lose some of its crispness, but they will still be delicious. To bring them back to life from the fridge, you can gently warm them in the microwave for a short burst (about 15-30 seconds, depending on your microwave) to soften the rice a little, though they are also perfectly enjoyable cold.
The Nutritional Benefits of This Healthy Recipe
When we talk about ‘How to Make Quick Tuna Onigiri Rice Balls | Healthy Recipe’, the “healthy” aspect truly shines through. This recipe isn’t just a treat for your taste buds; it’s a smart choice for your body, offering a balanced profile of essential nutrients. Each serving of these onigiri, thoughtfully portioned, packs a punch. With approximately 210 calories per serving, they provide sustained energy without being overly heavy, making them an excellent option for a light meal or a power-packed snack.
Protein is a crucial component for muscle repair and satiety, and these tuna onigiri deliver a commendable 10 grams per serving. This comes primarily from the lean tuna and the scrambled eggs, ensuring you feel full and satisfied long after you’ve finished eating. The primary energy source comes from carbohydrates, with 35 grams per serving. The short-grain sushi rice provides complex carbohydrates, which are broken down slowly by the body, offering a steady release of energy rather than a sudden spike and crash. This makes them ideal for maintaining focus and energy throughout your day, whether you’re at work, school, or on an adventure.
Fat content is kept relatively low at 3 grams per serving, contributed mainly by the mayonnaise in the tuna filling and any natural fats in the eggs. This modest amount ensures flavor and satiety without adding excessive unhealthy fats. Furthermore, the inclusion of nori seaweed provides beneficial minerals like iodine, and the green onions offer a dose of vitamins and antioxidants, reinforcing the “healthy recipe” aspect of these quick tuna onigiri. This nutritional breakdown makes these rice balls a truly wholesome and convenient option for anyone looking for a balanced and delicious meal.
Exploring Delicious Onigiri Variations
While the classic tuna, egg, and corn filling is undeniably delicious and a staple for a reason, the beauty of onigiri lies in its incredible adaptability. This recipe for ‘How to Make Quick Tuna Onigiri Rice Balls | Healthy Recipe’ is just the starting point for a world of culinary exploration. The notes section of this recipe hints at some fantastic alternatives, encouraging you to unleash your inner chef and experiment with different fillings to suit your palate and dietary preferences.
Imagine swapping out the tuna and egg for some succulent cooked salmon. Flaked salmon, perhaps seasoned with a touch of soy sauce and a squeeze of lemon, offers a rich, oceanic flavor that pairs wonderfully with the seasoned rice and crisp nori. Another traditional and highly popular filling is umeboshi, or pickled plum. These tangy, salty plums, often a vibrant pink, provide a delightful sour kick that perfectly contrasts the mild sweetness of the rice, creating a truly authentic Japanese experience.
If you’re leaning towards a vegetarian option or simply want to boost your vegetable intake, seasoned vegetables are a fantastic choice. Think finely diced and sautéed carrots, bell peppers, or spinach, perhaps seasoned with a little soy sauce and a hint of ginger. You could also include edamame, lightly blanched and shelled, for a pop of green and a dose of plant-based protein. For those who enjoy a bit of heat, a touch of sriracha or a dash of chili oil could be mixed into any of these fillings for an extra zing. The possibilities are truly endless, limited only by your imagination. These variations ensure that your quick tuna onigiri journey can be a continually exciting and personalized culinary adventure, making this a healthy recipe you can adapt again and again.
Why Onigiri Should Be Your Next Go-To Meal
In a world that often demands speed without sacrificing quality, the Quick Tuna Onigiri Rice Balls | Healthy Recipe stands out as a true culinary hero. They are the epitome of practical deliciousness, offering a delightful blend of savory, sweet, and umami flavors in a perfectly portable package. Whether you’re a busy professional needing a grab-and-go lunch, a parent packing healthy snacks for school, or simply someone who appreciates the beauty of a simple yet satisfying meal, these onigiri tick all the boxes.
Beyond their convenience, there’s a certain charm to these humble rice balls. They represent comfort, creativity, and the joy of hands-on cooking. The process of making them is surprisingly meditative, turning a few basic ingredients into something truly special. And the best part? You control every element, ensuring fresh, wholesome ingredients go into every bite.
So, the next time you’re contemplating what to make that’s both easy and exciting, remember the humble onigiri. This healthy recipe is more than just food; it’s a testament to how simple ingredients can create extraordinary experiences. Gather your components, get your hands a little damp, and embark on your own onigiri adventure. Your taste buds, and your busy schedule, will thank you!
Mastering the Secrets of Cooking
For perfectly formed and flavorful rice balls, sequence is key. While your sushi rice simmers undisturbed, prepare the creamy tuna mixture and finely chop the scrambled eggs. Having all components ready for assembly right after the rice cools slightly makes the process smooth and enjoyable.
Make Your Recipe Unique
Personalize your delicious onigiri rice balls by swapping out a few ingredients. For a tangier kick, replace standard mayonnaise with a zesty lemon-infused version. Opt for low-sodium soy sauce to manage salt intake. You could also use black sesame seeds instead of white for a striking visual contrast and nutty flavor.
Smart Storage & Reheating
To maintain that delightful crispness, store the nori seaweed strips separately from the tuna onigiri rice balls. Place the assembled rice balls in an airtight container at room temperature for a few hours. Alternatively, refrigerate them for up to one day. Add the nori just before serving for the best texture experience.
The Chef’s Golden Tips
I remember making these for a surprise picnic; my friends couldn’t believe how easy and utterly delicious they were. Watching their happy faces as they savored each bite was truly an unforgettable moment.
Final Thoughts
This delightful recipe for onigiri offers a wonderful blend of convenience and deliciousness. Preparing these savory rice balls means you get a healthy, protein-packed snack or light meal, perfect for on-the-go enjoyment. The fluffy rice, savory tuna, creamy egg, and sweet corn, all nestled within a nori embrace, create an irresistible combination. It’s more than just food; it’s a tiny package of joy that’s both satisfying and simple to prepare. Don’t wait to bring this easy and satisfying dish to your kitchen. Try your hand at shaping these quick tuna onigiri rice balls today and savor every delicious, homemade bite!
Print
How to Make Quick Tuna Onigiri Rice Balls | Healthy Recipe
- Total Time: 55 minutes
- Yield: 8 onigiri
Description
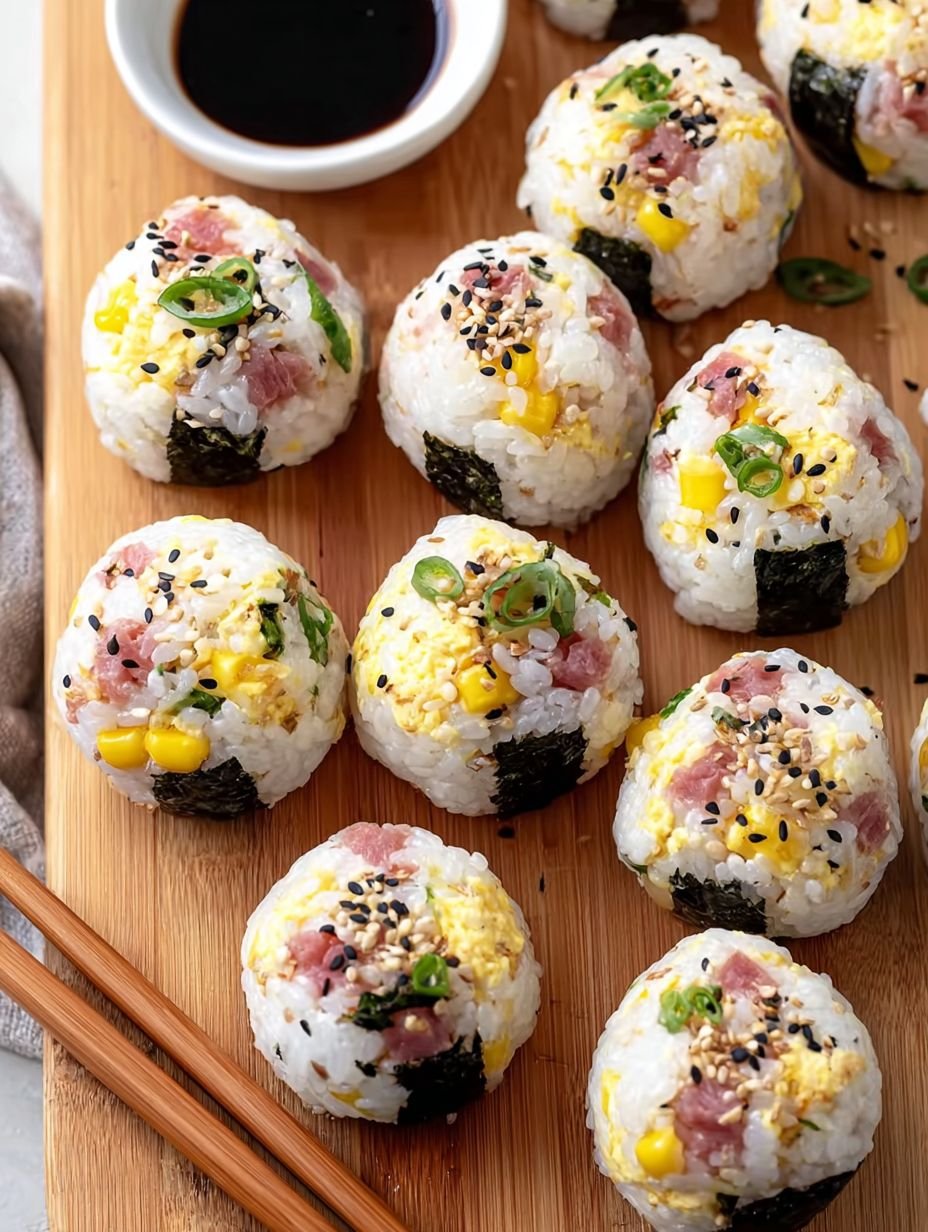
These delightful onigiri rice balls feature a harmonious blend of flavors and textures. Fluffy, seasoned short-grain rice encases a savory filling of tender tuna, creamy scrambled egg, and sweet corn kernels. Each ball is neatly wrapped with a strip of crisp nori seaweed and garnished with a sprinkle of toasted sesame seeds and fresh green onion, offering a balanced and satisfying bite. These handheld treats are perfect for a light meal or a convenient snack.
Ingredients
Instructions
- Rinse the sushi rice thoroughly under cold water until the water runs clear.
- Combine the rinsed rice and water in a medium saucepan. Bring to a boil, then reduce heat to low, cover, and simmer for 15-20 minutes, or until all water is absorbed. Do not lift the lid during cooking.
- Remove from heat and let stand, covered, for 10 minutes.
- In a small bowl, whisk together the rice vinegar, sugar, and salt until dissolved.
- Transfer the cooked rice to a large, shallow bowl. Drizzle the vinegar mixture over the rice and gently fold with a rice paddle or spatula until evenly coated and cooled slightly.
- In a separate bowl, combine the drained tuna, mayonnaise, and 1 teaspoon soy sauce. Mix well.
- Prepare the scrambled eggs: Whisk eggs and cook in a non-stick pan until set, then chop finely.
- To assemble the onigiri, wet your hands lightly with water to prevent sticking. Take about ½ cup of seasoned rice and form it into a loose ball in your palm.
- Make a small indentation in the center of the rice ball. Place a small amount of tuna mixture, chopped egg, and corn into the indentation.
- Cover the filling with another small amount of rice and gently press and shape the rice into a triangle or round ball, ensuring the filling is fully enclosed.
- Wrap a strip of nori seaweed around the base or side of each rice ball.
- Garnish the top of each onigiri with toasted sesame seeds and sliced green onion.
- Serve immediately or store for later.
Notes
For easier shaping, use plastic wrap or an onigiri mold.
Keep your hands damp while shaping to prevent rice from sticking.
Onigiri are best enjoyed fresh, but can be stored in an airtight container at room temperature for a few hours or refrigerated for up to one day.
Experiment with other fillings like cooked salmon, pickled plum (umeboshi), or seasoned vegetables.
- Prep Time: 25 minutes
- Cook Time: 30 minutes
Nutrition
- Calories: 210 kcal
- Fat: 3g
- Carbohydrates: 35g
- Protein: 10g
FAQs
What kind of rice is best for this recipe?
The recipe specifically calls for sushi rice, also known as short-grain rice, which is ideal for this preparation. Sushi rice has a higher starch content compared to other varieties, making it stickier when cooked. This stickiness is crucial for forming the rice into stable balls or triangles that hold their shape without falling apart. Before cooking, remember to rinse the sushi rice thoroughly under cold water until the water runs clear. This step removes excess surface starch, contributing to a better texture. Once cooked, season it with the vinegar mixture for the authentic flavor.
How can I prevent the rice from sticking while shaping?
To prevent the rice from sticking to your hands during the shaping process, it is essential to keep your hands lightly damp with water. Before you begin assembling the onigiri, have a small bowl of water nearby. Simply dip your hands in the water and shake off any excess before handling the seasoned rice. This creates a barrier that stops the sticky rice from adhering to your skin, making it much easier to form neat and compact shapes, whether you choose a triangle or a round ball. The recipe also notes that using plastic wrap or an onigiri mold can simplify shaping.
What ingredients are used for the delicious filling in these tuna rice balls?
The delicious filling for these homemade tuna rice balls combines several flavorful components to create a balanced bite. It features drained tuna, which is mixed with creamy mayonnaise and a teaspoon of soy sauce for a savory base. Alongside the tuna mixture, finely chopped scrambled eggs add a rich texture and extra protein. Sweet corn kernels are also incorporated, providing a lovely burst of sweetness and color. These ingredients are placed into a small indentation within the rice ball, ensuring they are fully enclosed as you shape the onigiri.
What is the best way to store these Quick Tuna Onigiri if I prepare them in advance?
When preparing these quick tuna onigiri rice balls ahead of time, it is important to store them properly to maintain freshness and taste. While they are best enjoyed immediately after preparation, you can store them in an airtight container. If you plan to eat them within a few hours, keeping them at room temperature is suitable. For longer storage, up to one day, refrigerate the onigiri in the airtight container. Keep in mind that refrigerated rice can become a bit firm, so allowing them to come to room temperature briefly before serving can improve the texture.