Imagine a delicate, soft cloud that melts in your mouth, whispering notes of subtle sweetness and a tropical breeze, then surprises you with a rich, nutty embrace. This is the magic of these exquisite mooncakes, a refreshing departure from their baked cousins. My first attempt at mooncakes involved a sticky kitchen, dough clinging to every surface like an overly affectionate puppy, but the reward was absolutely worth the playful mess!
What Makes This Recipe Special
These elegant snow skin mooncakes are a true culinary delight, boasting an incredibly easy preparation process since they are steamed, not baked. Their unique flavor profile, a harmonious blend of fragrant coconut milk in the delicate skin and a deep, nutty black sesame filling, offers a refreshing taste experience. Beyond their deliciousness, their stunning appearance, achievable with beautiful mooncake molds, makes them a showstopper, and their versatility means you can experiment with various delightful fillings.
Why You’ll Love Learning How to Make Coconut Milk Snow Skin Mooncakes
There’s something uniquely satisfying about creating a dessert that looks as intricate as it tastes, especially when the process is surprisingly straightforward. These non-baked delights offer a refreshing twist on a beloved tradition, perfect for impressing guests or simply treating yourself to a sophisticated snack. The delicate outer layer, characteristic of true snow skin mooncakes, perfectly cradles a rich, flavorful filling, making each bite an experience. Forget the heavy, often dense traditional baked versions; these chilled beauties, with their vibrant flavors and tender texture, are a breath of fresh air, proving that some of the best culinary treasures come from the simplest methods. Learning how to make coconut milk snow skin mooncakes is not just about following a recipe; it’s about embracing a new, delightful tradition in your kitchen.
Gathering Your Culinary Treasures: Ingredients for Coconut Milk Snow Skin Mooncakes
Here’s what you need for this delicious dish:
- **Black Sesame Seeds** Toasting these seeds unlocks their incredible aroma and deep, nutty flavor, which forms the heart of our rich, smooth filling, creating a beautiful contrast with the delicate snow skin.
- **Granulated Sugar** This provides the essential sweetness for both the robust black sesame filling and the subtle, tender snow skin dough, balancing the overall flavor profile.
- **Vegetable Oil** Used to achieve a silky-smooth texture in the black sesame paste and to add elasticity and a pleasant mouthfeel to the steamed snow skin dough, ensuring a wonderfully pliable mooncake.
- **Water (or plant-based milk)** This liquid helps bind the black sesame seeds and sugar into a smooth, workable paste, crucial for a perfectly creamy filling.
- **Glutinous Rice Flour** This is the magic ingredient for our snow skin dough, providing the signature soft, chewy, and slightly stretchy texture that makes these coconut milk snow skin mooncakes so delightfully unique.
- **Rice Flour** Working in tandem with glutinous rice flour, rice flour contributes to the delicate tenderness of the snow skin, preventing it from becoming overly sticky and ensuring a smooth finish.
- **Wheat Starch** A small amount of wheat starch is added to the snow skin dough to enhance its translucency and give it that elegant, almost ethereal quality after steaming.
- **Coconut Milk** The star ingredient for our snow skin, coconut milk infuses the dough with its fragrant aroma and subtle sweetness, contributing directly to the delicate, soft, and chewy outer layer of these mooncakes.
- **Extra Glutinous Rice Flour for Dusting** Essential for preventing sticking during the molding process, ensuring your mooncakes release beautifully from their molds and maintain their intricate patterns.
All ingredients and quantities can be found directly in the recipe card below.
Your Journey to Perfection: How to Make Coconut Milk Snow Skin Mooncakes
Simply follow these easy steps to prepare this delicious meal:
Crafting the Aromatic Black Sesame Filling
Our journey to deliciousness begins with the heart of these mooncakes: the black sesame filling. First, gently toast the black sesame seeds in a dry pan over medium heat. Keep them moving for 3 to 5 minutes until you catch a whiff of their distinct, fragrant aroma, then allow them to cool completely. Once cool, combine the toasted sesame seeds with the granulated sugar, vegetable oil, and water (or plant-based milk if you prefer) in a blender. Process this mixture until it transforms into a wonderfully smooth paste. If you find the paste a bit too thick, a tiny splash more water or plant-based milk will help achieve the perfect consistency. Finally, transfer this aromatic paste to a non-stick pan and cook it over low heat, stirring constantly for 5 to 7 minutes. You’ll know it’s ready when it visibly thickens and begins to pull away cleanly from the sides of the pan. Let it cool entirely, then portion it into 15 to 20 gram balls, rolling each into a smooth sphere ready for encasing.
Preparing the Velvety Snow Skin Dough
Next, we prepare the delicate outer shell, the “snow skin.” In a heatproof bowl, meticulously whisk together the glutinous rice flour, rice flour, wheat starch, and granulated sugar until they are thoroughly combined. This dry mix sets the stage for our wonderfully soft and chewy dough. Gradually, with a whisk, incorporate the coconut milk, water, and vegetable oil into the dry ingredients. Continue whisking until the mixture is beautifully smooth and entirely free of any lumps. Cover the bowl securely with plastic wrap or a plate, then place it into a steamer. Steam this mixture over high heat for 20 to 25 minutes, or until the dough becomes translucent and is cooked all the way through. Remember to stir the dough every 5 to 7 minutes during this steaming process to ensure even cooking and a consistent texture. After steaming, carefully remove the bowl from the steamer. While the dough is still warm, knead it gently with a spatula or a gloved hand for a few minutes until it achieves a smooth and elastic consistency. Crucially, allow this exquisite dough to cool completely to room temperature before proceeding to the next step, as proper cooling ensures easier handling and an ideal final texture for your coconut milk snow skin mooncakes.
Assembling Your Elegant Mooncakes
With both your filling and dough prepared and cooled, it’s time to bring these components together to form your mooncakes. Lightly dust your work surface, your hands, and especially your mooncake mold with extra glutinous rice flour. For an even better non-stick surface, you can lightly toast this dusting flour in a dry pan beforehand. Take a portion of the cooled snow skin dough, specifically about 25 to 30 grams, and gently flatten it into a thin, even disc. Carefully place one of your pre-rolled black sesame filling balls directly into the center of this dough disc. Now, with the utmost care, begin to wrap the dough around the filling, bringing the edges together and pinching them firmly to seal the filling completely inside. Once sealed, gently roll the filled dough into a smooth, uniform ball. Place this beautiful ball into your mooncake mold, pressing down firmly and evenly to imprint the desired intricate pattern. Then, with a gentle touch, release the mooncake from the mold. Continue this rewarding process with the remaining dough and filling until all your elegant mooncakes are perfectly formed.
The Chilling Grand Finale and Serving Perfection
The final, yet essential, step to achieving the perfect texture and flavor for your coconut milk snow skin mooncakes is chilling. Once all the mooncakes are assembled, carefully transfer them to an airtight container. Place this container in the refrigerator for at least 2 hours. This chilling period is absolutely crucial as it allows the snow skin to firm up, developing its signature delicate chewiness and enhancing the overall refreshing experience. For the best texture and flavor, always chill the mooncakes for at least 2 hours before serving. When ready to enjoy, simply retrieve them from the fridge. Serve these chilled delights immediately to savor their unique texture and fragrant aroma.
Expert Tips for Impeccable Coconut Milk Snow Skin Mooncakes
Creating these delicate treats can be incredibly rewarding, and a few expert pointers will ensure your success. First, pay close attention to dusting: always use cooked glutinous rice flour generously on your work surface, hands, and especially your mooncake mold. This prevents the wonderfully pliable dough from sticking and helps your intricate patterns emerge flawlessly. Secondly, patience is a virtue, particularly when it comes to cooling the dough. Ensure the snow skin dough is fully cooled to room temperature before you begin assembling. This step is non-negotiable for easier handling and a superior final texture. Lastly, for the ultimate experience, remember the chill factor! These mooncakes truly shine when served cold, so chilling them in an airtight container for at least 2 hours before serving is key to achieving that perfect delicate chew and refreshing flavor. Store any leftover snow skin mooncakes in an airtight container in the refrigerator for up to 3 days to maintain their freshness.
Why Homemade Snow Skin Mooncakes are Always a Win
There’s an unparalleled joy and satisfaction that comes from mastering how to make coconut milk snow skin mooncakes right in your own kitchen. Beyond the impressive results, making them yourself means you have complete control over the ingredients, ensuring the freshest, highest-quality components go into every bite. You can tailor the sweetness to your liking and know exactly what you’re serving to your loved ones. The process itself is a delightful culinary adventure, transforming simple ingredients into an elegant dessert that showcases your skill and passion. Homemade treats, especially something as unique as these non-baked mooncakes, carry an extra layer of warmth and thoughtfulness, making them perfect for celebrations or a special everyday indulgence.
Frequently Asked Questions About Snow Skin Mooncakes
**What makes snow skin mooncakes different from traditional mooncakes?**
Unlike traditional mooncakes, which are baked and typically have a golden-brown, thin crust, snow skin mooncakes are steamed. They feature a delicate, soft, and chewy outer layer that is often translucent and are best enjoyed chilled, offering a refreshing contrast to their baked counterparts.
**Can I make these coconut milk mooncakes ahead of time?**
Absolutely! Snow skin mooncakes are fantastic for making in advance. Once assembled, store them in an airtight container in the refrigerator for at least 2 hours before serving. They will keep well in the refrigerator for up to 3 days.
**What other fillings can I use for these mooncakes?**
While the black sesame paste is wonderfully complementary to the coconut milk snow skin, you can certainly vary the filling. Other popular options include classic red bean paste or smooth lotus seed paste, both of which pair beautifully with the delicate dough.
**Why is it important to chill the mooncakes before serving?**
Chilling the mooncakes for at least 2 hours is crucial for achieving their optimal texture and flavor. The cold helps the snow skin dough to firm up, enhancing its delicate chewiness and making the entire dessert more refreshing and enjoyable.
Embrace the Sweetness of Creation
Now that you know how to make coconut milk snow skin mooncakes, there’s nothing stopping you from bringing this unique and utterly delightful dessert to life in your own home. Each step, from toasting the fragrant black sesame to meticulously molding the delicate snow skin, is a rewarding part of the culinary journey. These non-baked, chilled treats offer a refreshing twist on a cherished classic, promising a subtle sweetness and a tender, chewy bite that will captivate anyone who tries them. So, gather your ingredients, unleash your inner pastry artist, and prepare to delight your senses with these exquisite, homemade beauties. Your kitchen (and your taste buds) will thank you!
Mastering the Secrets of Cooking
For perfect results, ensure the black sesame filling cools completely. Roll it into balls only when fully chilled. Similarly, let the steamed snow skin dough cool to room temperature before kneading. This prevents stickiness and creates an elastic wrap, making assembly much easier.
Make Your Recipe Unique
Elevate your snow skin mooncakes by experimenting with liquids. For the filling, swap water with almond or oat milk for a subtle flavor variation. Regarding the dough’s vegetable oil, try a mild sunflower or canola oil. This keeps the taste neutral, letting the coconut milk aroma truly shine.
Smart Storage & Reheating
Preserve the delicate, chewy texture of your snow skin mooncakes. Store them promptly in an airtight container in the refrigerator. Consume within three days for optimal freshness. These delightful treats are best enjoyed thoroughly chilled. Crucially, do not reheat; their unique texture relies on being served cool.
The Chef’s Golden Tips
The first time I successfully unmolded a snow skin mooncake, it felt like magic! The delicate pattern emerged perfectly, a little edible masterpiece. Sharing these chilled delights with friends always brings such joy and smiles.
Final Thoughts
After creating these exquisite non-baked delights, you now hold the key to a truly special treat. The delicate, soft, chewy skin offers subtle sweetness and fragrant coconut milk. It perfectly cradles the rich, smooth black sesame paste. This refreshing dessert, best enjoyed chilled, offers a delightful contrast to traditional baked varieties. Imagine the satisfying texture and deep, nutty flavor. Don’t just dream about it; bring this unique experience to your kitchen. Gather your ingredients and discover the joy of crafting beautiful, homemade mooncakes. Share them with loved ones or savor them yourself – you’ll be glad you did!
Print
How to Make Coconut Milk Snow Skin Mooncakes
- Total Time: 1 hour 15 minutes
- Yield: 10-12 mooncakes 1x
Description
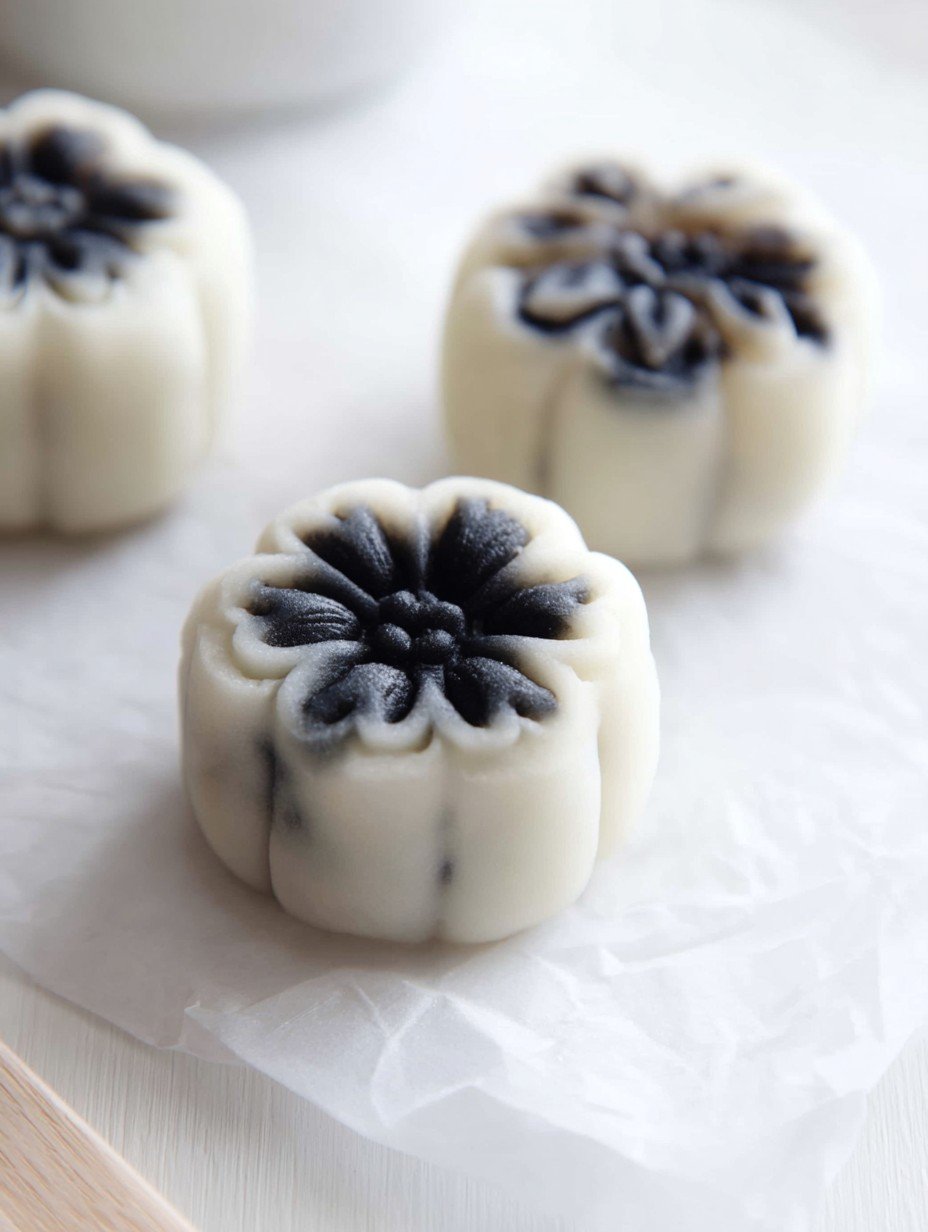
These elegant snow skin mooncakes feature a delicate, soft, and chewy outer layer made with coconut milk, offering a subtle sweetness and fragrant aroma. Encased within is a rich, smooth black sesame paste, providing a deep, nutty flavor that beautifully complements the tender skin. Unlike traditional baked mooncakes, these are steamed, resulting in a refreshing, non-baked dessert best enjoyed chilled.
Ingredients
- *For the Black Sesame Filling:*
- 1 cup (150g) black sesame seeds
- 1/2 cup (100g) granulated sugar
- 1/4 cup (60ml) vegetable oil
- 1/4 cup (60ml) water (or plant-based milk)
- *For the Snow Skin Dough:*
- 1/2 cup (60g) glutinous rice flour
- 1/4 cup (30g) rice flour
- 2 tablespoons (15g) wheat starch
- 1/4 cup (50g) granulated sugar
- 1 cup (240ml) coconut milk
- 1/2 cup (120ml) water
- 2 tablespoons (30ml) vegetable oil
- Extra glutinous rice flour for dusting
Instructions
- **Prepare the Black Sesame Filling:** Toast black sesame seeds in a dry pan over medium heat for 3-5 minutes until fragrant. Let cool completely.
- Blend the toasted sesame seeds with sugar, oil, and water until a smooth paste forms. If the mixture is too thick, add a tiny bit more water or plant-based milk.
- Transfer the paste to a non-stick pan and cook over low heat, stirring constantly, for 5-7 minutes until it thickens and pulls away from the sides of the pan. Let cool completely, then divide into 15-20 gram portions and roll into smooth balls.
- **Prepare the Snow Skin Dough:** In a heatproof bowl, whisk together glutinous rice flour, rice flour, wheat starch, and sugar until well combined.
- Gradually whisk in coconut milk, water, and vegetable oil until the mixture is smooth and free of lumps.
- Cover the bowl with plastic wrap or a plate and steam over high heat for 20-25 minutes, or until the dough is translucent and cooked through. Stir the dough every 5-7 minutes during steaming to ensure even cooking.
- Carefully remove the bowl from the steamer. While still warm, knead the dough with a spatula or a gloved hand for a few minutes until it becomes smooth and elastic. Allow it to cool completely to room temperature.
- **Assemble the Mooncakes:** Lightly dust your work surface, hands, and mooncake mold with extra glutinous rice flour (preferably cooked by toasting it lightly in a dry pan).
- Take a portion of the cooled snow skin dough (about 25-30 grams) and flatten it into a thin disc. Place a black sesame filling ball in the center.
- Carefully wrap the dough around the filling, pinching the edges to seal completely. Roll the filled dough into a smooth ball.
- Place the filled ball into your mooncake mold and press down firmly to create the desired pattern. Gently release the mooncake from the mold.
- Repeat with the remaining dough and filling until all mooncakes are formed.
- Chill the finished snow skin mooncakes in an airtight container in the refrigerator for at least 2 hours before serving.
Notes
Dust your mooncake mold and hands generously with cooked glutinous rice flour to prevent sticking.
For the best texture and flavor, chill the mooncakes for at least 2 hours before serving.
Store snow skin mooncakes in an airtight container in the refrigerator for up to 3 days.
You can vary the filling with other options like red bean paste or lotus seed paste.
Ensure the snow skin dough is fully cooled before handling for easier molding and a better final texture.
- Prep Time: 45 minutes
- Cook Time: 30 minutes
Nutrition
- Calories: 280 per mooncake (estimate)
- Fat: 12g per mooncake (estimate)
- Carbohydrates: 40g per mooncake (estimate)
- Protein: 5g per mooncake (estimate)
FAQs

Why do I need to cook the black sesame paste after blending?
Cooking the black sesame paste after blending is a crucial step. You use a non-stick pan over low heat, stirring for 5-7 minutes. This process allows the paste to thicken considerably. As moisture evaporates, the paste becomes more cohesive, pulling away from the pan’s sides. This thickening is essential for achieving the correct consistency. It makes the paste firm enough to roll into smooth balls for the filling. A properly cooked and cooled paste will hold its shape perfectly when encased in the delicate snow skin dough.
How can I prevent the snow skin dough from sticking when assembling?
To prevent the delicate snow skin dough from sticking during assembly, generous dusting is vital. Apply extra glutinous rice flour to your hands, work surface, and mooncake mold. The recipe suggests toasting this flour lightly in a dry pan beforehand for best results. This cooked glutinous rice flour creates an effective non-stick barrier. It ensures the dough releases cleanly, preserving the intricate pattern of your mooncakes.
Why is it important to chill the snow skin mooncakes before serving?
Chilling finished snow skin mooncakes for at least two hours is essential. This step, done in an airtight container, optimizes their texture and flavor. These delightful treats are designed to be served cold, enhancing their refreshing quality. The cooling process allows the delicate snow skin to firm up. It develops that signature soft, chewy, and slightly elastic mouthfeel. Additionally, chilling helps the flavors meld beautifully, creating a more enjoyable and authentic experience.
What should be the appearance and texture of the snow skin dough after steaming?
After steaming for 20-25 minutes, the snow skin dough will transform into a translucent and cooked-through mass. When you remove it from the steamer, it will still be warm. At this stage, it’s crucial to knead the dough with a spatula or a gloved hand for a few minutes. This kneading process helps it become smooth and develop its characteristic elasticity. Once it has cooled completely to room temperature, the dough should be pliable, non-sticky, and easy to handle, ready to be flattened and shaped around the black sesame filling.