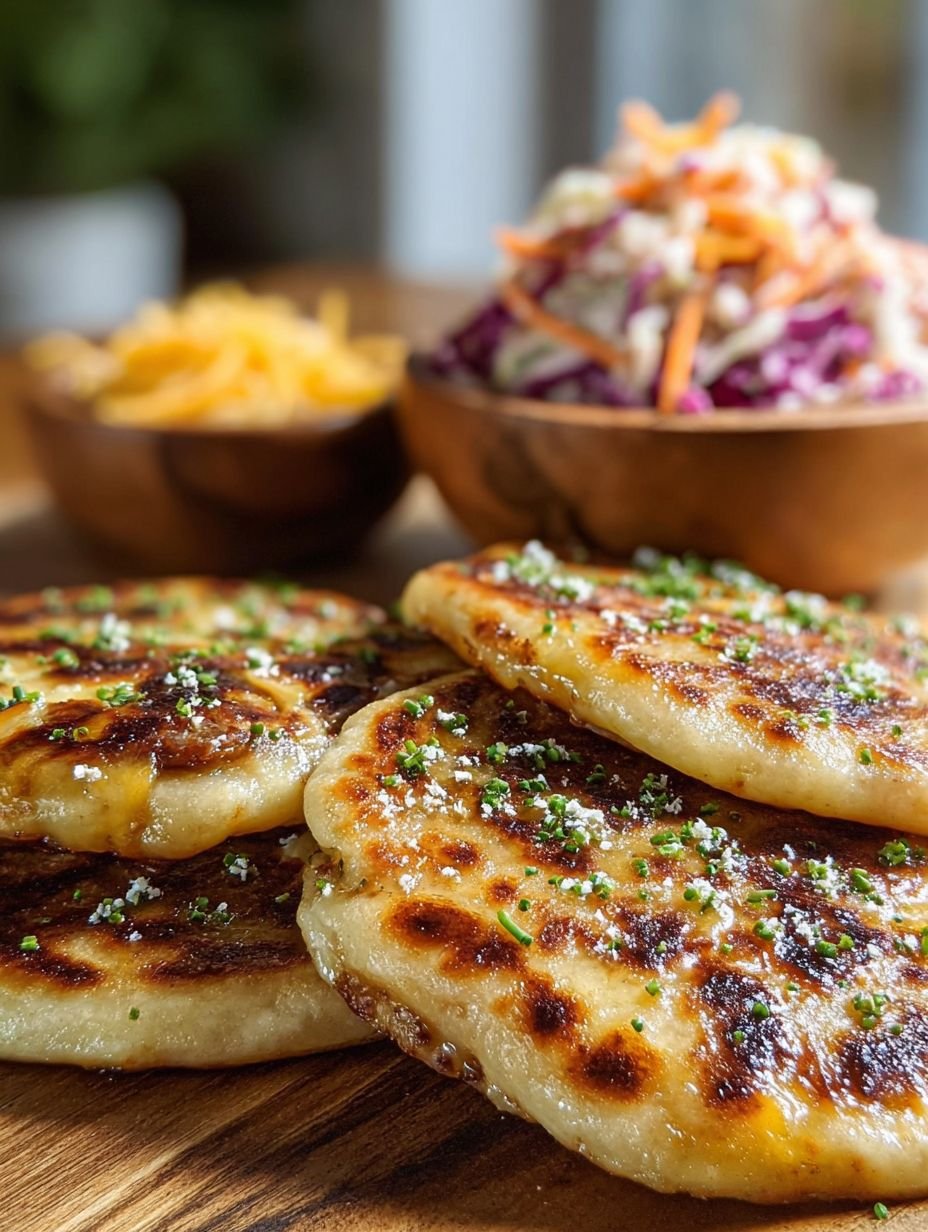
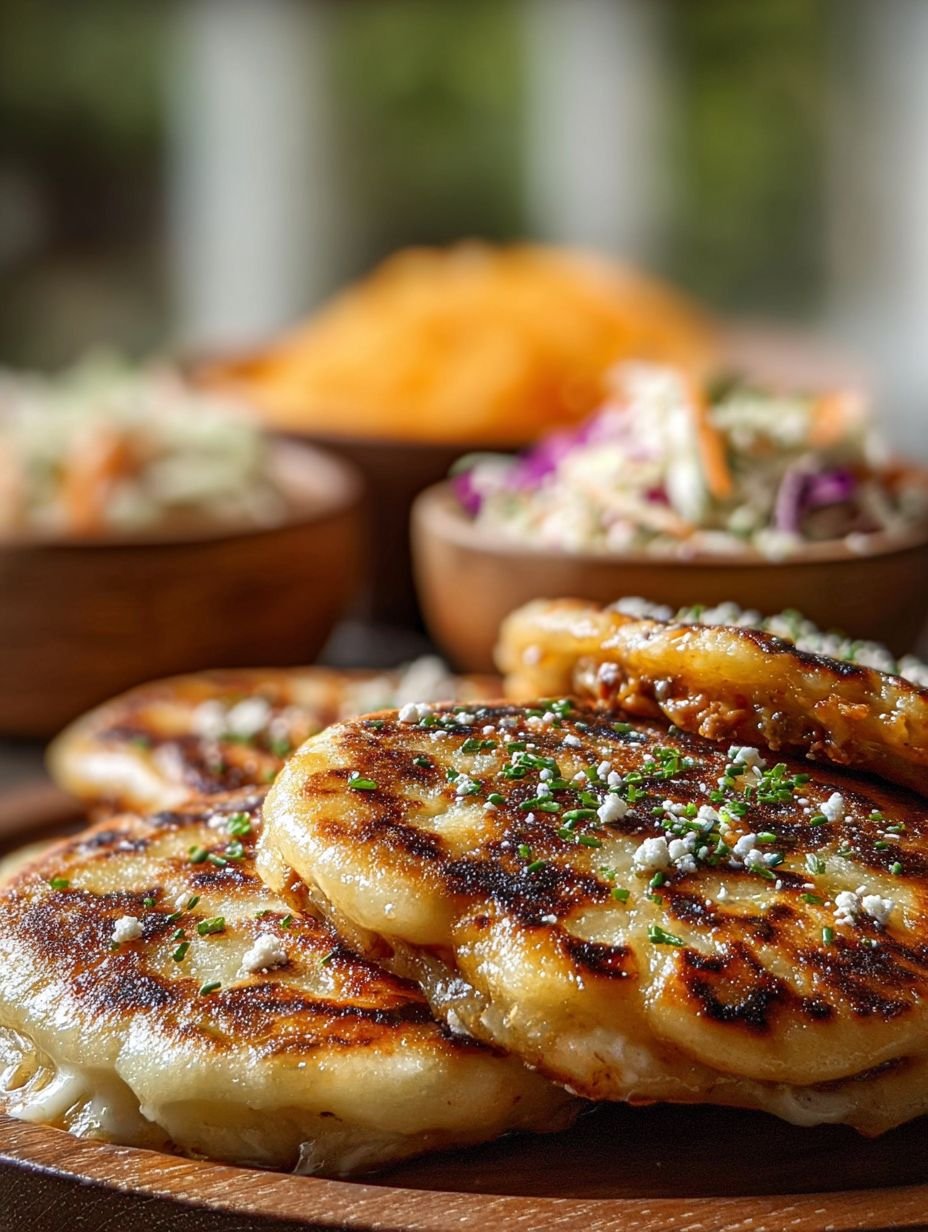
Imagine a warm, golden-brown disc with a slightly crisp exterior, giving way to a soft, savory corn masa and a luscious, gooey heart of melted cheese. Every bite offers a comforting crunch followed by a tender chew, brimming with subtle, earthy flavors that sing of home.
My earliest memory of pupusas involves a bustling family kitchen, the air thick with laughter and the irresistible aroma of corn masa on a hot griddle. As a kid, I thought they were edible UFOs, perfectly round and utterly delicious, a culinary mystery I was determined to unravel.
What Makes This Recipe Special
This recipe is a true game changer, not just for its incredibly easy preparation that even novice home cooks can master, but also for its unique flavor profile that perfectly balances savory masa with rich, melted cheese. The stunning golden-brown appearance, complete with those enticing crispy spots from the griddle, makes these pupusas incredibly appealing, and their versatile nature allows for delightful customization with your favorite fillings or toppings.
Ingredients
Here’s what you need for this delicious dish:
- **Masa Harina** This finely ground corn flour is the heart and soul of our pupusas, forming the tender, pliable dough. For the crispiest exterior and authentic flavor, choose a high-quality masa harina specifically labeled for tortillas or pupusas.
- **Warm Water** Crucial for hydrating the masa harina, the warm water helps create a soft, supple dough that is easy to work with and ensures the pupusas cook up tender. Adjust the amount as needed to achieve the perfect consistency.
- **Salt** A pinch of salt enhances the natural savory notes of the masa dough, providing a well-rounded and flavorful foundation for our cheesy pupusas.
- **Vegetable Oil** Used both in the dough for added pliability and on the griddle for cooking, vegetable oil contributes to the beautiful golden-brown color and creates that irresistible crispy texture. It’s also essential for lightly oiling your hands, which prevents sticking during the pupusa forming process.
- **Shredded Cheese (such as mozzarella, Oaxaca, or a blend)** This is the star ingredient that delivers the “cheesy” goodness our focus keyword promises. Opt for a cheese that melts beautifully, like mozzarella or Oaxaca, to ensure a wonderfully gooey, stretchy filling that oozes with every bite. The better the melt, the happier the bite!
All ingredients and quantities can be found directly in the recipe card below.
Step-by-Step Instructions
Simply follow these easy steps to prepare this delicious meal:
Step 1: Prepare the Dough
In a large bowl, combine the masa harina and salt. Gradually add the warm water, mixing with your hands until a soft, pliable dough forms. It should feel moist but not sticky. If the dough appears too dry and crumbly, add a tablespoon of water at a time until it reaches the right consistency. Conversely, if it feels too wet or sticky, incorporate a tablespoon of masa harina until it firms up. Knead the dough gently for 2-3 minutes to develop its structure. Once kneaded, cover the bowl with a damp cloth and let the dough rest for 10-15 minutes; this resting period allows the masa harina to fully hydrate, making the dough even more pliable and easier to handle.
Step 2: Prepare the Filling
While your dough rests, ensure your shredded cheese is ready to go. Having the filling prepped and within easy reach will streamline the pupusa assembly process. This key ingredient is what makes these homemade pupusas so incredibly satisfying.
Step 3: Form the Pupusas
Lightly oil your hands to prevent the dough from sticking. Take a portion of dough roughly the size of a golf ball, which is about 2-3 tablespoons, and roll it into a smooth, even ball between your palms. Using your thumb, gently press into the center of the ball to create a deep indentation, effectively forming a small cup or bowl shape with the dough.
Step 4: Fill and Seal
Carefully spoon about 1-2 tablespoons of the shredded cheese into the dough cup you’ve created. Gently gather the edges of the dough up and over the filling, pinching them together firmly at the top to seal the cheese completely inside. Once sealed, roll the filled ball gently between your palms again to smooth out any seams and create a neat, round package.
Step 5: Flatten
With great care, gently flatten the filled dough ball into a disc approximately ½ inch thick and 4-5 inches in diameter. Be very gentle during this process to avoid the filling bursting through the dough. If you notice any small cracks appearing on the surface of your pupusa, simply moisten your fingertips with a little water or oil and gently smooth them out. This step is crucial for achieving the classic pupusa shape.
Step 6: Cook the Pupusas
Heat a comal or a large, sturdy non-stick skillet over medium heat. Once hot, lightly grease the cooking surface with a small amount of vegetable oil. Place the flattened pupusas onto the hot surface, taking care not to overcrowd the pan. Cook them in batches if necessary to ensure even cooking and a consistent golden-brown finish on each.
Step 7: Griddle to Golden
Allow the pupusas to cook for 5-7 minutes per side. During this time, they should develop a beautiful golden-brown color with inviting dark, crispy spots, indicating they are perfectly cooked. The most exciting part? The cheese inside will have melted into a wonderfully gooey, irresistible center, making these cheesy crispy pupusas truly exceptional. Continue cooking until they achieve this desired texture and color on both sides.
Step 8: Serve
Remove the pupusas from the comal or skillet immediately after cooking. Serve them hot with traditional curtido, a vibrant pickled cabbage slaw, and a mild salsa roja for an authentic experience that truly complements this easy recipe. Remember, these pupusas are best enjoyed straight from the griddle!
Beyond the classic serving suggestions, consider the versatility of this easy recipe. For variations, you could add refried beans or finely chopped loroco flowers directly to the cheese filling, creating new layers of flavor and texture. Don’t worry about leftovers, either! Pupusas can be easily reheated in a dry skillet or an air fryer until they are warmed through, maintaining their deliciousness for another meal.
These homemade pupusas are more than just a meal; they are an experience, bringing the warmth and comfort of traditional cuisine right into your kitchen. Learning how to make cheesy crispy pupusas at home is a rewarding adventure, yielding results that are undeniably delicious. Each serving, approximately one pupusa, provides a satisfying nutritional profile: 300 calories, 12g of protein, 35g of carbohydrates, and 12g of fat. This makes them a substantial and flavorful option for lunch, dinner, or even a hearty snack.
The simple joy of shaping the dough, filling it with cheese, and watching it transform into a golden, bubbling delight on the griddle is truly unparalleled. The secret to success lies in keeping your hands lightly oiled while forming the pupusas, which prevents the dough from sticking and makes shaping incredibly easier. Also, don’t be afraid to adjust the dough consistency if needed; if it’s too dry and cracks, a little more warm water will fix it, and if it’s too sticky, a tablespoon of masa harina will bring it back to perfect pliability. This flexibility ensures that anyone can master this easy recipe for cheesy crispy pupusas at home.
The inviting aroma that fills your kitchen as these pupusas cook is just the beginning. The real magic happens when you take that first bite, experiencing the harmonious blend of textures and flavors – the slightly crisp exterior, the tender masa, and the glorious, stretching cheese within. It’s a moment of pure culinary bliss, proving that sometimes, the simplest ingredients can create the most profound satisfaction. Whether you’re a seasoned cook or just starting your kitchen adventures, this guide on how to make cheesy crispy pupusas at home is designed to empower you with confidence and deliver utterly delicious results. Get ready to impress your taste buds and share the joy of these incredible, homemade delights!
Mastering the Secrets of Cooking
For success in making these delightful pupusas, ensure your dough rests properly. This allows the masa to fully hydrate. When flattening the filled balls, be gentle to prevent cheese from escaping. Maintain medium heat on your griddle. This achieves that ideal golden-brown, crispy exterior and perfectly melted, gooey center.
Make Your Recipe Unique
Customize your pupusas by experimenting with various shredded cheeses. Try Monterey Jack or a sharp cheddar alongside the mozzarella or Oaxaca for richer flavor. For an authentic twist, mix finely chopped loroco flowers into your cheese filling. You can also combine refried beans with the cheese for savory depth.
Smart Storage & Reheating
To maintain the delightful crispy exterior of your pupusas, store them in an airtight container. For reheating, use a dry skillet over medium heat or an air fryer. This ensures they regain their golden-brown crispness. The cheese will become perfectly gooey, just like fresh.
The Chef’s Golden Tips
The first time I made these at home, I accidentally squished one, and cheese oozed everywhere! But it tasted so good, it became our happy little “oops” pupusa, cementing my love for this easy recipe.
Final Thoughts
There’s nothing quite like the satisfaction of crafting these golden-brown treasures in your own kitchen. From the moment you mix the masa harina to the first bite of that warm, gooey cheese enveloped in a crispy exterior, making cheesy crispy pupusas at home is a truly rewarding experience. This easy recipe promises a delightful journey into authentic flavors and textures, perfect for any meal. Don’t wait; gather your ingredients and bring this comforting, satisfying dish to your table tonight!
Print
How to Make Cheesy Crispy Pupusas at Home | Easy Recipe
- Total Time: 50 minutes
- Yield: 6 pupusas 1x
Description
These golden-brown pupusas offer a delightful combination of textures and flavors. A thick, griddled corn tortilla exterior yields to a soft, tender interior generously filled with melted cheese. The masa dough is subtly savory, creating a comforting and satisfying experience with each bite. Cooked on a hot griddle, they develop a beautiful crust and a warm, gooey center.
Ingredients
- 2 cups masa harina
- 1 ½ cups warm water (plus more if needed)
- 1 teaspoon salt
- 1 tablespoon vegetable oil (for dough, plus more for cooking)
- 1 ½ cups shredded cheese (such as mozzarella, Oaxaca, or a blend)
Instructions
- **Prepare the Dough**: In a large bowl, combine masa harina and salt. Gradually add warm water, mixing with your hands until a soft, pliable dough forms. It should be moist but not sticky. If too dry, add a tablespoon of water at a time; if too wet, add a tablespoon of masa harina. Knead for 2-3 minutes. Cover the bowl with a damp cloth and let rest for 10-15 minutes.
- **Prepare the Filling**: Have your shredded cheese ready.
- **Form the Pupusas**: Lightly oil your hands. Take a golf-ball sized portion of dough (about 2-3 tablespoons) and roll it into a smooth ball. Using your thumb, create an indentation in the center of the ball, forming a cup.
- **Fill and Seal**: Place about 1-2 tablespoons of shredded cheese into the cup. Gently bring the edges of the dough up and over the filling, pinching them together to seal completely. Roll the filled ball gently between your palms to smooth it out.
- **Flatten**: Carefully flatten the ball into a disc about ½ inch thick and 4-5 inches in diameter. Be gentle to prevent the filling from bursting through. If cracks appear, moisten your fingers and smooth them out.
- **Cook the Pupusas**: Heat a comal or a large non-stick skillet over medium heat. Lightly grease the surface with a little vegetable oil. Place the pupusas on the hot surface, ensuring not to overcrowd the pan.
- **Griddle to Golden**: Cook for 5-7 minutes per side, or until golden brown and slightly crispy with dark spots. The cheese inside should be melted and gooey.
- **Serve**: Remove from the comal and serve immediately.
Notes
Keep your hands lightly oiled while forming pupusas to prevent sticking and make shaping easier.
If the dough is too dry and cracks, add a little more water. If it is too sticky, add a little more masa harina.
Serve pupusas hot with traditional curtido (pickled cabbage slaw) and a mild salsa roja for an authentic experience.
For variations, consider adding refried beans or finely chopped loroco flowers to the cheese filling.
Leftover pupusas can be reheated in a dry skillet or air fryer until warmed through.
- Prep Time: 25 minutes
- Cook Time: 25 minutes
Nutrition
- Calories: 300
- Fat: 12g
- Carbohydrates: 35g
- Protein: 12g
FAQs
What should the texture of the masa dough be like for perfect pupusas?
Achieving the correct dough consistency is key for delicious pupusas. After combining masa harina, salt, and warm water, you’re looking for a soft, pliable dough. It should be moist enough to hold together easily but not overly sticky. If the dough feels too dry and starts to crack, gradually add a tablespoon of water at a time until it reaches the desired texture. Conversely, if it becomes too wet or sticky, incorporate a tablespoon of masa harina until it’s just right. Kneading it for a few minutes and letting it rest helps ensure its readiness for shaping.
How do I prevent the cheese filling from bursting out when forming pupusas?
Preventing the cheese from escaping is a common concern when learning how to make cheesy crispy pupusas at home. The trick lies in gentle handling and proper sealing. After creating an indentation in your dough ball and adding the shredded cheese, carefully bring the edges of the dough over the filling. Pinch them firmly together to seal completely, ensuring no gaps. Then, gently roll the filled ball between your palms to smooth it out before carefully flattening it into a disc. If any small cracks appear during flattening, moisten your fingers slightly and gently smooth them over.
How long should I cook pupusas on each side, and how do I know when they’re done?
Cooking pupusas to perfection ensures a crispy exterior and a melted, gooey interior. Once placed on a lightly greased comal or non-stick skillet heated over medium heat, you should cook them for 5-7 minutes per side. The visual cues are important: look for a beautiful golden brown color, a slightly crispy texture, and distinct dark spots appearing on the surface. These indicators, along with the cheese inside becoming fully melted and soft, tell you your pupusas are ready to be removed and served immediately for the best experience.
Why is it important to lightly oil my hands when making pupusas?
Lightly oiling your hands is a small but crucial step that significantly simplifies the pupusa-making process. The masa dough, while pliable, can be quite sticky, especially when working with it for an extended period. Applying a thin layer of vegetable oil to your hands helps prevent the dough from sticking to your skin, making it much easier to roll the dough into balls, create the indentation, fill with cheese, and seal the edges without frustration. This ensures a smoother, more efficient shaping process, leading to perfectly formed pupusas.