The air fills with the fragrant whispers of pandan, a sweet, earthy embrace that promises an experience of tender chewiness and a smooth, melt-in-your-mouth filling. There’s nothing quite like the delicate dance of flavors in these vibrant green treats. I still remember the first time I tasted one, a tiny emerald jewel that transported me straight back to my childhood kitchen, where every sweet creation felt like pure magic.
Why You’ll Love This Recipe
You are absolutely going to adore these mooncakes! This recipe makes preparing these traditional delights surprisingly straightforward, transforming what seems complex into an achievable culinary adventure for any home cook. Beyond their ease, they boast an incredibly unique flavor profile, blending the subtle, aromatic notes of pandan with a creamy mung bean filling that’s simply irresistible. Their stunning appearance, with intricate designs pressed into the vibrant green skin, will impress everyone who sees them, making them perfect for special occasions or just a beautiful snack. Plus, there’s great versatility to customize the sweetness of the filling to perfectly suit your palate.
Ingredients
Here’s what you need for this delicious dish:
- **Glutinous Rice Flour** This special flour is key to achieving the distinctive soft and chewy texture of the snow skin dough, providing that delightful pliability. You will also use extra glutinous rice flour for dusting your molds, ensuring a clean release and maintaining those beautiful intricate patterns.
- **Wheat Starch** Partnering with glutinous rice flour, wheat starch contributes to the mooncake’s translucent appearance and delicate, smooth consistency, making the dough incredibly pleasant to handle and eat.
- **Powdered Sugar** Used in the snow skin dough, powdered sugar dissolves easily, ensuring a smooth batter and lending a subtle sweetness that balances the pandan flavor.
- **Coconut Milk** This creamy liquid provides richness and helps bind the snow skin dough, contributing to its luscious texture. For the filling, it adds an optional touch of velvety smoothness, enhancing the overall creaminess.
- **Vegetable Oil** A small amount of vegetable oil in both the dough and the filling helps to keep them pliable and prevents sticking, contributing to the smooth texture of the finished mooncakes.
- **Pandan Extract** This is the star ingredient for the “Pandan” in our mooncakes, infusing both the vibrant green color and that uniquely aromatic, slightly vanilla-like flavor that makes these treats so special. Use a good quality extract for the best results.
- **Salt** Just a pinch of salt enhances all the other flavors, making the sweetness of the sugar and the aroma of the pandan truly sing in both the dough and the filling.
- **Split Mung Beans** These form the foundation of our creamy, rich filling. Soaking them overnight or for at least four hours is crucial for softening them up, making them easy to steam and blend into a wonderfully smooth paste.
- **Granulated Sugar** This sweetens the mung bean filling. You can easily adjust the amount to your personal preference, ensuring the filling is perfectly balanced for your taste.
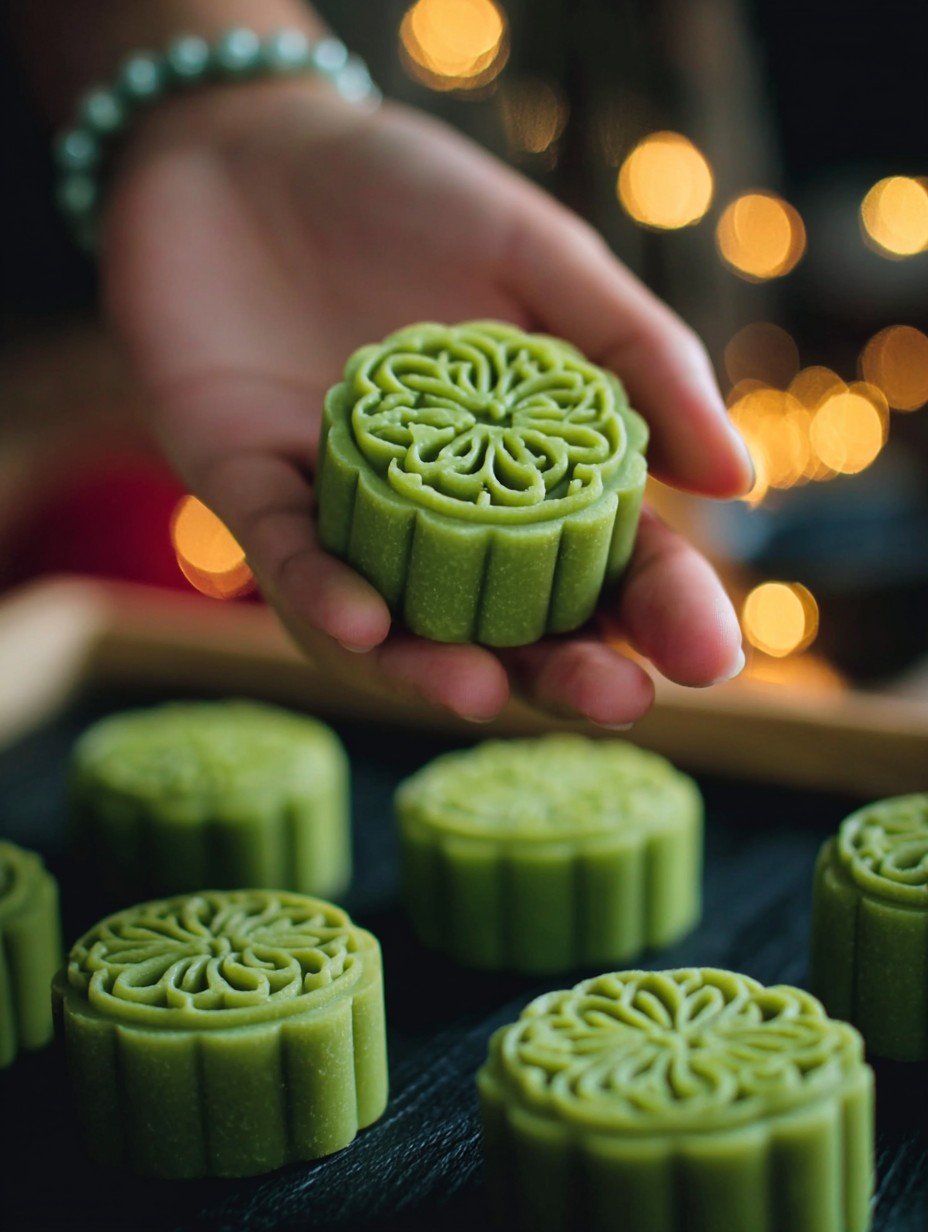
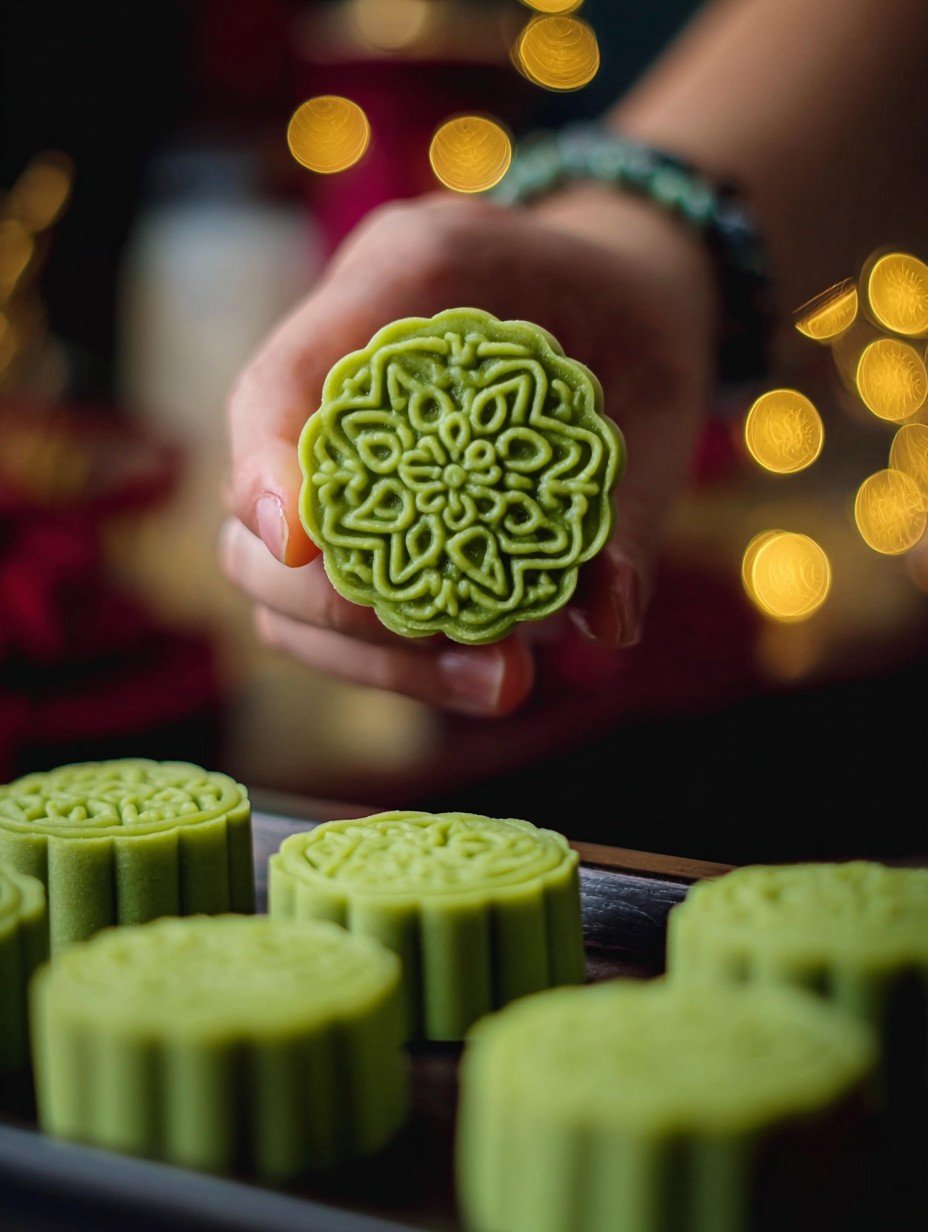
- **Mooncake Molds** Essential for the “Beautiful” aspect of these treats, mooncake molds allow you to press intricate designs onto your creations, transforming simple dough into stunning, artisanal pieces.
The complete ingredient list, including quantities, can be found directly under the recipe card.
Step-by-Step Instructions
Follow these simple steps to prepare this delicious dish:
Prepare the Mung Bean Filling
First, give your soaked mung beans a thorough rinse. Transfer them to a steamer and cook until they are incredibly soft, which usually takes about 20-25 minutes. Once steamed, move the soft beans to a food processor along with the granulated sugar, vegetable oil, coconut milk (if you are opting for a creamier texture), and a pinch of salt. Blend everything until you achieve a perfectly smooth paste. This step creates the rich, flavorful core of your mooncakes.
Cook the Filling
Once blended, transfer the mung bean paste into a non-stick pan. Place it over medium-low heat and stir continuously. You’ll need to dedicate about 15-20 minutes to this, or until the paste visibly thickens and starts to pull away cleanly from the sides of the pan. This cooking process reduces the moisture and ensures the filling holds its shape. Allow the cooked paste to cool completely before dividing it into equal portions. For 50g mooncakes, use 30g portions, and for 100g mooncakes, divide it into 60g portions. Roll each portion into a neat ball.
Prepare the Snow Skin Dough
In a large mixing bowl, combine the glutinous rice flour, wheat starch, powdered sugar, and a pinch of salt. Whisk these dry ingredients together until they are well combined. Gradually pour in the coconut milk, vegetable oil, and pandan extract. Stir continuously as you add the liquids, ensuring no lumps form, until you have a smooth, consistent batter. The pandan extract will give your dough its characteristic vibrant green hue.
Steam the Dough
Carefully pour the prepared snow skin batter into a heatproof dish. Cover the dish securely with plastic wrap or a plate. This covering is crucial to prevent any condensation from dripping into your dough during steaming, which could alter its texture. Steam the dough over high heat for 20-25 minutes, or until you observe that it has become translucent and fully cooked through. This steaming process transforms the batter into a pliable dough.
Knead the Dough
Once the dough is steamed, let it cool just enough so it’s warm and comfortable to handle, but not cold. Transfer the slightly warm dough to a clean surface that has been lightly oiled, or place it in a stand mixer fitted with a dough hook. Knead the dough for a good 5-10 minutes. This step is essential for developing its smooth, elastic texture and ensuring it is no longer sticky. After kneading, divide the dough into equal portions: 20g for 50g mooncakes, or 40g for 100g mooncakes.
Assemble the Mooncakes
Take your mooncake mold and lightly dust its interior with extra glutinous rice flour. Gently tap out any excess flour. Pick up one portion of the prepared snow skin dough and flatten it into a thin, even disc. Place one of the pre-rolled mung bean filling balls directly in the center of the dough disc. Carefully wrap the dough around the filling, making sure to completely enclose and seal it, creating a smooth, filled ball.
Mold the Mooncakes
Once your dough is filled, place the sealed ball into the dusted mooncake mold. Press down firmly on the plunger to imprint the beautiful, intricate design onto the mooncake. Then, gently push the plunger to release your perfectly shaped pandan mooncake. Repeat this process with all the remaining dough and filling until you have a tray of these stunning green treats.
Chill and Serve
Arrange your freshly molded mooncakes on a plate. Cover them loosely with plastic wrap to protect them. The final, essential step is to refrigerate them for at least 2-4 hours before you plan to serve them. This chilling period allows the flavors to meld beautifully and helps the delicate snow skin texture to firm up perfectly. Garnish with a fresh sprig of mint and serve immediately to enjoy the refreshing taste.
Tips for Crafting Beautiful Pandan Mooncakes at Home
Creating these vibrant mooncakes at home can be a truly rewarding experience, and a few insider tips can make all the difference. For starters, the distinctive color and flavor of these treats come primarily from the pandan extract. To ensure you achieve the most striking green hue and the fullest, most aromatic taste, always opt for a high-quality pandan extract. It genuinely elevates the entire experience of these homemade pandan mooncakes. Another critical detail, especially when aiming for those beautifully intricate designs, is to properly dust your mooncake molds. Make sure to use enough glutinous rice flour to prevent any sticking, but also tap out any excess. This ensures the patterns are crisp and clear without a powdery residue.
Furthermore, when preparing the mung bean filling, remember that sweetness is a matter of personal preference. The provided amount of granulated sugar is a good starting point, but don’t hesitate to adjust it to your preferred level. Taste the blended paste before you cook it down and add more sugar if you like it sweeter. This customization allows you to tailor these delightful treats exactly to your liking. Lastly, proper storage is key to enjoying these mooncakes at their best. Store any leftover mooncakes in an airtight container in the refrigerator. They will maintain their freshness and delicate texture for up to 3-4 days, allowing you to savor them over a few days.
The Allure of Snow Skin Mooncakes
Traditional baked mooncakes are wonderful, but there’s a unique charm to snow skin mooncakes that sets them apart. Unlike their baked counterparts, these delights feature an unbaked, soft, and chewy glutinous rice flour skin that is typically served chilled. This gives them a wonderfully refreshing quality, especially appealing in warmer climates. The texture is often described as mochi-like, yielding a delightful mouthfeel that perfectly complements the smooth, rich filling within. The “snow skin” name comes from their traditionally pale, often translucent appearance, though with the addition of pandan extract, we’re giving them a beautiful, natural green glow. Mastering how to craft beautiful pandan mooncakes at home means you’re creating a contemporary twist on a beloved classic.
Exploring Flavor Variations for Your Homemade Mooncakes
While this recipe for crafting beautiful pandan mooncakes at home is a fantastic starting point, the world of snow skin mooncakes invites creativity. Once you’ve mastered the basic technique, you might consider exploring different filling options beyond the classic mung bean. Imagine a taro paste filling for another earthy, subtly sweet flavor, or perhaps a black sesame paste for a nutty, robust alternative. For those who enjoy fruity notes, a sweet potato puree could also be a delightful choice, offering a different texture and natural sweetness. The beauty of these homemade treats lies in their adaptability. You could even experiment with natural food colorings like butterfly pea flower for a blue dough, or beetroot powder for a soft pink, always ensuring the flavors complement your chosen filling.
How to Enjoy Your Pandan Mooncakes
These pandan-infused treats are best enjoyed when served cold, directly from the refrigerator, allowing their refreshing qualities to truly shine. Their delicate texture and aromatic flavor make them a wonderful accompaniment to a cup of hot, unsweetened tea. A jasmine green tea or a light oolong would complement the pandan notes beautifully without overpowering them. They are perfect for an afternoon snack, a light dessert after a meal, or as a thoughtful gift for friends and family during festive seasons. Remember that these mooncakes are not meant to be warmed or baked; their charm lies in their cool, soft, and pliable state. Savor each bite, appreciating the craftsmanship you’ve put into creating these vibrant, delicious mooncakes.
Frequently Asked Questions About Pandan Mooncakes
Many home cooks have questions when they first embark on the journey of how to craft beautiful pandan mooncakes at home. Here are some common inquiries that might help you along the way.
**Q: Can I make the mung bean filling ahead of time?**
A: Absolutely! The mung bean filling can be prepared up to 2-3 days in advance. Store it in an airtight container in the refrigerator. Just ensure it reaches room temperature or is slightly pliable before you start rolling it into balls for assembly.
**Q: Why is my snow skin dough sticky?**
A: A sticky dough can happen for a few reasons. It might not have been kneaded long enough after steaming; kneading helps develop its elasticity and reduces stickiness. Also, ensure your work surface and hands are lightly oiled when handling the dough. If it’s still too sticky, you can try lightly dusting it with a tiny bit of extra glutinous rice flour, but be careful not to add too much, as it can make the dough tough.
**Q: Do these mooncakes need to be refrigerated?**
A: Yes, absolutely! These snow skin mooncakes contain fresh ingredients and are not baked, so they must be stored in the refrigerator. Chilling them also allows the flavors to meld and the texture to firm up, which is crucial for their delicate consistency.
**Q: Can I freeze snow skin mooncakes?**
A: While possible, freezing is not generally recommended for snow skin mooncakes as it can affect their delicate texture upon thawing, making them a bit tougher or watery. They are best enjoyed fresh within 3-4 days of preparation, stored in the refrigerator.
**Q: What if I don’t have mooncake molds?**
A: If you don’t have traditional mooncake molds, you can still make these delicious treats! You can shape the filled dough balls into simple round balls or even flattened discs. While they won’t have the intricate patterns, they will still be incredibly tasty. The key is to enjoy the process of how to craft beautiful pandan mooncakes at home, even if they look a little different.
Nutrition Information for Your Homemade Pandan Mooncakes
For those mindful of their dietary intake, here’s a general overview of the nutrition per serving for these delightful pandan mooncakes. Please remember these are estimates and can vary based on exact ingredient quantities and specific brands used. Each serving, which is roughly one mooncake, provides between 280-320 calories. You can expect about 6-8g of protein, contributing to a satisfying bite. The carbohydrate content ranges from 45-55g, providing energy. Fat content is between 10-14g per serving. These values highlight that while these are indulgent treats, they are also a source of energy and a small amount of protein, making them a wonderful occasional delight.
Bringing Home the Magic of Pandan Mooncakes
There you have it! A comprehensive guide on how to craft beautiful pandan mooncakes at home, bringing a touch of vibrant green magic and delicate flavor right into your kitchen. From preparing that luscious mung bean filling to carefully pressing the intricate designs, each step is a small act of culinary love. These mooncakes are more than just a dessert; they are a celebration of flavor, texture, and tradition, made accessible and enjoyable for every home cook. So gather your ingredients, set aside some time, and get ready to impress yourself and your loved ones with these stunning, aromatic creations. Happy mooncake making!
Perfecting the Cooking Process
To ensure your mooncakes turn out perfectly, always start by preparing and cooling the mung bean filling completely. This prevents the dough from melting during assembly. Next, steam your snow skin dough until translucent, then knead it thoroughly for that essential elastic texture. Chilling finished mooncakes for a few hours really enhances their delicate structure.
Add Your Personal Touch
While perfecting how to craft beautiful pandan mooncakes at home, feel free to customize. Adjust the granulated sugar in the mung bean filling for your ideal sweetness, or vary the pandan extract for a deeper color and stronger aromatic flavor. You can also experiment with different types of vegetable oil in both the dough and filling for subtle taste variations.
Storage & Reheating
To keep these delicate pandan mooncakes at their best, store them in an airtight container in the refrigerator for up to 3-4 days. This preserves their soft, pliable snow skin and the smooth, refreshing filling. For optimal enjoyment, always serve them chilled, as this allows the distinct flavors to meld and the texture to firm up beautifully.
Helpful Chef Tips
I remember the first time I pressed a pandan mooncake out of its mold; the intricate design felt like a tiny work of art. Sharing those vibrant green treats with my family, seeing their smiles, made all the effort worthwhile. It was pure joy.
Final Thoughts
As we conclude our journey, remember the joy of creating these vibrant treats. The subtle aroma of pandan, the beautiful green hue, and the satisfying texture of a soft, pliable skin giving way to a rich, smooth mung bean filling truly make these mooncakes a unique experience. They are not just desserts; they are edible artistry, a testament to thoughtful preparation and delightful flavors. There’s immense satisfaction in learning to make these cherished delicacies from scratch, transforming simple ingredients into something truly special. Don’t wait to bring this enchanting dessert to life in your own kitchen; gather your ingredients and start crafting these beautiful pandan delights today!
Print
How to Craft Beautiful Pandan Mooncakes at Home
- Total Time: 1 hour 15 minutes
- Yield: 8-10 (depending on mold size) 1x
Description
These Pandan Mooncakes present a vibrant green hue, offering a distinctive aromatic and subtly sweet pandan essence. Each mooncake features a soft, pliable outer skin encasing a smooth, rich filling. Crafted with traditional molds, they are typically chilled to achieve their delicate texture and refreshing taste, making them a delightful treat.
Ingredients
- For the Snow Skin Dough:
- 150g Glutinous Rice Flour
- 50g Wheat Starch
- 50g Powdered Sugar
- 250ml Coconut Milk
- 2 tablespoons Vegetable Oil
- 1 teaspoon Pandan Extract (or more for desired color and flavor)
- Pinch of salt
- For the Mung Bean Filling:
- 200g Split Mung Beans, soaked overnight or for at least 4 hours
- 100g Granulated Sugar (adjust to taste)
- 50ml Vegetable Oil
- 50ml Coconut Milk (optional, for creaminess)
- Pinch of salt
- For Assembly:
- Extra Glutinous Rice Flour (for dusting molds)
- Mooncake Molds (50g or 100g size)
Instructions
- **Prepare the Mung Bean Filling:** Rinse soaked mung beans thoroughly. Steam the mung beans until very soft, about 20-25 minutes. Transfer to a food processor with sugar, oil, coconut milk (if using), and salt. Blend until smooth.
- **Cook the Filling:** Transfer the blended mung bean paste to a non-stick pan over medium-low heat. Stir continuously for 15-20 minutes, or until the paste thickens and pulls away from the sides of the pan. Let it cool completely, then divide into equal portions (e.g., 30g for 50g mooncakes, 60g for 100g mooncakes). Roll into balls.
- **Prepare the Snow Skin Dough:** In a large bowl, whisk together glutinous rice flour, wheat starch, powdered sugar, and salt. Gradually add coconut milk, vegetable oil, and pandan extract, stirring until a smooth, lump-free batter forms.
- **Steam the Dough:** Pour the batter into a heatproof dish, cover with plastic wrap (or a plate) to prevent condensation from dripping in. Steam over high heat for 20-25 minutes, or until the dough is translucent and cooked through.
- **Knead the Dough:** Once steamed, let the dough cool slightly until it is warm enough to handle. Transfer to a clean, lightly oiled surface or a stand mixer with a dough hook. Knead for 5-10 minutes until smooth, elastic, and no longer sticky. Divide the dough into equal portions (e.g., 20g for 50g mooncakes, 40g for 100g mooncakes).
- **Assemble the Mooncakes:** Lightly dust your mooncake mold with glutinous rice flour and tap out any excess. Take one portion of dough and flatten it into a disc. Place a mung bean filling ball in the center. Carefully wrap the dough around the filling, sealing it completely.
- **Mold the Mooncakes:** Place the filled dough ball into the dusted mooncake mold. Press down firmly to imprint the design. Gently push the plunger to release the mooncake. Repeat with the remaining dough and filling.
- **Chill and Serve:** Arrange the finished mooncakes on a plate. Cover loosely with plastic wrap and refrigerate for at least 2-4 hours before serving. This allows the flavors to meld and the texture to firm up.
Notes
For the best color and flavor, use a high-quality pandan extract.
Ensure your mooncake molds are well-dusted with glutinous rice flour to prevent sticking.
Adjust the sugar in the filling to your preferred level of sweetness.
Store leftover mooncakes in an airtight container in the refrigerator for up to 3-4 days.
- Prep Time: 45 minutes
- Cook Time: 30 minutes
Nutrition
- Calories: 280-320 per serving
- Fat: 10-14g
- Carbohydrates: 45-55g
- Protein: 6-8g
FAQs
Why is it important to soak and steam the mung beans before blending them?
Soaking the split mung beans, ideally overnight or for at least four hours, is a crucial first step. This process rehydrates them, making them significantly softer and easier to steam effectively. Following the soaking, steaming the beans until they are very soft, for about 20-25 minutes, ensures they break down easily. Both steps are vital for achieving the ultra-smooth, creamy texture required for the filling. Without proper preparation, the filling might be gritty or difficult to blend into the desired consistency, which is essential for these delectable treats.
What is the significance of kneading the snow skin dough after steaming?
Kneading the snow skin dough for 5-10 minutes after it has been steamed and cooled slightly is a key step in achieving the ideal mooncake texture. This process transforms the warm, cooked dough into a smooth, pliable, and elastic consistency. It helps to develop the glutinous rice flour’s properties, making the dough easier to handle and less sticky when assembling the mooncakes. A well-kneaded dough will wrap beautifully around the mung bean filling and hold the intricate design from your mooncake molds, resulting in the perfect delicate outer layer.
How can I adjust the pandan flavor and color in my snow skin mooncakes?
Adjusting the pandan flavor and vibrant green color of your mooncakes is quite simple. The recipe suggests starting with one teaspoon of pandan extract, but you can certainly add more to achieve your desired intensity. If you prefer a bolder pandan aroma or a deeper green hue, simply incorporate a bit more extract when you are preparing the snow skin batter. For the most impactful and authentic pandan notes, it is highly recommended to use a high-quality pandan extract. This ensures both a beautiful color and a rich, distinctive flavor that defines these delightful pastries.
What is the best way to prevent the mooncakes from sticking to the molds?
To ensure your beautiful mooncakes release cleanly and perfectly from their molds, proper preparation is essential. Before placing your filled dough ball into the mold, lightly dust the inside of the mold with extra glutinous rice flour. It is crucial to then tap out any excess flour, as too much can leave a white residue on your finished mooncakes. This fine layer of flour acts as a non-stick barrier, allowing the intricate designs to transfer flawlessly onto your mooncakes. This simple but critical step guarantees a professional and appealing finish every time.