
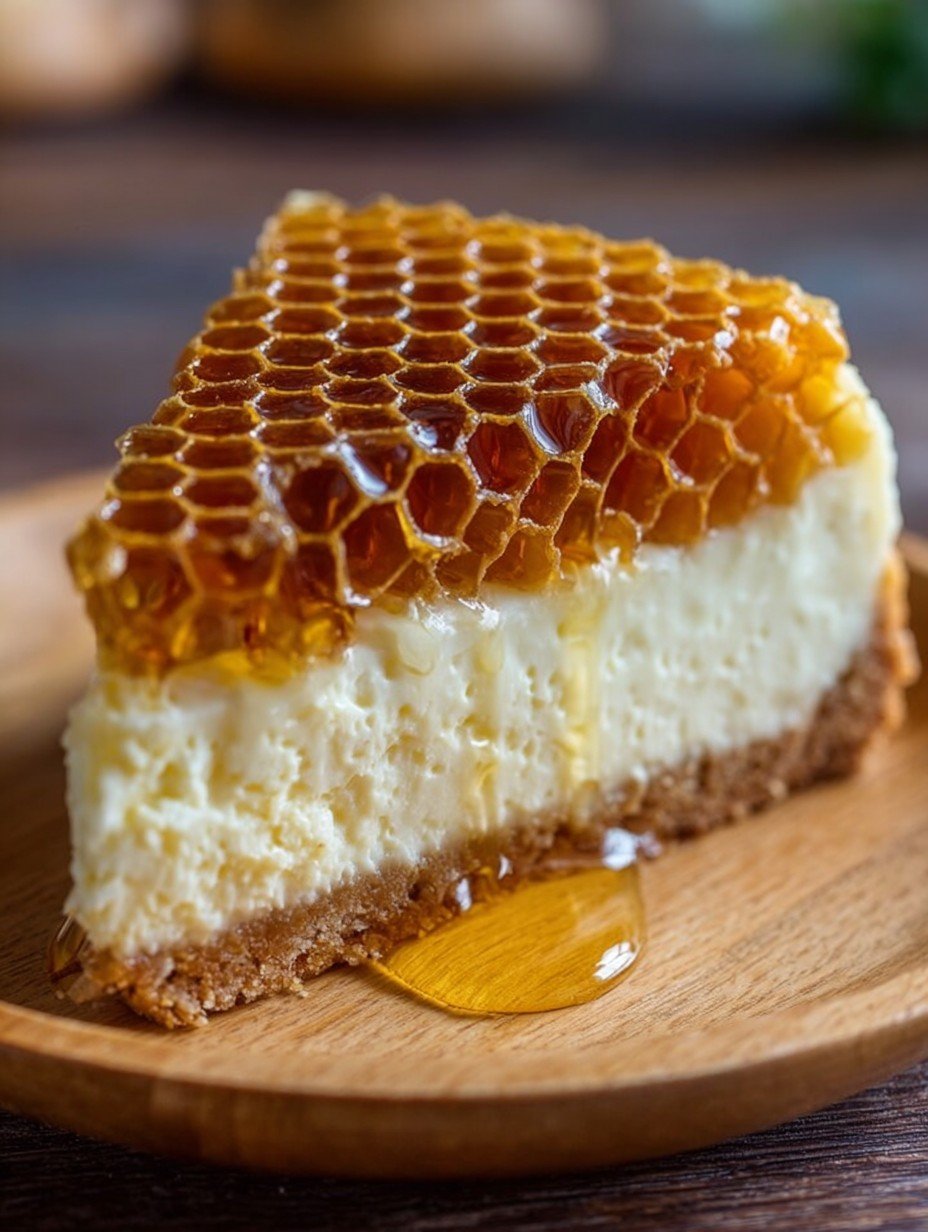
Imagine a dessert where rich, velvety cream cheese meets the satisfying crunch and golden sweetness of natural honeycomb. This Honeycomb Cheesecake: A Sweet Indulgence, delivers a symphony of textures and flavors that dance on your palate, a truly delightful experience.
I still remember the first time I attempted a cheesecake, convinced I’d end up with something resembling a fallen soufflé. My kitchen looked like a flour bomb went off, but the end result, though a bit wonky, was devoured with gusto, proving that even kitchen mishaps can lead to sweet victories.
Why You’ll Love This Recipe
This recipe is designed for effortless enjoyment, making it perfect for both seasoned bakers and eager beginners. It boasts a truly unique flavor profile, marrying the classic creamy tang of cheesecake with the distinct, floral notes and satisfying chew of natural honeycomb. Visually, it is simply stunning, destined to be the centerpiece of any gathering with its elegant topping. Plus, it offers delightful versatility; while perfect as is, it also welcomes creative garnishes if you ever want to add your own personal flair.
The Irresistible Allure of Honeycomb Cheesecake
There’s something truly magical about a perfectly crafted cheesecake. It’s a dessert that speaks of celebration, comfort, and a touch of elegance. But when you introduce the rustic charm and unique texture of natural honeycomb, you elevate the experience to an entirely new level. This isn’t just any dessert; it’s a culinary journey, a testament to the fact that sometimes, the simplest additions can create the most profound impact. The interplay between the smooth, delicate cheesecake and the intriguing bite of the honeycomb is what makes this particular treat so unforgettable. It’s an homage to sweetness, a delightful exploration of contrast, and frankly, a dessert that everyone will be talking about long after the last slice is gone. Preparing this Honeycomb Cheesecake: A Sweet Indulgence, is more than just baking; it’s an act of creating joy, piece by delicious piece. Whether you’re a cheesecake connoisseur or a newcomer to the world of creamy desserts, this recipe promises to deliver an experience that feels both familiar and excitingly new.
Gather Your Treasures: Ingredients for the Magic
Here’s what you need for this delicious dish:
- **1 ½ cups graham cracker crumbs** These form the sturdy, slightly spiced base, providing the perfect counterpoint to the creamy filling. They should be finely crushed for a uniform crust.
- **¼ cup granulated sugar** Just enough sugar to sweeten the crust without overpowering the graham crackers, contributing to the overall sweet indulgence.
- **½ cup unsalted butter, melted** The essential binding agent for our crust, ensuring it holds together beautifully and offers that satisfying buttery richness.
- **32 ounces (4 blocks) cream cheese, softened** This is the heart and soul of our cheesecake filling, providing that signature tangy, rich, and ultra-creamy texture. Ensure it’s fully softened to room temperature for a lump-free batter, which is crucial for a smooth Honeycomb Cheesecake: A Sweet Indulgence.
- **1 ½ cups granulated sugar** The primary sweetener for the filling, balancing the tang of the cream cheese and contributing to the luscious, sweet flavor profile.
- **4 large eggs, room temperature** These act as a binder and help set the cheesecake, giving it structure and that characteristic dense yet melt-in-your-mouth consistency. Having them at room temperature helps them incorporate smoothly into the batter.
- **1 cup sour cream, room temperature** Adds a wonderful tang and extra creaminess to the filling, enhancing its velvety texture and depth of flavor. Like the cream cheese, room temperature is key.
- **1 teaspoon vanilla extract** A classic flavor enhancer that brings warmth and a comforting aroma to the cheesecake, complementing the other sweet notes.
- **1 tablespoon fresh lemon juice (optional)** A touch of fresh lemon juice brightens the flavors of the cheesecake, offering a subtle zest that cuts through the richness, if you prefer that extra zing.
- **8 ounces natural honeycomb, cut into pieces** The star of our show, this topping delivers a unique chewy texture, a deep floral sweetness, and an unmistakable visual appeal, crowning our indulgent dessert. It’s the “honeycomb” element that makes this cheesecake truly special.
The complete ingredient list, including quantities, can be found directly under the recipe card.
Unveiling the Secrets: Step-by-Step to Perfection
Follow these simple steps to prepare this delicious dish:
Step 1: Crafting the Golden Crust
Begin by preheating your oven to 325°F (160°C). In a medium bowl, combine your 1 ½ cups of graham cracker crumbs, ¼ cup of granulated sugar, and ½ cup of melted unsalted butter. Mix these ingredients thoroughly until the crumbs are evenly moistened. Take this mixture and firmly press it into the bottom of a 9-inch springform pan, creating an even layer. Bake this crust for exactly 10 minutes. Once baked, remove it from the oven and allow it to cool slightly while you prepare the filling.
Step 2: Preparing for the Gentle Water Bath
This step is optional but highly recommended for a flawless cheesecake. To prepare for the water bath, carefully wrap the entire outside of your springform pan tightly with heavy-duty aluminum foil. Ensure there are no gaps or openings, as this will prevent any water from seeping into the pan during baking, which is crucial for avoiding a soggy crust.
Step 3: Mixing the Velvety Filling
In a large bowl, using an electric mixer on medium speed, beat the 32 ounces (4 blocks) of softened cream cheese until it reaches a perfectly smooth consistency. Gradually add the 1 ½ cups of granulated sugar, continuing to beat until the sugar is just combined with the cream cheese. Next, beat in the 4 large eggs, adding them one at a time and mixing only until each egg is just incorporated before adding the next. Finally, stir in the 1 cup of sour cream, 1 teaspoon of vanilla extract, and the 1 tablespoon of fresh lemon juice (if you’re using it). Mix gently until the entire mixture is smooth and creamy. Remember, it is important not to overmix the filling, especially after adding the eggs, as this can incorporate too much air and lead to cracks in your finished Honeycomb Cheesecake: A Sweet Indulgence.
Step 4: Setting Up the Bake
Carefully pour the creamy filling mixture over the cooled graham cracker crust in the prepared springform pan. Now, place the foil-wrapped springform pan into a larger roasting pan. Slowly and with great care, pour hot water into the roasting pan until the water level reaches approximately halfway up the sides of the springform pan. This water bath is essential for ensuring the cheesecake bakes evenly and helps prevent those dreaded cracks on the surface.
Step 5: The Gentle Bake
Place the roasting pan containing your cheesecake into the preheated oven. Bake for 60 to 75 minutes. The cheesecake is ready when the edges appear set, but the center still retains a slight jiggle when you gently shake the pan. This slight jiggle indicates a perfectly moist and tender interior, ensuring your sweet indulgence is cooked just right.
Step 6: Cooling Down to Perfection
Once the baking time is complete, turn off the oven, but do not remove the cheesecake immediately. Instead, crack the oven door open and allow the cheesecake to cool within the water bath for a full hour. This slow cooling prevents drastic temperature changes that can cause cracking. After one hour, carefully remove the springform pan from the water bath, unwrap the foil, and let it cool completely on a wire rack at room temperature. Once it has fully cooled, cover the cheesecake and refrigerate it for at least 6 hours, or ideally, overnight. This crucial chilling time is essential for the cheesecake to fully set and develop its perfect dense, yet melt-in-your-mouth texture.
Step 7: The Grand Topping and Serving
Once your Honeycomb Cheesecake: A Sweet Indulgence, is thoroughly chilled and set, carefully remove it from the springform pan. This is when the true magic happens! Just before you are ready to serve, artfully arrange the pieces of natural honeycomb over the top of the cheesecake. Garnish with a sprig of fresh mint or a few berries for an extra touch of color and serve immediately to enjoy the harmonious blend of creamy, tangy, and sweet textures.
Tips for Cheesecake Triumph
Achieving cheesecake perfection is surprisingly simple with a few key insights. Firstly, ensure all your dairy ingredients for the filling – that’s your cream cheese, eggs, and sour cream – are at room temperature. This isn’t just a suggestion; it’s a golden rule for a smooth, lump-free batter that will bake evenly. Another critical point, especially after adding the eggs to the filling, is to avoid overmixing. Whipping in too much air can lead to unfortunate cracks in the cheesecake’s beautiful surface. The water bath, as mentioned in the instructions, is truly your secret weapon. It provides a moist baking environment that ensures your cheesecake bakes evenly, prevents those dreaded cracks, and contributes to that wonderfully creamy texture. Lastly, but perhaps most importantly, do not skimp on the chilling time. Allowing the cheesecake to refrigerate for at least 6 hours, or preferably overnight, is absolutely essential. This extended chilling period allows the cheesecake to fully set, firm up, and develop its signature dense and utterly delightful consistency. Patience, in this case, is truly a virtue, yielding an indulgent reward.
Beyond the Slice: Serving Suggestions and Storage
This Honeycomb Cheesecake: A Sweet Indulgence, is an absolute showstopper on its own, with its stunning honeycomb topping delivering both visual appeal and unique texture. For an extra touch of elegance, consider a light dusting of powdered sugar or a simple berry coulis on the side, allowing guests to customize their sweet journey. This dish serves 12 people generously, making it ideal for gatherings and celebrations where you want to impress. Each delightful slice comes in at approximately 450 calories, offering 9 grams of protein, 48 grams of carbohydrates, and 32 grams of fat, providing a substantial and truly satisfying treat. If you find yourself with any glorious leftovers – a rare occurrence, I assure you – simply cover the cheesecake tightly and store it in the refrigerator. It will maintain its deliciousness for up to 4-5 days, ready to bring a moment of joy whenever the craving for something extraordinary strikes.
A Final Sweet Thought
Creating this Honeycomb Cheesecake: A Sweet Indulgence, is more than just following a recipe; it’s about crafting an experience. It’s an opportunity to create something beautiful and incredibly delicious, proving that sometimes, the simplest ingredients, combined with a little love and patience, can yield the most extraordinary results. So go ahead, whip up this amazing dessert, gather your loved ones, and savor every single, glorious bite.
Perfecting the Cooking Process
For a flawless result, always ensure your cream cheese, eggs, and sour cream are at room temperature; it’s the secret to that velvety-smooth filling. Also, don’t skip the water bath; it’s a simple step that guarantees an evenly baked and crack-free dessert, making your Honeycomb Cheesecake a true showstopper.
Add Your Personal Touch
Feeling adventurous? While the graham cracker crust is a classic, you could experiment with other crumbly biscuits like digestive biscuits or shortbread for a slightly different base texture. For a citrusy twist on the filling, feel free to increase the fresh lemon juice for an extra zing, or omit it entirely if you prefer a pure vanilla essence.
Storage & Reheating
To keep your delightful creation fresh, store any leftover Honeycomb Cheesecake covered tightly in the refrigerator for up to 4-5 days. To maintain the elegant look and prevent the honeycomb from softening, only arrange the pieces of natural honeycomb on top of individual slices just before serving.
Helpful Chef Tips
I once baked this glorious treat for a summer potluck, and a little bee actually tried to land on a slice of my Honeycomb Cheesecake. It was a hilarious, sticky, and undeniably sweet moment everyone still talks about!
Final Thoughts
As you embark on creating this extraordinary dessert, imagine the irresistible aroma filling your kitchen. The result is a symphony of textures and flavors: a buttery graham cracker crust, a rich, creamy filling, and the delightful chew of natural honeycomb. This sweet indulgence is more than just a recipe; it’s an experience. Perfect for gatherings or a luxurious treat, this splendid cheesecake promises to impress. Its elegant appearance and exquisite taste will delight your guests. Don’t wait—gather your ingredients and treat yourself to a truly remarkable dessert today!
Print
Honeycomb Cheesecake: A Sweet Indulgence
- Total Time: 1 hour 40 minutes
- Yield: 12 1x
Description
This cheesecake offers a harmonious blend of creamy, tangy filling set upon a buttery biscuit crust. It is elegantly crowned with a layer of natural honeycomb, providing a unique chewiness and a rich, floral sweetness that complements the smooth texture of the cheesecake. The dessert is baked to a delicate perfection, then chilled to achieve its signature dense yet melt-in-your-mouth consistency.
Ingredients
- For the Crust:
- 1 ½ cups graham cracker crumbs
- ¼ cup granulated sugar
- ½ cup unsalted butter, melted
- For the Filling:
- 32 ounces (4 blocks) cream cheese, softened
- 1 ½ cups granulated sugar
- 4 large eggs, room temperature
- 1 cup sour cream, room temperature
- 1 teaspoon vanilla extract
- 1 tablespoon fresh lemon juice (optional)
- For the Topping:
- 8 ounces natural honeycomb, cut into pieces
Instructions
- **Prepare the Crust:** Preheat oven to 325°F (160°C). In a medium bowl, combine graham cracker crumbs, sugar, and melted butter. Press the mixture firmly into the bottom of a 9-inch springform pan. Bake for 10 minutes. Remove from oven and let cool slightly.
- **Prepare Water Bath (Optional but Recommended):** Wrap the outside of the springform pan tightly with heavy-duty aluminum foil to prevent water from seeping in.
- **Make the Filling:** In a large bowl, using an electric mixer on medium speed, beat softened cream cheese until smooth. Gradually add sugar, beating until just combined. Beat in eggs one at a time, mixing until just incorporated after each addition. Stir in sour cream, vanilla extract, and lemon juice (if using) until the mixture is smooth and creamy. Do not overmix.
- **Bake the Cheesecake:** Pour the filling over the cooled crust in the springform pan. Place the foil-wrapped springform pan into a larger roasting pan. Carefully pour hot water into the roasting pan until it reaches about halfway up the sides of the springform pan.
- **Bake:** Bake for 60-75 minutes, or until the edges are set but the center still jiggles slightly when gently shaken.
- **Cool and Chill:** Turn off the oven, crack the door open, and let the cheesecake cool in the water bath for 1 hour. Remove from the water bath, remove foil, and let cool completely on a wire rack at room temperature. Once cool, cover and refrigerate for at least 6 hours, or preferably overnight, until thoroughly chilled and set.
- **Add Topping and Serve:** Once chilled, carefully remove the cheesecake from the springform pan. Arrange pieces of natural honeycomb over the top of the cheesecake just before serving.
Notes
Ensure all dairy ingredients for the filling are at room temperature for a smooth, lump-free batter.
Avoid overmixing the cheesecake filling once eggs are added, as this can incorporate too much air and lead to cracks.
The water bath is crucial for even baking and preventing cracks in the cheesecake surface.
Allow ample chilling time; this is essential for the cheesecake to fully set and develop its texture.
Store leftover cheesecake covered in the refrigerator for up to 4-5 days.
- Prep Time: 30 minutes
- Cook Time: 70 minutes
Nutrition
- Calories: 450
- Fat: 32g
- Carbohydrates: 48g
- Protein: 9g
FAQs
Why is a water bath recommended for baking this cheesecake?
A water bath, while optional, is highly recommended for baking this cheesecake. It creates a moist, consistent cooking environment, which helps the cheesecake bake evenly from the edges to the center. This gentle heat distribution is crucial for preventing the surface from cracking, ensuring your dessert has that beautiful, smooth finish we all desire. Simply wrap your springform pan with foil, place it in a larger roasting pan, and fill with hot water partway up the sides before baking.
What is the importance of using room temperature ingredients for the filling?
Using room temperature ingredients, especially for the cream cheese and sour cream, is key to achieving the incredibly smooth and lump-free cheesecake batter. When ingredients like cream cheese are cold, they tend to be firm and do not blend well, often leading to a lumpy texture. Allowing them to come to room temperature ensures they mix effortlessly, creating a perfectly homogenous and creamy filling for your baked dessert. This attention to detail contributes significantly to the final texture.
How can I prevent cracks from forming on the surface of the cheesecake?
To prevent cracks on your dessert, several steps are crucial. Firstly, using a water bath during baking is highly recommended, as it provides a moist environment that promotes even cooking and reduces the risk of cracking. Secondly, avoid overmixing the filling, especially after adding the eggs, as this can incorporate too much air. Finally, allowing the cheesecake to cool slowly in the oven with the door cracked open for an hour, followed by complete cooling at room temperature, and then thorough chilling, helps prevent sudden temperature changes that can cause cracks.
When is the best time to add the natural honeycomb topping?
The best time to add the natural honeycomb topping is just before serving your chilled cheesecake. The instruction specifically guides you to arrange pieces of the delicate honeycomb over the top once the cheesecake has been thoroughly chilled and removed from the springform pan. Adding it at this stage ensures the honeycomb retains its unique texture and visual appeal without softening or melting into the creamy surface during the cooling or chilling process. This preserves its distinct chewiness and rich, floral sweetness.