Imagine the gentle perfume of pandan meeting the sweet caress of honey, all wrapped in a wonderfully chewy, spongy cake. Its vibrant green and intricate texture are truly a sight to behold.
I remember the first time I tasted something like this; it was at a bustling street food market, and I thought I’d found a portal to dessert heaven. Now, I’m bringing that magic to your kitchen!
Why You’ll Love This Recipe
You’re about to discover a dessert that combines stunning elegance with surprising simplicity. This delightful creation, with its unique honeycomb texture and vibrant green hue from the pandan, looks incredibly impressive but is remarkably easy to prepare. The distinct, subtly sweet and aromatic pandan flavor pairs beautifully with a delicate honey drizzle, offering a taste experience unlike any other. Plus, its beautiful layers of creamy coconut and intricate air pockets make it a truly gorgeous centerpiece for any gathering, proving that homemade can absolutely be show-stopping.
Ingredients
Here’s what you need for this delicious dish:
- **Tapioca starch** This is your secret weapon for that signature chewy, bouncy texture that gives the cake its spring. It’s essential for creating those beautiful air pockets that resemble a honeycomb pattern.
- **Rice flour** Used in conjunction with tapioca starch, rice flour helps provide structure to the cake while maintaining a light, tender crumb.
- **Granulated sugar** Essential for sweetening the cake batter, ensuring a balanced flavor that complements the pandan and honey.
- **Instant dry yeast** The magic ingredient that creates the airy, open structure characteristic of a honeycomb cake, allowing those gorgeous tunnels to form.
- **Warm coconut milk (about 105-115F)** The ideal temperature is crucial for activating the yeast, ensuring your cake gets the lift and texture it needs. It also adds a lovely richness to the batter.
- **Large eggs** These contribute to the cake’s structure, richness, and help bind the ingredients together for a cohesive batter.
- **Pandan extract** This provides the distinctive aromatic flavor and the beautiful, vibrant green color that makes this cake so visually appealing. Choose a good quality extract for the most authentic taste.
- **Salt** A pinch of salt enhances all the other flavors, bringing out the sweetness and the subtle pandan notes.
- **Vegetable oil (for greasing pan)** Crucial for ensuring the cake doesn’t stick and can be easily removed, preserving its delicate structure and beautiful exterior.
- **Full-fat coconut cream, chilled overnight** Chilling allows the thick cream to separate from the liquid, making it easy to whip into a light, fluffy, and stable frosting for your layers.
- **Powdered sugar** Used to sweeten the whipped coconut cream, dissolving easily to create a smooth, lump-free texture.
- **Vanilla extract** Adds a touch of warmth and aromatic sweetness to the coconut cream, complementing the pandan.
- **Honey** This forms the simple yet irresistible syrup topping, adding a final layer of golden sweetness and a beautiful sheen to the dessert.
- **Hot water** Used to thin the honey into a pourable syrup, making it easy to drizzle evenly over the finished cake.
The complete ingredient list, including quantities, can be found directly under the recipe card.
My Kitchen Confessions: Embracing the Honeycomb Dream
Before we dive into the nitty-gritty of baking, let’s talk about the journey of baking this specific cake. My kitchen has seen its share of baking experiments – some glorious, some… less so. There was that one time I attempted a soufflé, and it promptly deflated faster than my hopes on a Monday morning. But this recipe, this glorious pandan honeycomb cake, is different. It’s a testament to patient effort yielding spectacular rewards. The first time I saw those perfect little tunnels forming, I almost did a victory dance in my kitchen, oven mitts and all. It’s a process that builds anticipation, from the gentle rise of the batter to the moment you slice into it and reveal its mesmerizing interior. Don’t rush it, trust the process, and soon you’ll be basking in the glow of your own baking triumph. It’s more than just a recipe; it’s an edible art project that tastes like a dream.
Mastering the Art of the Rise: Key to the Perfect Texture
The secret to this particular cake’s unique texture lies in its fermentation and baking process. The yeast isn’t just there for a basic rise; it’s actively working to create those distinct air pockets that give the cake its chewy, spongy feel and its gorgeous honeycomb structure. Think of it like a natural aeration process. This isn’t your average fluffy cake; it’s something special, a delightful textural experience. The warm coconut milk provides the perfect environment for the yeast to thrive, and the resting period allows the batter to develop those crucial bubbles. It might seem like a long wait, but every minute is contributing to the magic that happens in your oven. Just imagine cutting into those soft, chewy layers, each one infused with the subtle fragrance of pandan and a hint of natural sweetness. This isn’t just baking; it’s a careful orchestration of ingredients and time, all working towards that satisfying first bite. The end result is a cake that is both visually striking and incredibly rewarding to eat, a true culinary delight.
Step-by-Step Instructions
Follow these simple steps to prepare this delicious dish:
Step 1: Activate the Yeast for Foamy Goodness
In a small bowl, combine the warm coconut milk, one tablespoon of the granulated sugar, and the instant dry yeast. Stir this mixture gently until everything is just combined. Let it sit undisturbed for 10 to 15 minutes, allowing the yeast to activate fully; you’ll know it’s ready when a noticeable foamy layer appears on the surface. This crucial step ensures the cake will develop its signature honeycomb texture.
Step 2: Combine the Dry Baking Essentials
In a large mixing bowl, thoroughly whisk together the tapioca starch, rice flour, the remaining granulated sugar, and the salt. Ensure there are no lumps and the ingredients are evenly distributed, preparing a smooth base for the liquid components. This blend of flours is key to the cake’s unique chewiness.
Step 3: Prepare the Liquid Elements
In a separate bowl, lightly beat the large eggs until just combined, without over-whipping. Next, carefully add the pandan extract directly into your activated, foamy yeast mixture. Stir gently to incorporate the vibrant extract, ensuring it distributes evenly for consistent color and flavor.
Step 4: Create and Rest the Batter
Gradually pour the yeast mixture containing the pandan extract, along with the lightly beaten eggs, into the bowl with your dry ingredients. Whisk continuously and smoothly until a completely lump-free, homogeneous batter forms. Once the batter is smooth, cover the bowl tightly with plastic wrap and place it in a warm spot in your kitchen. Allow it to rest for 2 to 3 hours, or until you observe the batter has risen slightly and small, visible bubbles have formed on its surface.
Step 5: Preheat and Prepare the Baking Vessel
Preheat your oven to 350F (175C). While the oven heats, generously grease a 9-inch round cake pan with vegetable oil, ensuring all interior surfaces are well-coated. Place the greased pan into the preheated oven for 10 minutes. This critical step warms the pan, which is essential for achieving the distinct honeycomb texture in the cake.
Step 6: Bake the Pandan Honeycomb Cake
Once the oven and pan are hot, gently stir the rested batter to release some of the accumulated air, but do not overmix. Carefully pour the batter into the hot, greased cake pan. Immediately place the pan into the preheated oven and bake for 40 to 50 minutes. The cake is done when a wooden skewer inserted into its center comes out clean and the top has achieved a beautiful golden brown hue.
Step 7: Cool Down for Structural Integrity
Upon removing the cake from the oven, let it cool undisturbed in the pan for 10 minutes. This allows the cake to firm up slightly and prevent sticking. After 10 minutes, carefully invert the cake onto a wire rack to cool completely. Ensure it is absolutely cool before proceeding to the next steps, as a warm cake will melt the delicate coconut cream.
Step 8: Whip the Creamy Coconut Layer
While the cake cools, retrieve your can of full-fat coconut cream, which should have been chilled overnight. Carefully scoop only the thick, solidified coconut cream from the top into a mixing bowl, discarding any clear liquid at the bottom of the can. Add the powdered sugar and vanilla extract. Using an electric mixer, beat the mixture on medium-high speed for about 3 to 5 minutes until it becomes light, fluffy, and forms soft peaks.
Step 9: Assemble the Gorgeous Cake Layers
Once the cake is completely cool, use a serrated knife to carefully slice it horizontally into two even layers. Place the bottom cake layer onto your serving plate. Evenly spread half of the whipped coconut cream over this bottom layer. Gently place the top cake layer over the cream. Then, spread the remaining whipped coconut cream uniformly over the top surface of the second cake layer, creating a smooth and appealing finish.
Step 10: Craft the Simple Honey Drizzle
In a small bowl, combine the honey and hot water. Whisk these two ingredients together thoroughly until they are completely combined and the honey has dissolved into a smooth, pourable syrup. This will be the crowning glory for your dessert.
Step 11: Drizzle and Serve with a Flourish
Just before serving, generously drizzle the freshly prepared honey syrup over the entire assembled cake. Allow the golden syrup to cascade down the sides slightly, adding both visual appeal and an extra layer of sweetness. Slice into generous portions and serve immediately to delight in the unique texture and wonderful flavor combination of this Gorgeous Pandan Honeycomb Cake Layers with Honey.
Beyond the Plate: Perfect Pairings and Storage Tips
Now that you’ve created this magnificent dessert, let’s talk about how to make the most of it. This cake is truly a star on its own, but its delicate flavor profile also makes it incredibly versatile. Imagine serving a slice alongside a refreshing cup of green tea or a light, fruity sorbet. The coolness of the sorbet would beautifully contrast with the cake’s chewy texture and the warmth of the honey. For an extra touch of elegance, consider a sprinkle of toasted coconut flakes or a few fresh pandan leaves (if you can find them) for garnish, enhancing both the visual appeal and the aromatic experience. The vibrant green of the cake is already a showstopper, but a thoughtful pairing elevates it further.
When it comes to leftovers – and let’s be honest, there might not be many – proper storage is key to preserving its unique qualities. To keep your cake at its best, store it in an airtight container in the refrigerator. The distinct chewiness and the creamy coconut layer will maintain their texture for up to 3 days. However, for the absolute best experience, I always recommend enjoying this delectable treat within the first day or two. The vibrant pandan notes and the delightful texture are truly at their peak when fresh. If you plan to serve it to guests, you might even consider chilling it slightly before serving for a refreshing twist, especially on a warm day.
The Journey to Baking Bliss: A Few Final Thoughts
Baking, for me, is more than just following steps; it’s an act of creation, a moment of mindfulness, and a way to share joy. This Gorgeous Pandan Honeycomb Cake Layers with Honey is a perfect example of how simple ingredients, when handled with a little patience and care, can transform into something truly extraordinary. Don’t be intimidated by the unique honeycomb texture; it’s a delightful discovery waiting to happen in your kitchen. The first time you cut into it and see those perfect tunnels, you’ll feel an immense sense of accomplishment. It’s a rewarding experience, from the fragrant aroma filling your home to the satisfied smiles of everyone who takes a bite. Embrace the process, have fun with it, and remember that every perfectly imperfect crumb tells a delicious story.
**Servings: ** 8-10
**Nutrition Information (per serving): **
Calories: 350 kcal
Protein: 3g
Carbs: 55g
Fat: 14g
**Important Notes for Success: **
For the best honeycomb texture, ensure your oven and cake pan are very hot before pouring in the batter. This initial burst of heat is crucial. Do not overmix the batter after the final rise; a gentle stir is sufficient to release some air without deflating the structure. Chilling the full-fat coconut cream overnight is absolutely crucial for achieving a thick, whipped consistency for your creamy layers. Lastly, for a truly vibrant color and authentic flavor, use good quality pandan extract. Your taste buds will thank you!
Mastering the Secrets of Cooking
Mastering this cake involves smart sequencing. Activate the yeast and allow the batter to rise completely for its signature honeycomb texture. While the cake cools, prepare your chilled coconut cream. This ensures all components are perfectly ready for seamless assembly, guaranteeing a delightful result.
Make Your Recipe Unique
Make this cake uniquely yours! Consider swapping the vanilla extract in the coconut cream for a hint of almond for a nutty note. You could also replace the honey in the syrup with maple syrup for a different kind of sweetness. These small changes create a distinct flavor profile.
Smart Storage & Reheating
To preserve the cake’s unique chewy-spongy texture and the coconut cream’s fluffiness, store any remaining slices in an airtight container in the refrigerator. Enjoy this chilled treat within three days. Avoid reheating, as it can negatively impact the delicate structure and creamy layers.
The Chef’s Golden Tips
The first time I sliced this cake, seeing its perfect honeycomb, was pure magic! Sharing that vibrant green, fragrant pandan dessert with loved ones created an unforgettable, sweet memory.
Final Thoughts
You’ve just unveiled a creation that’s as delightful to behold as it is to taste. This Gorgeous Pandan Honeycomb Cake Layers with Honey offers a truly unique experience, with its captivating green hue, aromatic pandan essence, and distinct chewy-spongy texture. The luscious coconut cream layers provide a beautiful counterpoint, all brought together by that delicate drizzle of golden honey. It’s more than just a dessert; it’s an adventure for your senses. Don’t just read about it—step into your kitchen and let the magic unfold!
Print
Gorgeous Pandan Honeycomb Cake Layers with Honey
- Total Time: 1 hour 10 minutes
- Yield: 8-10 1x
Description
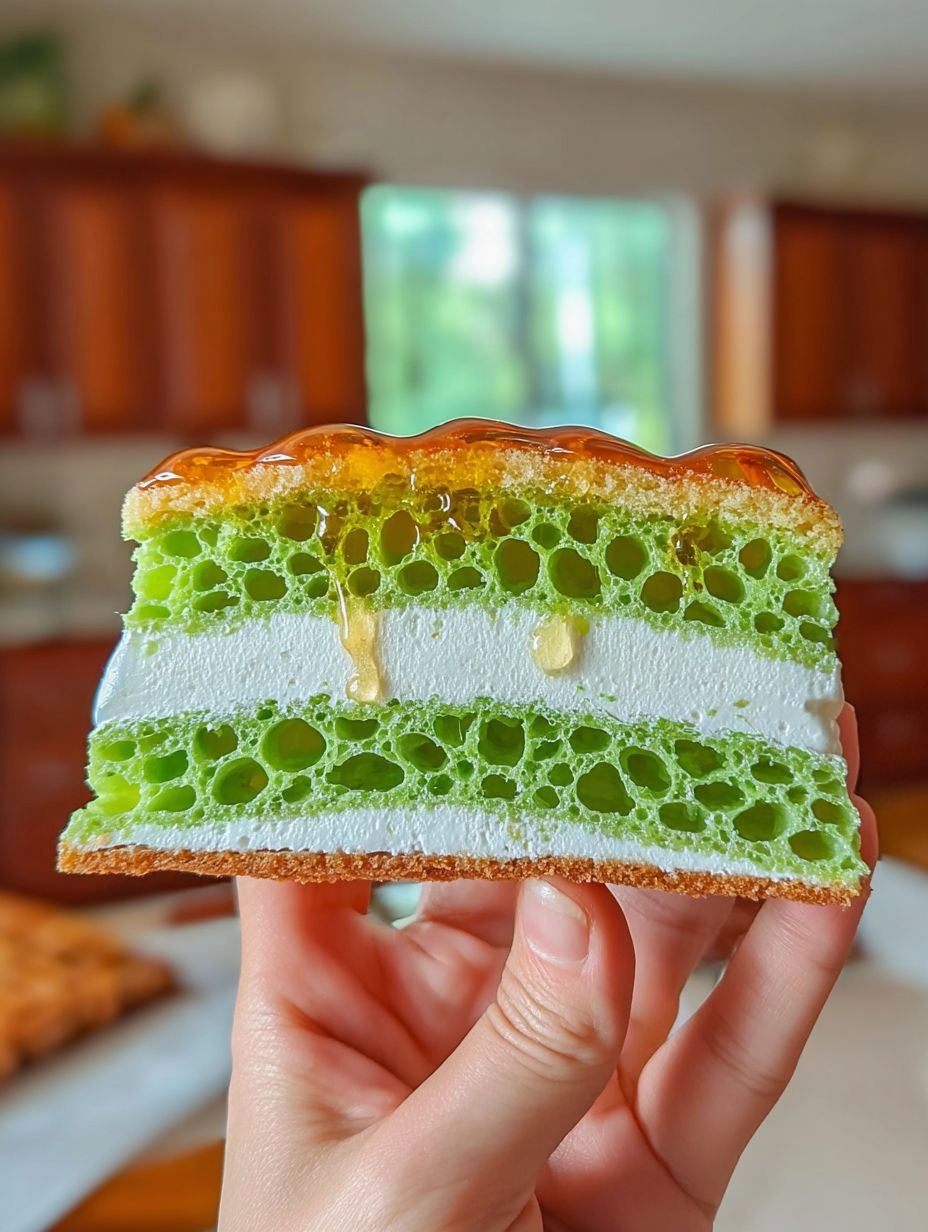
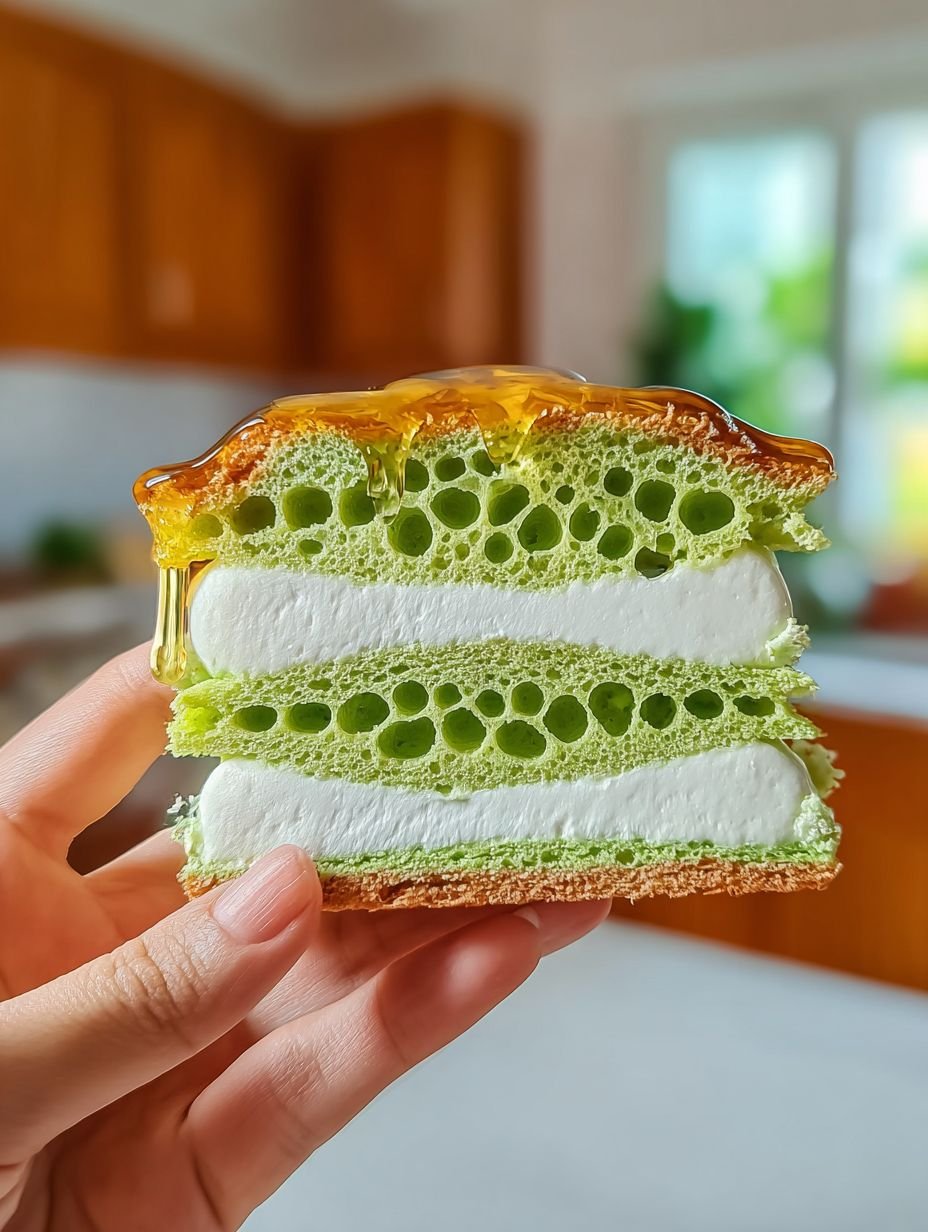
This Vietnamese Honeycomb Cake features a vibrant green hue, characteristic of pandan, offering a subtly fragrant and sweet flavor profile. Its unique texture is both chewy and spongy, showcasing an intricate network of air pockets that resemble a honeycomb. Layers of light, creamy coconut complement the cake’s distinctive chew, all finished with a delicate drizzle of golden honey syrup.
Ingredients
- For the Honeycomb Cake:
- 1 cup tapioca starch
- 1/4 cup rice flour
- 1 cup granulated sugar
- 1 teaspoon instant dry yeast
- 1 cup warm coconut milk (about 105-115F)
- 2 large eggs
- 1 teaspoon pandan extract
- 1/4 teaspoon salt
- 1 tablespoon vegetable oil (for greasing pan)
- For the Coconut Cream Layer:
- 1 can (13.5 oz) full-fat coconut cream, chilled overnight
- 1/4 cup powdered sugar
- 1/2 teaspoon vanilla extract
- For the Honey Syrup Topping:
- 1/4 cup honey
- 1 tablespoon hot water
Instructions
- **Prepare the Yeast Mixture:** In a small bowl, combine the warm coconut milk, 1 tablespoon of the granulated sugar, and instant dry yeast. Stir gently and let it sit for 10-15 minutes until foamy.
- **Mix Dry Ingredients:** In a large bowl, whisk together the tapioca starch, rice flour, remaining granulated sugar, and salt.
- **Combine Wet Ingredients:** In a separate bowl, lightly beat the eggs. Add the pandan extract to the yeast mixture.
- **Form the Batter:** Gradually pour the yeast mixture and beaten eggs into the dry ingredients, whisking continuously until a smooth batter forms. Cover the bowl with plastic wrap and let it rest in a warm place for 2-3 hours, or until the batter has risen slightly and shows small bubbles.
- **Prepare for Baking:** Preheat your oven to 350F (175C). Grease a 9-inch round cake pan generously with vegetable oil. Place the greased pan in the preheated oven for 10 minutes to heat up. This helps create the honeycomb texture.
- **Bake the Cake:** Stir the rested batter gently to release some air. Carefully pour the batter into the hot greased pan. Bake for 40-50 minutes, or until a wooden skewer inserted into the center comes out clean and the top is golden brown.
- **Cool the Cake:** Once baked, remove the cake from the oven. Let it cool in the pan for 10 minutes before inverting it onto a wire rack to cool completely.
- **Prepare Coconut Cream:** While the cake cools, scoop the thick coconut cream from the chilled can into a mixing bowl (discard any clear liquid). Add powdered sugar and vanilla extract. Beat with an electric mixer on medium-high speed until light and fluffy, about 3-5 minutes.
- **Assemble the Cake:** Once the cake is completely cool, carefully slice it horizontally into two even layers. Spread half of the whipped coconut cream evenly over the bottom layer. Place the top cake layer over the cream. Spread the remaining coconut cream over the top of the second cake layer.
- **Prepare Honey Syrup:** In a small bowl, whisk together honey and hot water until well combined.
- **Serve:** Drizzle the honey syrup generously over the assembled cake before serving.
Notes
For the best honeycomb texture, ensure your oven and cake pan are very hot before pouring in the batter.
Do not overmix the batter after the final rise; a gentle stir is sufficient.
Chilling the coconut cream overnight is crucial for achieving a thick, whipped consistency.
Use good quality pandan extract for a vibrant color and authentic flavor.
- Prep Time: 20 minutes
- Cook Time: 50 minutes
Nutrition
- Calories: 350 kcal
- Fat: 14g
- Carbohydrates: 55g
- Protein: 3g
FAQs
How do I ensure the characteristic honeycomb texture in this cake?
Achieving the unique honeycomb texture, which is a hallmark of this Pandan Honeycomb Cake, relies on a couple of critical steps mentioned in the recipe. Firstly, it’s essential to preheat your oven to 350F (175C) and generously grease your 9-inch round cake pan with vegetable oil. Then, place the greased pan in the hot oven for 10 minutes before pouring in the batter. This initial heat helps activate the ingredients and creates those intricate air pockets. Additionally, allowing the batter to rest for 2-3 hours as specified ensures the yeast develops properly, contributing to the distinct internal structure.
Why is it important to chill the coconut cream overnight?
Chilling the full-fat coconut cream overnight, as instructed, is a crucial step for the creamy layers of your cake. When a can of full-fat coconut cream is chilled, the thick, solid cream separates from the thinner, clear liquid. This allows you to easily scoop out only the rich, dense cream for whipping. Attempting to whip unchilled coconut cream will not yield the desired light and fluffy consistency needed for the layers, as it will remain too liquidy. This ensures your coconut cream layer is firm and delicious.
What is pandan extract, and how does it contribute to this recipe?
Pandan extract is a flavoring derived from pandan leaves, a tropical plant widely used in Southeast Asian cuisine. In this Gorgeous Pandan Honeycomb Cake, it serves a dual purpose: providing both the vibrant green color and a distinct, subtly fragrant, and sweet flavor. The recipe calls for 1 teaspoon of this extract, which infuses the cake with its characteristic aromatic profile, making it instantly recognizable and delightful. Using a good quality extract, as noted, will enhance both the hue and the authentic taste experience.
How long should the cake batter rest, and why is this step important?
The cake batter needs to rest in a warm place for 2-3 hours after mixing, or until it has risen slightly and shows small bubbles. This resting period is crucial for the instant dry yeast, which was activated earlier with warm coconut milk and sugar, to work its magic. During this time, the yeast ferments, producing gases that are key to developing the airy, spongy texture and the intricate honeycomb structure of the finished cake. Skipping or shortening this resting time may result in a denser cake with fewer internal air pockets.