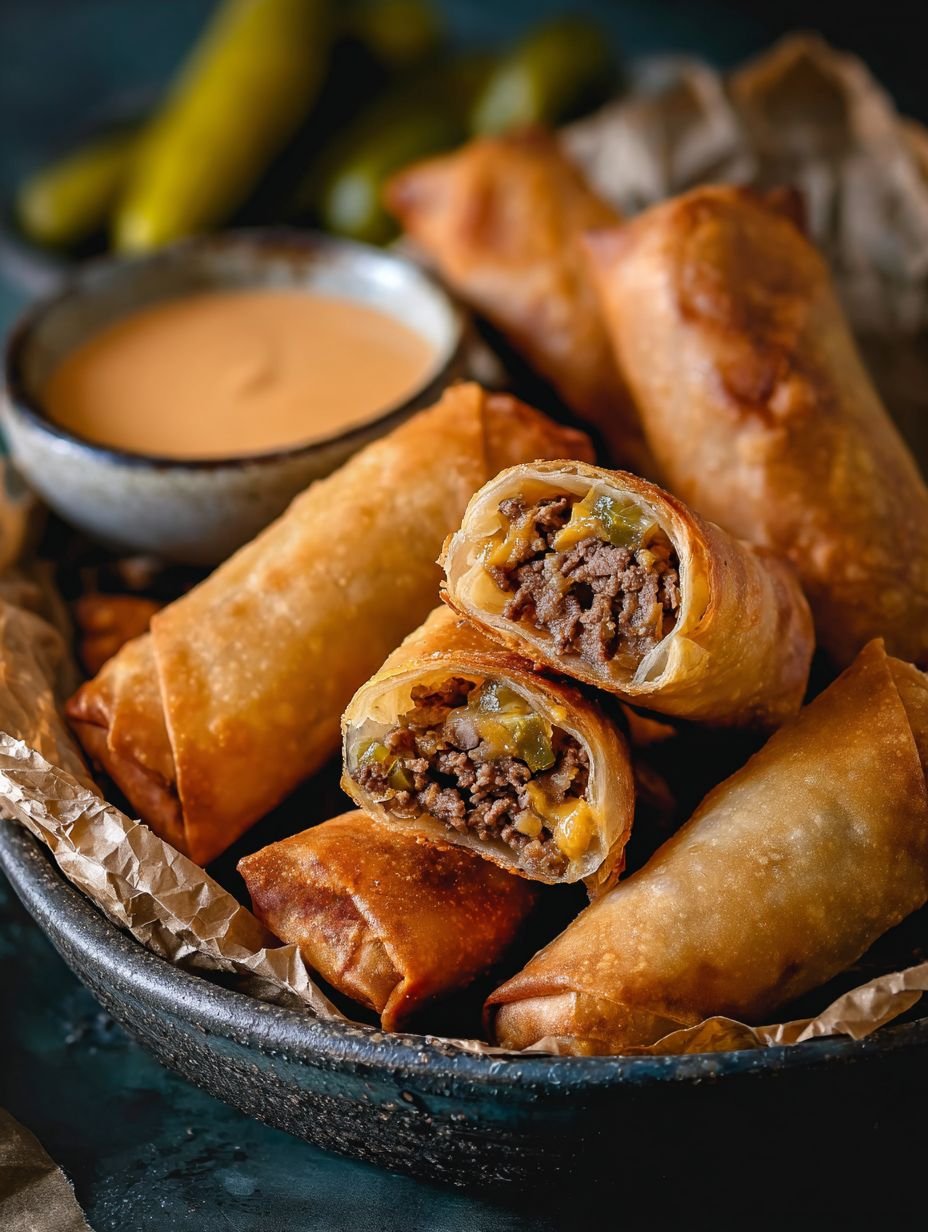
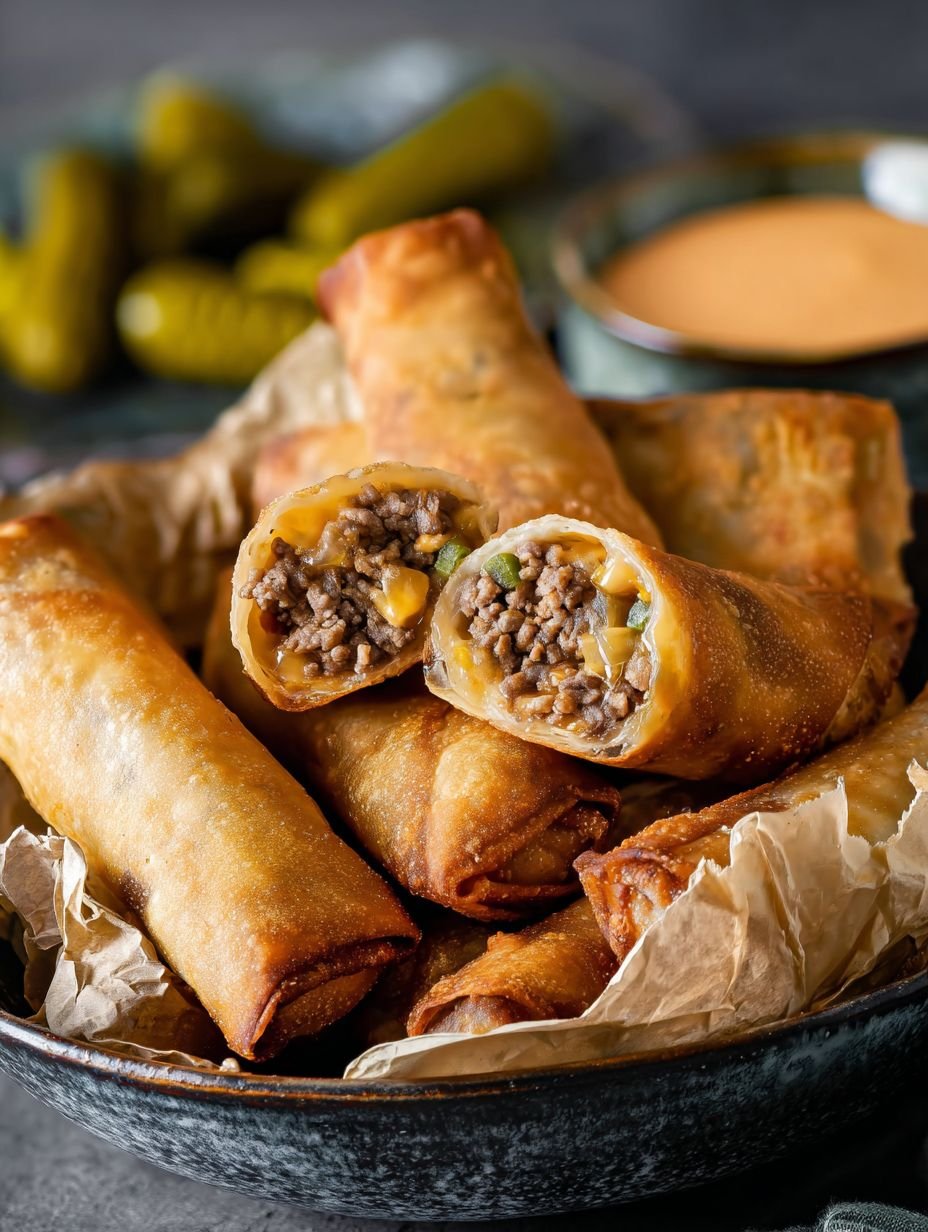
Imagine biting into a golden, shatteringly crisp wrapper, giving way to a warm, savory explosion of seasoned ground beef, gooey cheddar, and tangy pickles – all the best parts of a classic cheeseburger in one irresistible bite.
My earliest memory of this brilliant mash-up involves a particularly desperate Tuesday evening, staring into an empty fridge, dreaming of drive-thru delights, and then, a lightbulb moment for these incredible, quick cheeseburger bites.
Reasons Why You’ll Love This Recipe
You are absolutely going to adore these cheeseburger spring rolls. They are incredibly simple to prepare, requiring no complex techniques, making them perfect for even the busiest weeknights or last-minute cravings. The unique flavor profile brilliantly marries the comforting, savory taste of a classic cheeseburger with the exciting texture of a crispy spring roll, offering a fresh take on beloved favorites. Visually, these golden-brown beauties are an absolute showstopper, guaranteed to impress guests and spark conversation at any gathering. Plus, their versatility is unmatched; customize the cheese, add a touch of spice, or experiment with different dipping sauces to make them uniquely yours.
Ingredients
Here’s what you need for this delicious dish:
- **Olive oil** A foundational fat, perfect for sautéing our savory beef and onion mixture, ensuring a rich flavor base for our cheeseburger spring rolls.
- **Lean ground beef** The hearty, savory core of our cheeseburger experience. Opt for lean ground beef to ensure a flavorful but not overly greasy filling.
- **Finely diced yellow onion** This aromatic vegetable adds a subtle sweetness and depth, softening beautifully as it cooks with the beef, enhancing the overall savory profile.
- **Garlic powder** A convenient way to infuse a pungent, savory kick into our filling, complementing the beef and cheese without overpowering other flavors.
- **Onion powder** Working in tandem with the fresh onion, this provides a concentrated, savory onion flavor that deepens the “cheeseburger” essence.
- **Salt** Essential for seasoning, bringing out the natural flavors of all the ingredients and ensuring our filling is perfectly balanced.
- **Black pepper** A touch of warmth and subtle spice, black pepper adds a classic seasoning note that pairs wonderfully with beef and cheese.
- **Finely diced dill pickles** The secret weapon for that authentic cheeseburger tang! These little bursts of briny goodness cut through the richness, providing the essential zing.
- **Shredded sharp cheddar cheese** The ultimate melty, savory companion to our beef. Sharp cheddar brings a robust, creamy, and irresistible texture to the heart of each roll. For the ultimate gooey center in your Easy Airfryer Cheeseburger Spring Rolls – Crispy & Quick, make sure it is freshly shredded.
- **Spring roll wrappers (standard size)** The undisputed star for achieving that coveted ‘Crispy’ texture! These thin, pliable wrappers transform into a golden, crackly shell, providing the perfect contrast to the rich filling when fried or air-fried.
- **Vegetable oil** For deep frying, this oil is crucial for achieving that deeply golden, uniformly crispy exterior that makes these cheeseburger spring rolls so utterly satisfying.
- **For the Dipping Sauce:** This easy dipping sauce is the perfect complement to your savory rolls.
- **Mayonnaise** The creamy base of our homemade special sauce, providing a rich and smooth texture that perfectly coats these savory rolls.
- **Ketchup** Adds a touch of sweet and tangy tomato flavor, contributing to the classic “special sauce” taste that perfectly accompanies a cheeseburger.
- **Yellow mustard** A bright, tangy kick that cuts through the richness, adding that signature zesty note synonymous with cheeseburger condiments.
- **Pickle relish** Enhances the tangy pickle flavor present in the spring rolls, tying the dipping sauce back to the core cheeseburger experience and adding delightful texture.
All ingredients with their exact quantities can be found in the recipe card below.
Step-by-Step Instructions
Here’s a simple guide to help you prepare this delicious recipe:
Making these delightful cheeseburger spring rolls is surprisingly straightforward, whether you’re a kitchen novice or a seasoned pro. Just follow these steps, and you’ll be on your way to a crispy, savory masterpiece.
Step 1: Prepare the Filling
Begin by heating 1 tablespoon of olive oil in a large skillet over medium-high heat. Add 1 pound of lean ground beef and 1/2 cup of finely diced yellow onion to the hot skillet, ensuring you break up the beef with a spoon as it cooks. Continue cooking for approximately 7-9 minutes, until the beef is thoroughly browned and the onion has softened, creating a flavorful base for your rolls.
Step 2: Season and Drain
Once the beef and onion are cooked, carefully drain any excess fat from the skillet. This step is crucial for preventing soggy spring rolls and keeping them delightfully crispy. Now, stir in 1/2 teaspoon of garlic powder, 1/2 teaspoon of onion powder, 1/2 teaspoon of salt, and 1/4 teaspoon of black pepper. Cook for an additional minute, making sure all the spices are well incorporated into the beef mixture, infusing it with aromatic flavors. Remove the skillet from the heat and allow the mixture to cool slightly before proceeding.
Step 3: Combine Filling Ingredients
Transfer the seasoned beef mixture to a medium-sized bowl. Add 1/2 cup of finely diced dill pickles and 1 cup of shredded sharp cheddar cheese to the bowl. Mix all the ingredients well until the cheese is evenly distributed throughout the beef and has begun to slightly melt from the residual heat, creating a gooey, irresistible filling. This mixture is the heart of your Easy Airfryer Cheeseburger Spring Rolls – Crispy & Quick!
Step 4: Assemble Spring Rolls
Now for the fun part: assembly! Lay one spring roll wrapper on a clean, dry surface, orienting it so one corner points directly towards you, forming a diamond shape. Place about 2-3 tablespoons of the prepared beef and cheese mixture near the bottom corner of the wrapper. Carefully fold the bottom corner up and over the filling, tucking it in snugly. Next, fold in the side corners towards the center. Finally, roll the wrapper tightly upwards from the bottom to form a neat cylinder. To seal the roll securely, moisten the top corner with a little water before pressing it down. Repeat this process with the remaining wrappers and filling until all 16 spring rolls are assembled. For extra peace of mind, especially if you plan to fry, a cornstarch slurry (1 tsp cornstarch mixed with 1 tsp water) can be used for a stronger seal, ensuring your delicious filling stays put.
Step 5: Fry the Spring Rolls
Heat about 4-6 cups of vegetable oil in a large pot or deep fryer until it reaches 350°F (175°C). Use a kitchen thermometer to ensure accuracy. Carefully place 3-4 spring rolls into the hot oil at a time, being careful not to overcrowd the pot, which can lower the oil temperature and result in less crispy rolls. Fry for 3-5 minutes, turning them occasionally, until they achieve a beautiful golden brown color and are perfectly crispy. This step gives them that undeniable crunch.
Step 6: Drain and Serve
Once the cheeseburger spring rolls are golden and crispy, carefully remove them from the hot oil using a slotted spoon. Immediately transfer them to a wire rack lined with paper towels to drain any excess oil. This is a crucial step to maintain their crispiness. Repeat the frying process with the remaining spring rolls until they are all cooked to perfection.
Step 7: Make Dipping Sauce
While your delightful spring rolls are frying, it is the perfect time to whip up the accompanying dipping sauce. In a small bowl, combine 1/2 cup of mayonnaise, 2 tablespoons of ketchup, 1 tablespoon of yellow mustard, and 1 tablespoon of pickle relish. Stir all the ingredients until they are thoroughly combined and smooth, creating a tangy and creamy complement to your savory rolls. This homemade sauce truly elevates the cheeseburger experience.
Step 8: Serve the hot cheeseburger spring rolls immediately with the prepared dipping sauce. Enjoy the delightful contrast of the crispy exterior and the warm, savory, and tangy interior.
Air Fryer Option: A Quick and Crispy Alternative
For those looking for a slightly lighter touch or just love the convenience of their air fryer, these Easy Airfryer Cheeseburger Spring Rolls – Crispy & Quick are absolutely fantastic. The air fryer method delivers an equally golden and crunchy exterior with minimal oil, making cleanup a breeze. To achieve this, simply preheat your air fryer to 375°F (190°C). Lightly spray your assembled spring rolls with a bit of vegetable oil, ensuring an even coating for the best crisp. Place them in a single layer in your air fryer basket, making sure not to overcrowd it to allow for optimal air circulation. Air fry for 10-12 minutes, flipping them halfway through, until they are beautifully golden brown and irresistibly crispy. This alternative cooking method is perfect for a speedy snack or appetizer, proving that deliciousness doesn’t always require deep frying.
Meal Prep and Freezing Tips
Life gets busy, and sometimes, having delicious, homemade options ready to go is a lifesaver. These savory rolls are fantastic for meal prep! You can assemble the spring rolls ahead of time and store them in the refrigerator for up to 24 hours before cooking. Just make sure they are covered to prevent drying out.
For longer storage, these cheeseburger spring rolls can be frozen, making future snack attacks or party prep incredibly simple. After assembling them, lay the uncooked spring rolls in a single layer on a baking sheet. Freeze them until they are completely solid, which usually takes a couple of hours. Once frozen, transfer the solid rolls to an airtight freezer bag or container. This prevents them from sticking together and helps maintain their quality. When you are ready to enjoy them, there is no need to thaw! You can fry them directly from frozen; just add a few extra minutes to the cooking time to ensure they cook through evenly and reach that perfect crispy texture. This makes them an ideal quick snack solution for any day of the week.
Creative Variations and Serving Suggestions
While the classic cheeseburger spring roll is undeniably delicious, there is plenty of room to play around and customize this recipe to your taste preferences. One easy way to vary the flavor profile is by experimenting with different types of cheese. Instead of sharp cheddar, you could try using Monterey Jack for a milder, creamier melt, or even a blend of American and cheddar for that iconic diner-style cheeseburger taste. Adding a pinch of red pepper flakes to the beef mixture can give these rolls a subtle kick, perfect for those who enjoy a bit of heat.
Consider the dipping sauce as well! While our homemade special sauce is a winner, you could also serve these with a classic honey mustard, a spicy sriracha mayo, or even a simple ranch dressing. For a vibrant garnish, a sprinkle of fresh chopped chives or parsley can add a pop of color and freshness. These savory spring rolls are incredibly versatile and perfect for a variety of occasions. They shine as an appetizer at parties, a fun and unique game-day snack, or even as a light lunch when paired with a fresh side salad. However you choose to serve them, these crispy delights are sure to be a hit.
The Nutritional Scoop on Your Crispy Creations
It is always good to know what you are enjoying, especially when it is as tempting as these cheeseburger spring rolls. Each serving of these delightful bites, which includes 2 spring rolls, offers a balanced profile of nutrients to keep you fueled and satisfied.
**Nutrition Information (per serving): **
- **Calories:** 320 kcal
- **Protein:** 15g
- **Carbs:** 20g
- **Fat:** 20g
This breakdown shows that these Easy Airfryer Cheeseburger Spring Rolls – Crispy & Quick are not only incredibly flavorful but also provide a good source of protein to keep you feeling full, alongside a moderate amount of carbohydrates and fats. It is the perfect blend for a satisfying snack or a fun appetizer that hits all the right notes without being overly indulgent. Enjoy every crispy, savory bite!
Final Thoughts on These Flavorful Rolls
So there you have it: a recipe that transforms a beloved classic into an exciting, portable, and utterly delicious snack or appetizer. Whether you opt for the traditional deep-fried method or embrace the convenience of the air fryer, these cheeseburger spring rolls are guaranteed to deliver on flavor and crunch. They are simple to prepare, incredibly versatile, and perfect for sharing (or not, we won’t judge). The next time you are craving something both familiar and uniquely new, whip up a batch of these golden, savory rolls. Your taste buds, and your guests, will thank you! Remember, the key to truly irresistible results lies in ensuring your spring roll wrappers are sealed tightly to prevent any delicious filling from escaping during cooking. Now go forth and create some crispy magic!
Perfecting the Cooking Process
For perfectly crispy results, ensure your beef and onion mixture cools slightly before combining it with the shredded sharp cheddar cheese. This prevents premature melting, ensuring that glorious cheese pull later. When assembling your spring rolls, really commit to that tight roll and secure seal to guarantee no delicious filling escapes during frying or when making these Easy Airfryer Cheeseburger Spring Rolls.
Add Your Personal Touch
Feel free to experiment with the type of cheese for these savory snacks. While sharp cheddar provides a classic tang, American or Monterey Jack cheese would offer an equally delightful, melty experience. You could also vary the dill pickles by using a different brand or type of dill pickle for a subtle flavor shift in the filling.
Storage & Reheating
To maintain the irresistible crunch of these delightful cheeseburger spring rolls, store any leftovers in an airtight container in the refrigerator for up to 3 days. For best results when reheating, use an air fryer at 350°F (175°C) for 5-7 minutes, or bake them in an oven until hot and re-crisped.
Helpful Chef Tips
The first time I served these at a casual get-together, everyone thought they were just fancy spring rolls. Their faces lit up with pure joy at the unexpected cheeseburger surprise inside!
Final Thoughts
The journey of crafting these amazing cheeseburger spring rolls culminates in an irresistible treat. Imagine that first satisfying crunch, followed by the savory burst of seasoned beef, tangy pickles, and gooey cheddar. They’re quick to prepare, versatile with a delightful air fryer option, and perfect for any occasion. Don’t just read about them; experience the magic yourself! Gather your ingredients and create these golden, delicious bites. Your taste buds will thank you.
Print
Easy Airfryer Cheeseburger Spring Rolls – Crispy & Quick
- Total Time: 50 minutes
- Yield: 8 (2 spring rolls per serving)
Description
These savory spring rolls offer a delightful twist on a classic cheeseburger, encased in a golden, crispy wrapper. Each bite reveals a rich filling of seasoned ground beef, melted cheddar cheese, and finely diced pickles, creating a harmonious blend of savory, tangy, and umami flavors. The exterior provides a satisfying crunch, contrasting beautifully with the tender, juicy interior. Served hot, they are perfect as an appetizer or a unique snack.
Ingredients
- * 1 tablespoon olive oil
- * 1 pound lean ground beef
- * 1/2 cup finely diced yellow onion
- * 1/2 teaspoon garlic powder
- * 1/2 teaspoon onion powder
- * 1/2 teaspoon salt
- * 1/4 teaspoon black pepper
- * 1/2 cup finely diced dill pickles
- * 1 cup shredded sharp cheddar cheese
- * 16 spring roll wrappers (standard size)
- * Vegetable oil, for deep frying (about 4-6 cups)
- * **For the Dipping Sauce:**
- * 1/2 cup mayonnaise
- * 2 tablespoons ketchup
- * 1 tablespoon yellow mustard
- * 1 tablespoon pickle relish
Instructions
- **Prepare the Filling:** Heat olive oil in a large skillet over medium-high heat. Add ground beef and diced onion, breaking up the beef with a spoon. Cook until the beef is browned and the onion is softened, about 7-9 minutes.
- **Season and Drain:** Drain any excess fat from the skillet. Stir in garlic powder, onion powder, salt, and black pepper. Cook for another minute, ensuring spices are well incorporated. Remove from heat and let cool slightly.
- **Combine Filling Ingredients:** Transfer the beef mixture to a bowl. Add the diced dill pickles and shredded cheddar cheese. Mix well until the cheese is evenly distributed and slightly melted from the residual heat.
- **Assemble Spring Rolls:** Lay a spring roll wrapper on a clean, dry surface with one corner pointing towards you (diamond shape). Place about 2-3 tablespoons of the beef and cheese mixture near the bottom corner. Fold the bottom corner over the filling, then fold in the side corners. Roll tightly upwards to form a cylinder. Moisten the top corner with a little water to seal the roll securely. Repeat with remaining wrappers and filling.
- **Fry the Spring Rolls:** Heat vegetable oil in a large pot or deep fryer to 350°F (175°C). Carefully place 3-4 spring rolls into the hot oil, ensuring not to overcrowd the pot. Fry for 3-5 minutes, turning occasionally, until golden brown and crispy.
- **Drain and Serve:** Remove fried spring rolls with a slotted spoon and place them on a wire rack lined with paper towels to drain excess oil. Repeat with remaining spring rolls.
- **Make Dipping Sauce:** While spring rolls are frying, combine mayonnaise, ketchup, yellow mustard, and pickle relish in a small bowl. Stir until well combined.
- Serve the hot cheeseburger spring rolls immediately with the prepared dipping sauce.
Notes
* For an alternative cooking method, air fry the spring rolls at 375°F (190°C) for 10-12 minutes, flipping halfway, until golden and crispy. Lightly spray with oil before air frying for best results.
* These spring rolls can be assembled ahead of time and frozen. Freeze them on a baking sheet until solid, then transfer to an airtight freezer bag. Fry from frozen, adding a few extra minutes to the cooking time.
* Experiment with different types of cheese, such as American or Monterey Jack, for a varied flavor profile.
* Ensure the spring roll wrappers are sealed tightly to prevent the filling from leaking during frying. A cornstarch slurry (1 tsp cornstarch mixed with 1 tsp water) can be used for a stronger seal.
- Prep Time: 30 minutes
- Cook Time: 20 minutes
Nutrition
- Calories: 320 kcal
- Fat: 20g
- Carbohydrates: 20g
- Protein: 15g
FAQs
Can I cook these cheeseburger spring rolls using an air fryer instead of deep frying?
Yes, absolutely! For a slightly lighter option that’s still wonderfully crispy, you can air fry these delightful treats. Preheat your air fryer to 375°F (190°C). Lightly spray the assembled spring rolls with a little vegetable oil for the best golden-brown results. Place them in a single layer in the air fryer basket, ensuring not to overcrowd it. Cook for approximately 10-12 minutes, remembering to flip them halfway through the cooking time. They’ll emerge beautifully golden and perfectly crispy, offering a fantastic alternative to deep frying.
What’s the best way to seal the spring rolls to prevent the filling from leaking?
Ensuring your spring rolls are tightly sealed is crucial for a mess-free frying experience. After placing about 2-3 tablespoons of the seasoned beef and cheese mixture near the bottom corner of the wrapper, fold the bottom corner over the filling. Next, fold in the side corners snugly. Continue rolling upwards tightly to form a neat cylinder. To secure the roll, moisten the top corner of the wrapper with a little water. This creates a strong adhesive bond, keeping all that delicious filling safely inside during frying. A cornstarch slurry can also be used for a stronger seal.
Can these beef and cheddar rolls be prepared in advance and frozen for later?
These savory rolls are excellent for making ahead and freezing, which is perfect for meal prep or future gatherings. Once you’ve assembled the spring rolls, place them in a single layer on a baking sheet. Freeze them until they are completely solid. Once frozen, you can transfer the solid rolls into an airtight freezer bag or container. When you’re ready to cook them, you can fry them directly from frozen; just be sure to add a few extra minutes to the cooking time to ensure they heat through properly and achieve that desired crispiness.
What ingredients are used to make the dipping sauce for these crispy spring rolls?
The flavorful dipping sauce that perfectly complements these crispy treats is incredibly simple to prepare with just a few pantry staples. To create this delicious accompaniment, you will need 1/2 cup of creamy mayonnaise as the base. Then, incorporate 2 tablespoons of tangy ketchup and 1 tablespoon of classic yellow mustard. Finally, add 1 tablespoon of bright pickle relish to complete the flavor profile. Simply combine all these ingredients in a small bowl and stir them together until they are well blended for a quick, homemade sauce that enhances every bite.