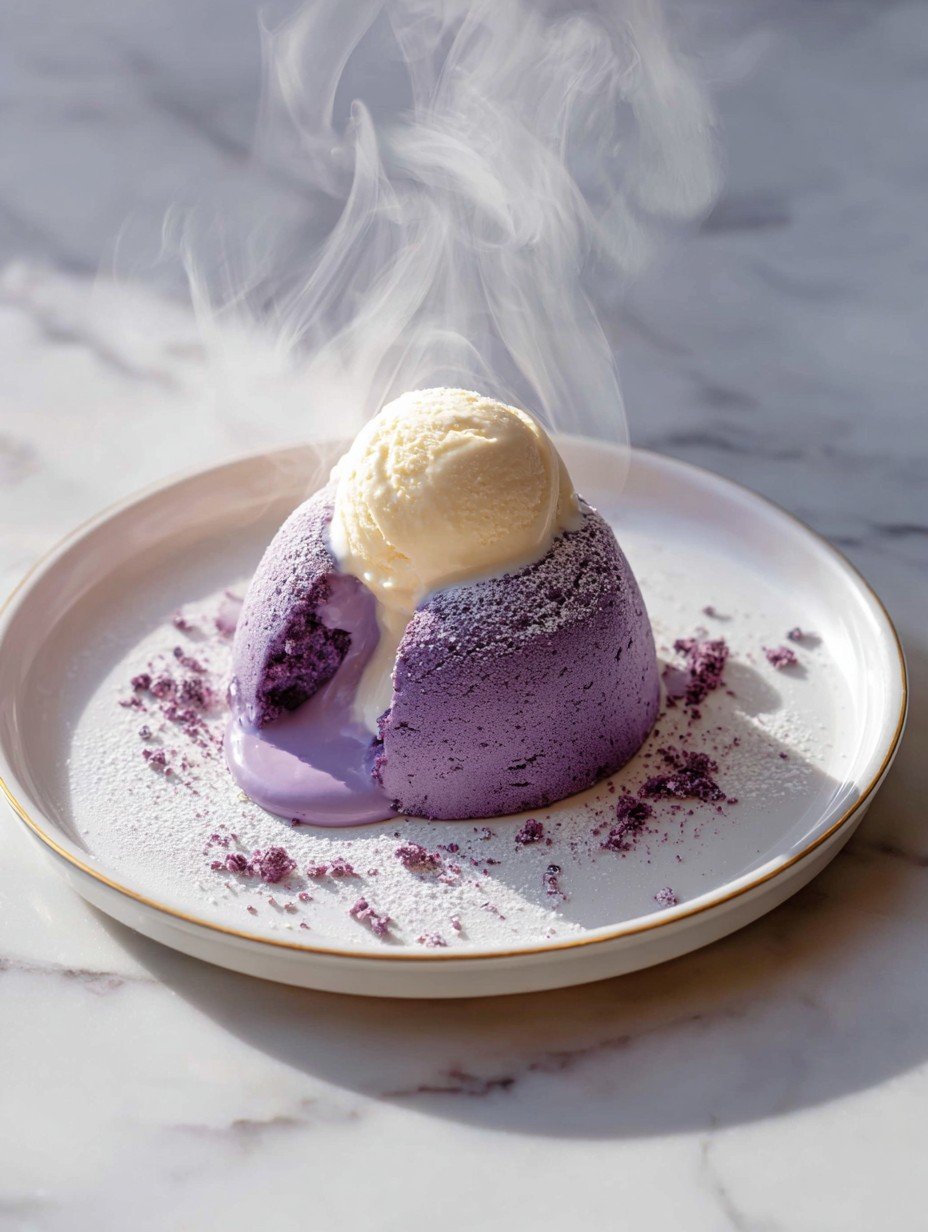
Imagine a fork gently breaking through a tender, vibrant purple cake, revealing a warm, molten ube center that elegantly oozes onto the plate, perfectly complemented by a melting scoop of creamy vanilla ice cream. This glorious sight takes me straight back to my first culinary adventure in Southeast Asia, where I once mistook a sweet yam for a particularly colorful potato, only to discover the enchanting world of ube.
Why You’ll Love This Recipe
This recipe is a true triple threat, offering an incredibly easy preparation that even novice bakers can master, a uniquely vibrant flavor profile from the enchanting ube, and a stunning appearance that will undoubtedly impress any guest. Beyond its immediate appeal, it’s wonderfully versatile, allowing for simple garnishes or more elaborate presentations, making it a go-to dessert for any occasion, from a cozy weeknight treat to a show-stopping dinner party finale.
Ingredients
Here’s what you need for this delicious dish:
- **Unsalted butter, melted:** This essential fat contributes to the luxurious richness and moist texture of the cake, especially when melted and combined with the ube halaya, playing a key role in the “Dreamy” quality of our Dreamy Ube Lava Cake & Melting Vanilla Ice Cream.
- **Ube halaya (purple yam jam):** The star of the show, ube halaya provides the distinctive vibrant purple color and the unique, sweet, earthy flavor that defines this ube dessert. Its smooth consistency is crucial for creating the signature molten “lava” center.
- **Large eggs:** These act as a binder and provide structure to the cake, while also contributing to the richness and overall texture, ensuring the cake holds its shape while maintaining a delicate crumb.
- **Large egg yolks:** Adding extra richness and tenderness to the batter, egg yolks help create a denser, more decadent cake that perfectly encases the molten interior.
- **Granulated sugar:** This sweetens the cake and aids in creating that perfect balance of flavors, working with the ube halaya to develop a truly “Dreamy” taste experience.
- **All-purpose flour:** Just enough flour provides the necessary structure for the cake to set around its molten core, ensuring a tender cake exterior that holds up to the warm, flowing center.
- **Ube extract:** This enhances both the striking purple hue and the authentic ube flavor, deepening the vibrant characteristics of the cake.
- **Salt:** A small pinch of salt balances the sweetness and brings out the full depth of the ube flavor, making every bite more complex and satisfying.
- **Cooking spray or butter for ramekins:** Essential for preventing your beautiful cakes from sticking, ensuring a smooth release and perfectly presented lava cakes every time.
- **Vanilla ice cream:** The cool, creamy contrast to the warm cake, this component is vital for the “Melting Vanilla Ice Cream” experience, providing a delightful temperature and texture juxtaposition.
- **Powdered sugar, for dusting:** A delicate finishing touch that adds a touch of elegance and subtle sweetness to the presentation of the molten ube cake.
- **Ube crumbs (optional, for garnish):** These optional crumbs offer an extra layer of ube flavor and a pleasing textural contrast, enhancing the visual appeal and tying into the ube theme.
The complete ingredient list, including quantities, can be found directly under the recipe card.
Step-by-Step Instructions
Follow these simple steps to prepare this delicious dish:
Step 1: Prepare Your Ramekins and Oven
Begin by preheating your oven to 400°F (200°C). Then, take four 6-ounce ramekins and lightly grease and flour them thoroughly, making sure every surface is well-coated to prevent any sticking. This careful preparation is crucial for an easy release of your Dreamy Ube Lava Cake & Melting Vanilla Ice Cream. Arrange the prepared ramekins on a baking sheet.
Step 2: Combine Ube Halaya and Melted Butter
In a microwave-safe bowl, combine the previously melted butter with the ube halaya. Microwave this mixture in short 30-second intervals, stirring diligently after each interval until the mixture becomes completely smooth and fully combined. Set this vibrant purple mixture aside to cool slightly before proceeding.
Step 3: Whisk Eggs, Yolks, and Sugar
Grab a large mixing bowl and whisk together the large eggs, extra large egg yolks, and granulated sugar. Continue whisking until the mixture transforms into a pale yellow color and gains a slightly thickened consistency. This aeration is important for the cake’s light texture.
Step 4: Incorporate Ube-Butter Mixture
Gently fold the cooled ube-butter mixture into the egg mixture. Be careful to mix until just combined, stopping as soon as no distinct streaks of either component are visible. Overmixing at this stage can affect the final texture of the cake.
Step 5: Fold in Dry Ingredients and Ube Extract
Into the wet ingredients, carefully sift the all-purpose flour and salt. Gently fold these dry ingredients until there are no remaining streaks of flour in the batter. The key here is to avoid overmixing to keep the cake tender. Finally, stir in the ube extract until the batter achieves a uniform, captivating purple color, ready for its transformation into a Dreamy Ube Lava Cake.
Step 6: Divide Batter into Ramekins
Once your vibrant ube batter is ready, divide it evenly among the four meticulously prepared ramekins. Ensure each ramekin holds an equal amount of batter for consistent baking.
Step 7: Bake the Lava Cakes to Perfection
Transfer the baking sheet with the filled ramekins to your preheated oven. Bake for approximately 12 to 14 minutes. The cakes are ready when their edges appear set, but their centers still show a distinct softness and a slight jiggle. Remember that exact baking times can vary, so keep a close eye on your oven and the size of your ramekins to achieve that perfect molten core for your Dreamy Ube Lava Cake.
Step 8: Cool and Invert
Once baked, carefully remove the ramekins from the oven. Allow them to cool on the baking sheet for just 1 minute. After this brief cooling period, gently invert each ube lava cake onto an individual serving plate. A short cooling time ensures the cake releases smoothly while remaining warm enough for the lava effect.
Step 9: Garnish and Serve Immediately
Dust each warm ube lava cake generously with powdered sugar. If you are using them, artfully garnish with ube crumbs for an added textural element and depth of flavor. The final, essential touch is to top each glorious warm cake with a generous scoop of creamy vanilla ice cream. Serve these magnificent creations immediately to enjoy the delightful contrast of warm, flowing ube lava cake and melting vanilla ice cream.
Expert Tips for Success
Crafting the perfect Dreamy Ube Lava Cake & Melting Vanilla Ice Cream involves a few crucial techniques that can elevate your baking from good to absolutely phenomenal. First and foremost, achieving that signature molten core is everything. This means you absolutely must not overbake the cakes. The center should retain a distinct softness and jiggly appearance when you remove them from the oven. That delicate jiggle is your golden ticket to the “lava” effect everyone craves.
Secondly, the release of your beautifully baked cakes from their ramekins is vital for a flawless presentation. Ensure your ramekins are not just lightly greased, but *thoroughly* greased and floured. This extra step creates a barrier that allows the warm cake to slide effortlessly onto the serving plate, preventing any frustrating sticking or tearing. Think of it as insurance for your dessert masterpiece.
Ube halaya, the soulful heart of this recipe, can naturally vary in its sweetness. Don’t be afraid to taste it beforehand. If you find your ube halaya is on the sweeter side, you might consider slightly reducing the amount of granulated sugar in the recipe to perfectly suit your palate. This small adjustment ensures your Dreamy Ube Lava Cake & Melting Vanilla Ice Cream hits just the right note of sweetness for you and your guests. For those who adore a truly vivid purple, and if your ube halaya or extract doesn’t deliver the intensity you desire, a tiny drop of purple food coloring can be added to the batter. This is entirely optional but can certainly make your dessert pop even more visually.
Finally, the ultimate enjoyment of this dessert comes down to timing. These cakes are designed to be a symphony of temperatures and textures. Serve them immediately after baking. The warmth of the cake ensures the ube center remains wonderfully molten, ready to flow, and allows the scoop of cold vanilla ice cream to begin its delightful melt, creating that signature Dreamy Ube Lava Cake & Melting Vanilla Ice Cream experience that will leave everyone craving another bite.
Nutrition Information
For those curious about the nutritional breakdown of this delightful treat, each serving of this decadent Dreamy Ube Lava Cake & Melting Vanilla Ice Cream provides a balanced indulgence. A single serving contains approximately 480 kcal, making it a satisfying dessert. It offers 7g of protein, contributing to your daily intake. The carbohydrate content stands at 60g, while the fat content is around 25g. This information ensures you can enjoy this unique and delicious dessert with full awareness of its nutritional contribution to your meal.
Mastering the Secrets of Cooking
Always begin by thoroughly preparing your ramekins; this ensures a perfect release for the ube lava cake. Gentle folding of the batter is crucial for a tender crumb. Most importantly, serve immediately after baking to enjoy the iconic molten center and luxurious melting vanilla ice cream.
Make Your Recipe Unique
While the classic combination of the ube lava cake with its melting vanilla ice cream is divine, try making it your own! Consider swapping the vanilla ice cream for a coconut or even a coffee-flavored scoop. You could also infuse the powdered sugar with a pinch of nutmeg for a subtle, warm spice note.
Smart Storage & Reheating
To preserve the iconic molten center of this Dreamy Ube Lava Cake & Melting Vanilla Ice Cream, serving immediately after baking is essential. Store leftover cakes in an airtight container at room temperature for up to a day. Reheating will warm them, but the “lava” effect will be reduced.
The Chef’s Golden Tips
- After greasing and flouring your ramekins, gently tap them upside down to remove any excess flour, ensuring a perfectly clean release.
- Watch closely for the edges to set while the very center still appears jiggly; this guarantees a truly molten, flowing interior.
- Fold the flour into the batter just until combined. Overmixing develops gluten, which can prevent your magnificent ube lava cake from achieving its tender, molten core.
The first time I unveiled these glorious ube lava cakes, my friends gasped at the vibrant purple and molten center. Their delight, paired with melting vanilla ice cream, was truly unforgettable.
Final Thoughts
This incredible dessert truly delivers a sensory experience, from its vibrant purple hue to the irresistible molten center. The tender ube cake paired with cool, creamy vanilla ice cream creates a delightful dance of textures and temperatures on your palate. It’s a surprisingly simple treat to master, yielding impressive results that will captivate anyone fortunate enough to enjoy it. Don’t just dream about this perfect pairing; gather your ingredients and bring this enchanting ube lava cake and melting vanilla ice cream combination to life in your own kitchen. You won’t regret experiencing its unique charm!
FAQs
How do I ensure my ube lava cake has a perfectly molten center?
To achieve that signature flowing ube center, precise baking is crucial. After dividing the batter into your prepared ramekins, bake them for 12-14 minutes at 400°F (200°C). The key is to look for edges that are set, while the very center still appears soft and slightly jiggly. Overbaking will solidify the middle, preventing the “lava” effect. Remember that oven temperatures can vary, so keep a close eye on your cakes. For the best experience, carefully invert each cake onto a serving plate and serve immediately with vanilla ice cream to enjoy the warm, flowing goodness.
What’s the best way to prevent the ube lava cakes from sticking to the ramekins?
Ensuring your ube lava cakes release cleanly from their molds is essential for a beautiful presentation. Before adding the batter, thoroughly grease and flour each of the four 6-ounce ramekins. You can use cooking spray or butter for greasing, followed by a light dusting of all-purpose flour. Make sure the entire interior surface is well-coated. This creates a non-stick barrier that helps the delicate cakes slide out effortlessly after baking. After removing them from the oven, allow them to cool for just one minute before inverting onto a serving plate.
Can I adjust the sweetness of this ube lava cake recipe?
Yes, you can certainly tailor the sweetness of these delightful ube cakes to your palate. The recipe calls for 1/2 cup of granulated sugar. However, ube halaya, the purple yam jam, can vary in its inherent sweetness depending on the brand or preparation. We recommend tasting your ube halaya first if you’re unsure. If you prefer a less sweet dessert, you may slightly reduce the amount of granulated sugar, perhaps by a tablespoon or two, or increase it if you desire a sweeter profile. Just ensure the overall texture of the batter remains consistent.
How can I achieve a vibrant purple color for my ube lava cake?
The stunning vibrant purple color of this ube lava cake comes primarily from the ube halaya and the addition of ube extract. During step 5 of the instructions, after sifting in the flour and salt, you’ll stir in 1 teaspoon of ube extract until the batter achieves a uniform purple hue. If, after adding the ube extract, you desire an even deeper, more intense purple shade, the recipe notes that you may add a tiny amount of purple food coloring. This is entirely optional and depends on your aesthetic preference for the finished dessert.

Dreamy Ube Lava Cake & Melting Vanilla Ice Cream
- Total Time: 0 hours
- Yield: 4 1x
Description
This dessert features a vibrant purple ube cake, baked to achieve a tender exterior and a warm, molten ube center that gently flows upon serving. It is elegantly topped with a scoop of creamy vanilla ice cream, offering a delightful contrast in temperature and texture. A light dusting of powdered sugar and ube crumbs completes this visually appealing and flavorful treat.
Ingredients
- For the Ube Lava Cake:
- 1/2 cup unsalted butter, melted
- 1/2 cup ube halaya (purple yam jam)
- 2 large eggs
- 2 large egg yolks
- 1/2 cup granulated sugar
- 1/4 cup all-purpose flour
- 1 teaspoon ube extract
- 1/4 teaspoon salt
- Cooking spray or butter for ramekins
- For Serving:
- 1 pint vanilla ice cream
- Powdered sugar, for dusting
- Ube crumbs (optional, for garnish)
Instructions
- Preheat your oven to 400°F (200°C). Lightly grease and flour four 6-ounce ramekins, ensuring they are well-coated to prevent sticking. Place the ramekins on a baking sheet.
- In a microwave-safe bowl, combine the melted butter and ube halaya. Microwave in 30-second intervals, stirring until smooth and fully combined. Set aside to cool slightly.
- In a large bowl, whisk together the eggs, egg yolks, and granulated sugar until the mixture is pale yellow and slightly thickened.
- Gradually fold the ube-butter mixture into the egg mixture until just combined.
- Sift the all-purpose flour and salt into the wet ingredients. Fold gently until no streaks of flour remain, being careful not to overmix. Stir in the ube extract until the batter is uniformly purple.
- Divide the batter evenly among the prepared ramekins.
- Bake for 12-14 minutes, or until the edges are set but the center still appears soft and jiggly. The exact baking time may vary depending on your oven and ramekin size.
- Carefully remove the ramekins from the oven. Let them cool for 1 minute before inverting each cake onto a serving plate.
- Dust generously with powdered sugar and garnish with ube crumbs, if using. Top each warm ube lava cake with a scoop of vanilla ice cream and serve immediately.
Notes
Do not overbake the cakes; the center should remain molten for the lava effect.
Ensure your ramekins are thoroughly greased and floured to allow for easy release.
Ube halaya can vary in sweetness; adjust the granulated sugar to your preference.
For a deeper purple color, you may add a tiny amount of purple food coloring, if desired.
Serve these cakes immediately after baking to enjoy the warm, flowing center.
- Prep Time: 20 minutes
- Cook Time: 12-14 minutes
Nutrition
- Calories: 480 kcal
- Fat: 25g
- Carbohydrates: 60g
- Protein: 7g