Imagine a delightful crunch giving way to a cloud of sweet, creamy goodness, brightened by vibrant pistachios and a hint of chocolate. It’s a symphony for your taste buds, a truly delicious treat. I once attempted full-sized cannoli from scratch, ending up with more dough on the ceiling than in the fryer, but these squares? They’re pure genius, no acrobatic skills required, and they deliver all the joy without the mess.
Why You’ll Love This Recipe
You are absolutely going to adore these pistachio cannoli squares for so many reasons. First, the easy preparation makes this classic Italian-inspired dessert surprisingly approachable for any home cook, transforming fiddly shells into simple, delightful squares. Secondly, the unique flavor profile, with its perfect balance of crisp pastry, a rich, creamy ricotta filling, miniature chocolate chips, bright orange zest, and salty-sweet pistachios, creates an unforgettable experience. Visually, these stunning squares, dusted with powdered sugar and crowned with a cherry, are guaranteed to impress, making them an ideal centerpiece for any gathering. Plus, their versatility means they’re perfect for casual family desserts or elegant dinner parties.
Ingredients
Here’s what you need for this delicious dish:
The complete ingredient list, including quantities, can be found directly under the recipe card.
Step-by-Step Instructions
Follow these simple steps to prepare this delicious dish:
Step 1: Prepare the Pastry Dough
In a large mixing bowl, whisk together the two cups of all-purpose flour, two tablespoons of granulated sugar, and half a teaspoon of salt until well combined. Next, carefully cut in the quarter cup of cold, cubed unsalted butter using a pastry blender or your fingertips until the mixture resembles coarse crumbs. In a separate small bowl, lightly whisk one large egg and two tablespoons of white vinegar. Gradually add the egg mixture and a quarter cup of cold water to the flour mixture, mixing until a shaggy dough forms. Transfer the dough to a lightly floured surface and knead gently for two to three minutes until it becomes smooth. Wrap the dough tightly in plastic wrap and refrigerate for at least 30 minutes to chill. This chilling process helps to relax the gluten, ensuring a wonderfully crisp texture for your pistachio cannoli squares.
Step 2: Roll and Cut Pastry
Once the dough has chilled sufficiently, remove it from the refrigerator. On a lightly floured surface, roll out the dough very thinly, aiming for approximately 1/16-inch thick. Precision here is key for achieving those perfectly crisp pastry shells for your delicious treats. Using a sharp knife or a pastry wheel, cut the rolled-out dough into 16 equal squares, each measuring approximately 3×3 inches. Take care to keep the squares uniform in size for consistent frying and assembly.
Step 3: Fry the Pastry Shells
Heat four cups of vegetable oil in a deep pot or Dutch oven until it reaches 350°F (175°C). Use a kitchen thermometer to ensure accuracy, as consistent oil temperature is vital for even browning. Carefully fry the pastry squares in batches, ensuring not to overcrowd the pot, which could lower the oil temperature. Turn the squares occasionally with tongs or a slotted spoon, frying until they turn golden brown and develop delicate bubbles, about one to two minutes per side. Once perfectly golden, remove the fried pastry squares with a slotted spoon and place them on a wire rack lined with paper towels to drain any excess oil. Allow them to cool completely before proceeding to the next step. These crisp shells are the foundation of your amazing pistachio cannoli squares.
Step 4: Prepare the Ricotta Filling
While the pastry shells are cooling, focus on preparing the luxurious ricotta filling. Begin by ensuring the two cups of whole milk ricotta cheese are thoroughly drained. This step is absolutely crucial to prevent a watery filling that could make your delicious treats soggy. In a medium bowl, combine the well-drained ricotta cheese, half a cup of sifted powdered sugar, one teaspoon of vanilla extract, and one tablespoon of orange zest (if you’re using it for that extra bright note). Mix these ingredients until the filling is wonderfully smooth and well combined. Finally, gently fold in the half cup of mini chocolate chips, distributing them evenly throughout the creamy mixture.
Step 5: Assemble the Cannoli Squares
Now for the fun part: assembling your best pistachio cannoli squares! Transfer the prepared ricotta filling into a piping bag fitted with a large round tip. If you don’t have a piping bag, a spoon will work just fine. Take one of the completely cooled, crisp pastry squares and pipe a generous amount of filling onto its surface, spreading it evenly to cover. Then, carefully place another cooled pastry square on top, creating a delightful cannoli sandwich. Repeat this process with the remaining pastry squares and creamy filling until all eight squares are assembled.
Step 6: Garnish and Serve
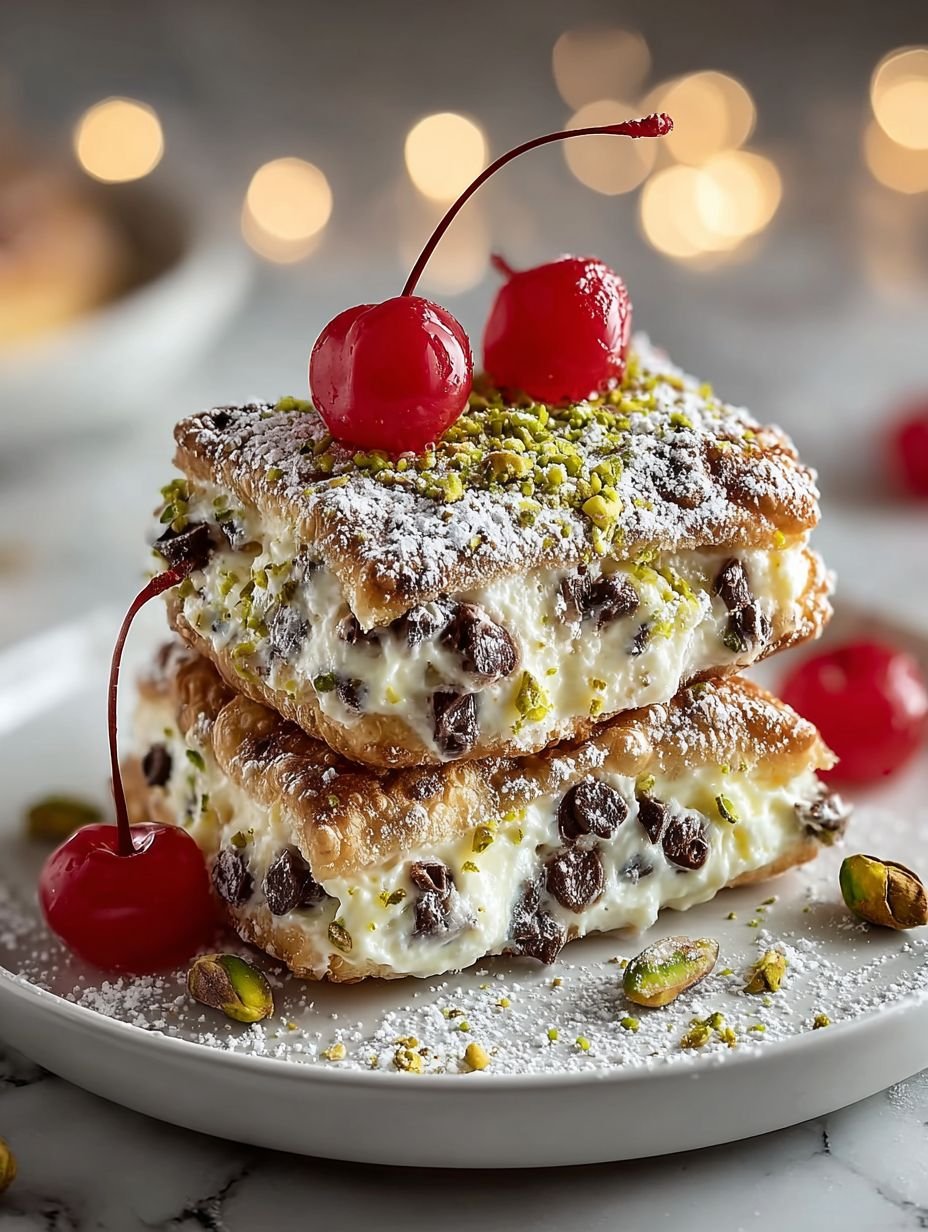
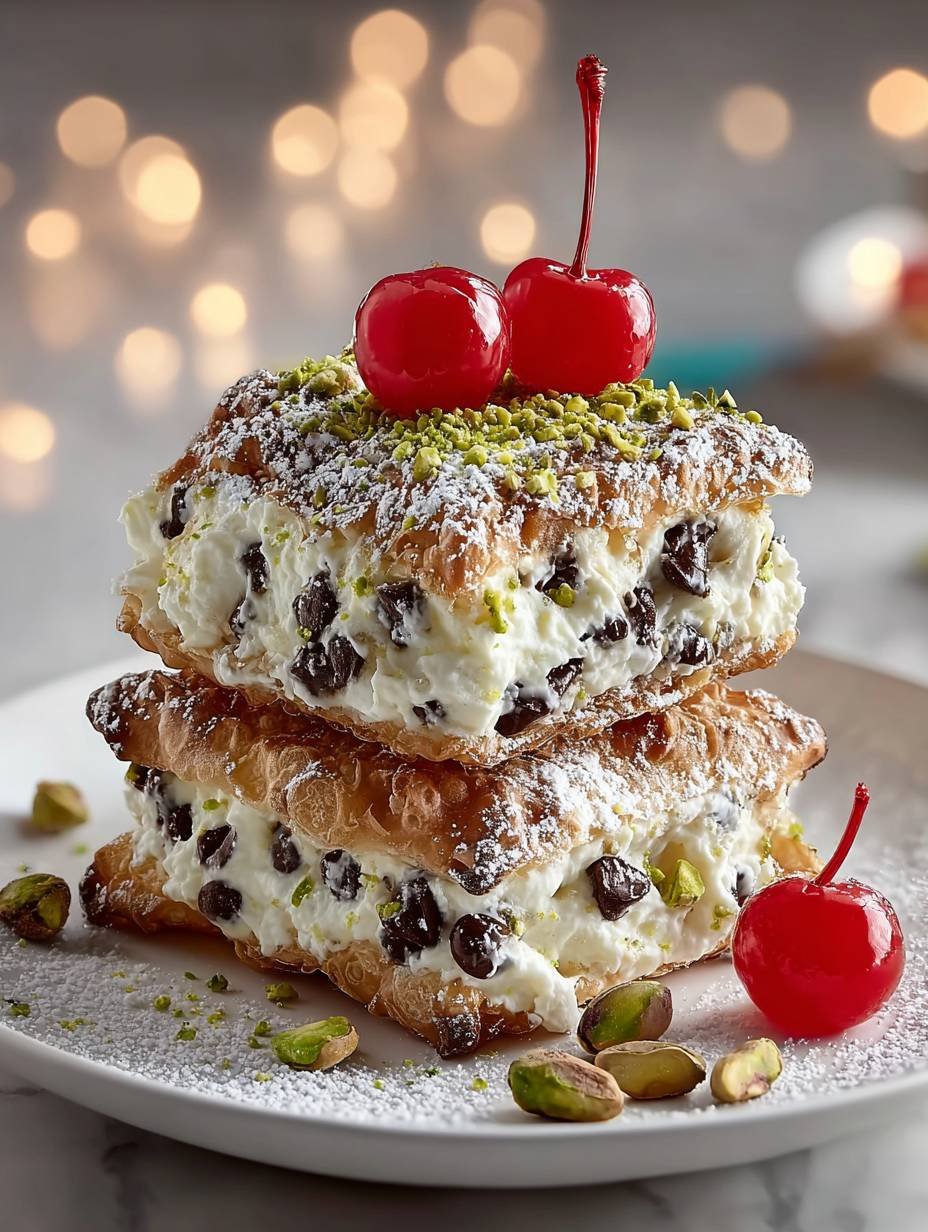
Just before you are ready to serve these fantastic treats, give them their final, irresistible flourish. Dust the assembled cannoli squares generously with the two tablespoons of powdered sugar. Then, sprinkle a quarter cup of finely chopped shelled pistachios over the top, adding both color and a delightful crunch. For the crowning glory, top each square with one of the eight maraschino cherries, stems on, for a vibrant finish. Serve immediately to ensure the pastry remains at its crispiest, offering that perfect textural contrast to the smooth, creamy filling.
Servings: 8 squares (4 servings)
Nutrition per serving:
Calories: 410
Protein: 10g
Carbs: 48g
Fat: 22g
Expert Tips for Flawless Pistachio Cannoli Squares
Achieving perfection with these Best Pistachio Cannoli Squares – Delicious Treat is easier with a few insider tricks. Firstly, the most critical step for a truly decadent filling is ensuring your whole milk ricotta cheese is exceptionally well-drained. Place it in a fine-mesh sieve lined with cheesecloth over a bowl in the refrigerator for several hours, or even overnight, to prevent a watery filling that could compromise the texture of your sweet squares. Secondly, when preparing the pastry dough, remember that rolling it as thin as possible, to about 1/16-inch thick, is paramount for creating those signature crisp and bubbly shells. A thicker dough will result in a chewier texture, so aim for transparency. Thirdly, when frying the pastry, always work in small batches to maintain a consistent oil temperature. Overcrowding the pot causes the oil to cool down, leading to greasy, unevenly browned shells instead of the perfectly crisp squares you’re after. Finally, and this is key for optimal enjoyment, always assemble your cannoli squares just before serving. This ensures the delicate pastry remains wonderfully crisp, offering the perfect textural contrast to the smooth, creamy filling. Trust me, these simple tips will elevate your delicious treat from great to absolutely unforgettable.
The Secret History of a Sweet Sensation
While these delightful Best Pistachio Cannoli Squares – Delicious Treat might seem like a modern marvel of convenience, they’re deeply rooted in the rich culinary history of Sicily. The traditional cannoli, cylindrical pastry shells filled with sweet ricotta, dates back centuries, with some historians tracing its origins to ancient Arab influences or even Roman times. Originally prepared for Carnevale, a pre-Lenten celebration, cannoli were a symbol of fertility and abundance. Over time, they evolved into a year-round staple, adored for their crisp shell and creamy filling. These squares pay homage to that timeless tradition, capturing all the iconic flavors and textures of the classic while simplifying the process. It’s like taking a beloved old recipe and giving it a fantastic, fresh haircut – all the charm, none of the fuss. So, when you bite into one of these delicious pistachio cannoli squares, you’re not just enjoying a dessert; you’re tasting a piece of history, reimagined for your modern kitchen.
Serving Suggestions and Perfect Pairings
These Best Pistachio Cannoli Squares – Delicious Treat are incredibly versatile and can be the star of many occasions. For a simple family dessert, they are perfect on their own, perhaps after a hearty Italian-inspired meal. Imagine enjoying a crisp bite with a warm cup of freshly brewed coffee or a soothing herbal tea; the flavors meld together beautifully. For a more elegant presentation, arrange them on a beautiful dessert platter alongside other small bites like fresh berries or a light sorbet. The vibrant green of the pistachios and the pop of the maraschino cherries make them visually stunning additions to any dessert spread. They also make a fantastic offering for potlucks or gatherings, as their square shape makes them easy to transport and serve. A chilled glass of sparkling water with a lemon twist also makes a refreshing accompaniment to these sweet, creamy desserts. No matter how you serve them, these delicious cannoli squares are sure to be a hit.
Storing Your Delicious Treat
To keep your Best Pistachio Cannoli Squares – Delicious Treat in optimal condition, it’s important to remember that they are best enjoyed fresh. As mentioned in our expert tips, assembling them just before serving ensures the pastry shells remain delightfully crisp. If you have any leftover unfilled pastry shells, store them in an airtight container at room temperature for up to two days. The ricotta filling can be stored separately in an airtight container in the refrigerator for up to two days as well. When you’re ready for another delicious treat, simply re-assemble and garnish following the final instructions. Assembled squares, however, should be eaten within a few hours, as the moisture from the filling will eventually soften the crisp pastry, though they will still be tasty!
Frequently Asked Questions about Cannoli Squares
You might have a few questions about making these incredible Best Pistachio Cannoli Squares – Delicious Treat. Are these cannoli squares difficult to make? Not at all! While traditional cannoli can be a bit challenging, the square format significantly simplifies the process, making it accessible even for novice bakers. Can I make the pastry dough ahead of time? Absolutely! The pastry dough can be prepared up to 24 hours in advance and stored, wrapped tightly in plastic, in the refrigerator. This makes for easy meal prep. What if I don’t have a piping bag for the filling? No problem! A sturdy Ziploc bag with one corner snipped off makes an excellent improvised piping bag. Alternatively, simply spoon the creamy ricotta filling onto the pastry squares. Can I skip the orange zest? Yes, the orange zest is optional. While it adds a bright, fresh note to the filling, these pistachio cannoli squares are equally delicious without it if you prefer a more classic flavor profile.
Why These are the Best Pistachio Cannoli Squares You’ll Ever Make
So, why are these the Best Pistachio Cannoli Squares – Delicious Treat you’ll ever encounter? It’s a combination of thoughtful design and irresistible flavors. We’ve taken the essence of a beloved Italian classic, that perfect marriage of crisp pastry and sweet, creamy ricotta, and made it gloriously approachable. The golden, bubbly shells offer an unparalleled crunch, while the filling, studded with miniature chocolate chips and brightened by optional orange zest, is pure creamy bliss. And, of course, the vibrant chopped pistachios and cheerful maraschino cherry don’t just add a stunning visual appeal; they deliver a delightful texture and flavor contrast that makes every bite sing. Whether you’re an experienced baker or just starting your culinary journey, this recipe provides a straightforward path to creating an impressive and incredibly delicious dessert that will have everyone asking for more. Get ready to fall in love with these pistachio cannoli squares!
Mastering the Secrets of Cooking
For perfectly crisp squares and creamy filling, begin by chilling your pastry dough. While the shells cool post-frying, pivot to preparing the luscious ricotta mixture. This synchronized approach ensures both components are ready for assembly just before serving. It guarantees peak freshness for these delightful pistachio squares.
Make Your Recipe Unique
Want to make these squares uniquely yours? Swap the mini chocolate chips for regular dark chocolate chips for a richer bite. For a brighter filling, use lemon zest instead of orange zest. Experiment with how finely you chop your pistachios, offering a varied texture to this delicious treat.
Smart Storage & Reheating
Maintain peak crispness by storing cooled pastry shells and the creamy ricotta filling separately. Keep the filling refrigerated in an airtight container. Store the shells at room temperature. For the ultimate texture, assemble your Best Pistachio Cannoli Squares – Delicious Treat just prior to serving.
The Chef’s Golden Tips
The first time I served these, my neighbor swore they were from a fancy Italian bakery! Seeing everyone’s faces light up with each crunchy, creamy bite of this delicious treat remains a cherished memory.
Final Thoughts
You’ve embarked on a delightful journey through the creation of these beautiful dessert squares. From the satisfying crunch of the golden pastry to the velvety embrace of the sweet ricotta filling, each bite delivers a symphony of textures and flavors. These squares, adorned with vibrant pistachios and a sweet cherry, are more than just a treat; they’re an experience. Perfect for sharing or savoring solo, this recipe makes for the Best Pistachio Cannoli Squares – Delicious Treat for any occasion. Don’t just imagine that perfect balance of crispiness and creamy sweetness – gather your ingredients and bring this culinary magic to your own kitchen today!
Print
Best Pistachio Cannoli Squares – Delicious Treat
- Total Time: 1 hour 5 minutes
- Yield: 8 squares (4 servings) 1x
Description
These Classic Cannoli Squares offer a delightful reinterpretation of a beloved Italian dessert. Featuring crisp, golden pastry shells, they are generously filled with a sweet, creamy ricotta mixture studded with miniature chocolate chips. Each square is elegantly dusted with powdered sugar and garnished with vibrant chopped pistachios and a maraschino cherry, providing a harmonious blend of textures and flavors.
Ingredients
- For the Pastry:
- 2 cups all-purpose flour
- 2 tablespoons granulated sugar
- 1/2 teaspoon salt
- 1/4 cup unsalted butter, cold and cubed
- 1 large egg, lightly beaten
- 2 tablespoons white vinegar
- 1/4 cup cold water (or more, as needed)
- 4 cups vegetable oil, for frying
- For the Ricotta Filling:
- 2 cups whole milk ricotta cheese, well-drained
- 1/2 cup powdered sugar, sifted
- 1 teaspoon vanilla extract
- 1/2 cup mini chocolate chips
- 1 tablespoon orange zest (optional)
- For Garnish:
- 2 tablespoons powdered sugar, for dusting
- 1/4 cup shelled pistachios, finely chopped
- 8 maraschino cherries, stems on
Instructions
- **Prepare the Pastry Dough:** In a large bowl, whisk together flour, granulated sugar, and salt. Cut in the cold butter using a pastry blender or your fingertips until the mixture resembles coarse crumbs. In a separate small bowl, whisk the egg and white vinegar. Gradually add the egg mixture and cold water to the flour mixture, mixing until a shaggy dough forms. Knead lightly on a floured surface for 2-3 minutes until smooth. Wrap in plastic wrap and refrigerate for at least 30 minutes.
- **Roll and Cut Pastry:** On a lightly floured surface, roll out the chilled dough very thinly, about 1/16-inch thick. Cut the dough into 16 equal squares, approximately 3×3 inches each.
- **Fry the Pastry Shells:** Heat vegetable oil in a deep pot or Dutch oven to 350°F (175°C). Carefully fry the pastry squares in batches, turning occasionally, until golden brown and bubbly, about 1-2 minutes per side. Remove with a slotted spoon and place on a wire rack lined with paper towels to drain excess oil. Let cool completely.
- **Prepare the Ricotta Filling:** While the pastry cools, ensure the ricotta cheese is thoroughly drained. In a medium bowl, combine the drained ricotta cheese, sifted powdered sugar, vanilla extract, and orange zest (if using). Mix until smooth and well combined. Gently fold in the mini chocolate chips.
- **Assemble the Cannoli Squares:** Transfer the ricotta filling to a piping bag fitted with a large round tip (or use a spoon). Take one cooled pastry square, pipe a generous amount of filling onto it, spreading evenly. Top with another pastry square to create a sandwich. Repeat with the remaining pastry and filling.
- **Garnish and Serve:** Just before serving, dust the assembled cannoli squares generously with powdered sugar. Sprinkle with finely chopped pistachios and top each square with a maraschino cherry. Serve immediately.
Notes
Ensure ricotta cheese is very well-drained to prevent a watery filling.
Roll the pastry dough as thin as possible for the crispiest shells.
Fry pastry in batches to maintain oil temperature and achieve even browning.
Assemble the cannoli squares just before serving to keep the pastry crisp.
- Prep Time: 45 minutes
- Cook Time: 20 minutes
Nutrition
- Calories: 410 per serving
- Fat: 22g
- Carbohydrates: 48g
- Protein: 10g
FAQs
Why is it important to drain the ricotta cheese thoroughly for the filling?
Draining the whole milk ricotta cheese thoroughly is a crucial step for achieving the perfect creamy consistency in your filling. Excess moisture from undrained ricotta can lead to a watery, loose filling that might not hold its shape well when piped onto the pastry squares. Our recipe specifies well-drained ricotta to ensure that when you combine it with sifted powdered sugar, vanilla extract, and mini chocolate chips (and optional orange zest), you get a rich, smooth, and stable mixture that perfectly complements the crisp pastry shells of these delicious treats.
How thin should I roll the pastry dough for the crispiest shells?
For the quintessential crisp texture that defines these squares, it’s vital to roll your pastry dough very thinly. The recipe instructs to roll it out to approximately 1/16-inch thick. Achieving this thinness ensures that when the pastry squares are fried in vegetable oil at 350°F (175°C), they become wonderfully golden brown and bubbly, developing that satisfying crunch we all love. A thinner dough also means a lighter, more delicate shell, making each bite of these Best Pistachio Cannoli Squares – Delicious Treat truly delightful.
Why is it recommended to fry the pastry squares in batches?
Frying the pastry squares in batches is an essential technique to ensure consistent quality for all your shells. When you add too many cold dough pieces to the hot vegetable oil at once, it can significantly drop the oil’s temperature. A lower oil temperature results in pastry that absorbs more oil, becoming greasy instead of crisp. Frying in smaller batches helps maintain the optimal 350°F (175°C) temperature, allowing each square to cook evenly, turn golden brown, and develop those characteristic bubbles for a perfect finish on every component of these scrumptious squares.
When is the best time to assemble these delightful dessert squares?
To ensure your Pistachio Cannoli Squares retain their irresistible crispness, it is highly recommended to assemble them just before serving. The delicate, fried pastry shells can soften over time once they come into contact with the creamy ricotta filling. By piping the well-drained ricotta mixture onto the cooled pastry squares and topping them right before you plan to enjoy them, you guarantee that satisfying contrast between the crunchy shell and the smooth, sweet filling. This timing ensures the ultimate fresh taste and textural experience for these delectable treats.