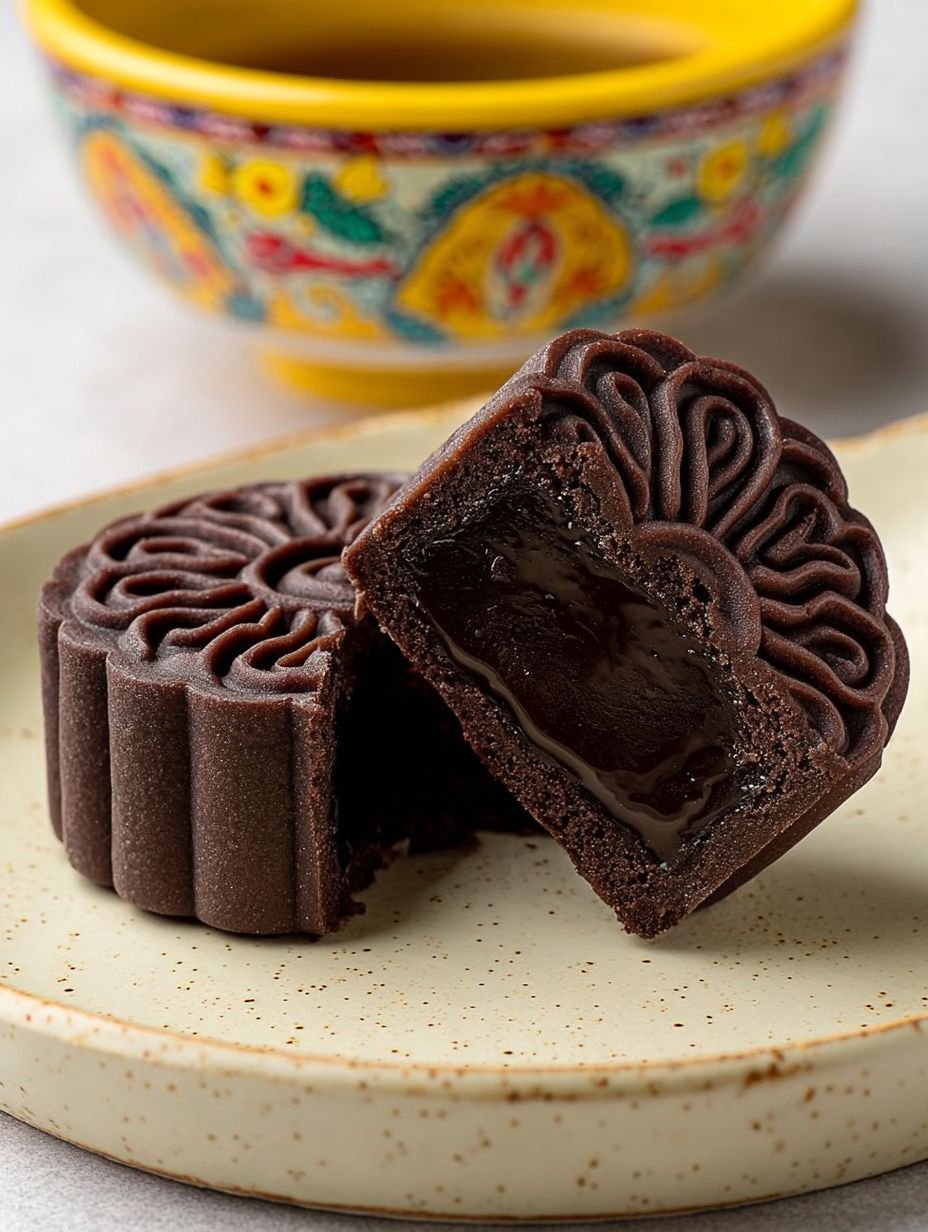
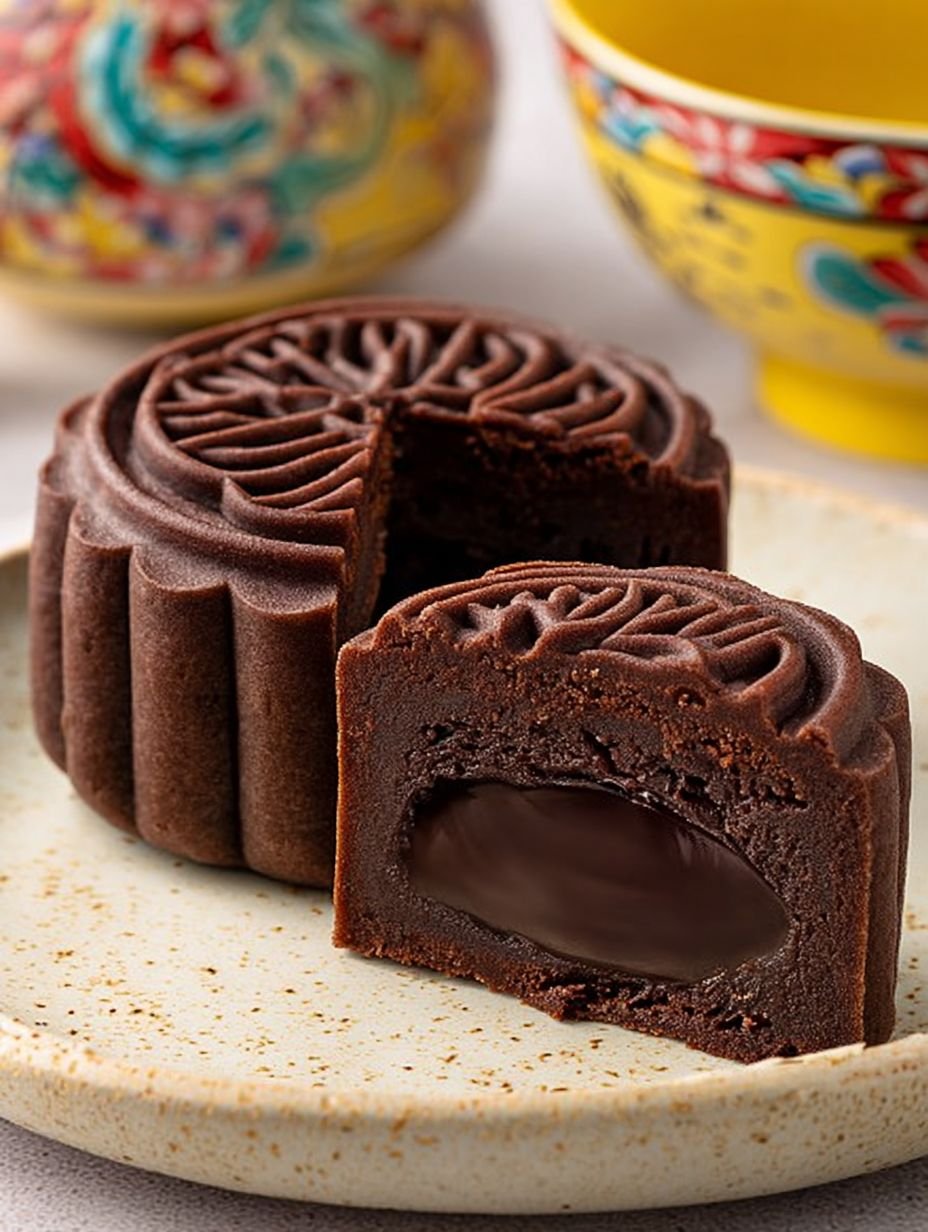
Imagine a bite where a tender, dark chocolate-infused crust yields to a rich, velvety chocolate and Oreo filling, a deep cocoa dream melting in your mouth. My earliest attempts at fancy baking often ended in a comical disaster, but discovering the magic of these mooncakes transformed my kitchen chaos into delightful confectionery triumphs.
What Makes This Recipe Special
This Decadent Chocolate Lava Mooncake Recipe stands out as a true culinary gem, effortlessly combining easy preparation with a unique flavor profile that marries deep cocoa with the comforting sweetness of crushed chocolate sandwich cookies. The result is a stunning appearance, showcasing intricate designs on its dark exterior, making it a versatile and impressive treat perfect for any occasion.
Ingredients
Here’s what you need for this delicious dish:
- **For the Dough:**
- **100g all-purpose flour:** This forms the structural base of our mooncake crust, ensuring it’s tender yet sturdy enough to hold its intricate shape.
- **15g cocoa powder, unsweetened:** The secret to our elegant, dark chocolate-infused crust, providing a deep, rich cocoa flavor and beautiful color.
- **70g golden syrup:** Essential for that traditional mooncake chewiness and a lovely golden-brown finish, contributing to the “Decadent” aspect of our treat. Ensure it’s good quality for the best texture.
- **1/4 teaspoon alkaline water (lye water):** A small but mighty ingredient that helps achieve the mooncake’s signature tender texture and a beautiful, deep brown color as it bakes.
- **25g vegetable oil:** This adds essential moisture and tenderness to the dough, making it pliable and easy to work with.
- **For the Chocolate Oreo Filling:**
- **200g Oreo cookies, finely crushed (about 20 cookies, cream filling included):** The star of our “Lava” filling, creating a familiar, comforting sweetness and delightful texture that makes the interior so satisfyingly rich and soft.
- **50g unsalted butter, melted:** Binds the filling ingredients together, adding a luxurious richness and contributing to that melt-in-your-mouth, velvety “lava” texture.
- **60g condensed milk:** Provides sweetness and creaminess, helping to create a smooth, pliable filling that is truly decadent.
- **20g cocoa powder, unsweetened:** Boosts the deep chocolate flavor in the filling, complementing the Oreo cookies and enhancing the overall richness.
- **50g dark chocolate chips or chopped dark chocolate:** These chips are crucial for the “lava” effect, melting slightly within the filling to add pockets of intense, gooey chocolate richness, elevating the indulgence factor significantly.
- **For Egg Wash (optional, for shine):**
- **1 egg yolk:** Provides a beautiful golden sheen and helps crisp up the crust ever so slightly.
- **1 tablespoon milk:** Thins the egg yolk, making it easier to brush evenly and preventing a thick, heavy coating.
All ingredients and quantities can be found directly in the recipe card below.
Step-by-Step Instructions
Simply follow these easy steps to prepare this delicious meal:
Step 1: Crafting Your Velvety Oreo Chocolate Filling
First, grab a medium bowl and combine the finely crushed Oreo cookies, luscious melted butter, sweet condensed milk, and a generous dash of unsweetened cocoa powder. Mix these ingredients thoroughly until you have a thick, pliable dough. This is the heart of our Decadent Chocolate Lava Mooncake Recipe. If your mixture feels a little too dry, just add a tiny bit more condensed milk; if it’s too wet, a tablespoon of crushed plain biscuits will sort it out. Gently stir in the dark chocolate chips, ensuring they are evenly distributed. Now, divide this glorious filling into 8 to 10 equal portions, each weighing about 40-45g, and roll them into perfectly smooth balls. Place them on a plate and let them chill in the refrigerator for at least 30 minutes; this firms them up for easy handling later.
Step 2: Preparing the Tender Chocolate Dough
In a large bowl, whisk together the golden syrup, alkaline water, and vegetable oil until they are thoroughly combined into a smooth mixture. Sift the all-purpose flour and unsweetened cocoa powder directly into these wet ingredients. With a spatula, gently mix until a soft dough forms. Be careful not to overmix; we want a tender crust, not a tough one! Cover your dough with plastic wrap and let it rest at room temperature for a minimum of 1 hour. This resting period is vital for the dough to relax, making it much easier to work with when you assemble your mooncakes.
Step 3: Assembling Your Chocolate Mooncake Treasures
Now for the fun part! Divide your rested dough into 8 to 10 equal portions, each weighing approximately 25-30g. Take one piece of dough and flatten it into a thin disc, about 3 to 4 inches in diameter. Place one of your chilled filling balls right in the center of the dough disc. Carefully wrap the dough around the filling, making sure to pinch the edges tightly to seal it completely. The goal is to ensure no filling is exposed, keeping the “lava” locked inside.
Step 4: Shaping the Mooncakes with Precision
Lightly dust your mooncake mold (either a 50g or 75g size works perfectly for this Decadent Chocolate Lava Mooncake Recipe) with a little flour, then tap out any excess. This ensures your mooncakes release beautifully. Place a wrapped mooncake ball into the prepared mold. Press down firmly and evenly onto a baking sheet lined with parchment paper to create that stunning, desired pattern. Gently release the mooncake from the mold, admiring its intricate design. Repeat this process with the remaining dough and filling, taking care with each one.
Step 5: The First Bake for Structure
Preheat your oven to 170°C (340°F). Once heated, carefully place your shaped mooncakes into the oven. Bake them for just 5 to 7 minutes. This initial bake helps set the crust and define the pattern. After this short bake, remove them from the oven and let them cool on the baking sheet for 5 minutes. They’ll firm up slightly during this brief cooling period.
Step 6: The Optional Egg Wash for a Lustrous Finish
If you’re opting for that beautiful, traditional golden shine, now is the time for the egg wash. In a small bowl, whisk together the egg yolk and milk until well combined. Using a pastry brush, very lightly brush the tops of the mooncakes with this mixture. Remember, less is more here; too much egg wash can obscure the delicate pattern you worked so hard to create. This step adds a touch of professional polish to your Decadent Chocolate Lava Mooncake Recipe.
Step 7: The Final Bake to Golden Perfection
Return your mooncakes to the preheated oven. Bake them for another 8 to 10 minutes, or until their crusts turn a lovely golden brown and feel perfectly set. Keep an eye on them to prevent over-browning. The crust should be firm, hinting at the tender interior.
Step 8: Cooling and Resting for Optimal Flavor
Once baked to perfection, remove the mooncakes from the oven and carefully transfer them to a wire rack to cool completely. This cooling process is crucial. For the absolute best experience, these mooncakes are truly best enjoyed after resting for 1 to 2 days at room temperature in an airtight container. This allows the oils from the crust to seep into the filling, resulting in a much softer, more tender texture and a wonderfully enhanced flavor, making each bite of this Decadent Chocolate Lava Mooncake Recipe truly unforgettable. Garnish with a sprinkle of cocoa powder if desired and serve these magnificent treats to delight your senses.
The Story Behind the Sweetness
There’s something uniquely satisfying about taking a traditional treat and giving it a playful, modern twist. My journey to perfecting this particular chocolate lava mooncake recipe began with a challenge: how do you convince someone who thinks mooncakes are “too traditional” to fall head over heels for them? The answer, as it turns out, involves a generous dose of chocolate, a hint of childhood nostalgia from Oreos, and a whole lot of love. I remember the look of utter surprise and then pure bliss on my friend’s face when they took their first bite of one of these. “This isn’t just a mooncake,” they declared, mouth full, “this is a chocolate dream wrapped in tradition!” That’s the magic we’re chasing here – a bridge between cultures and flavors, all in one perfectly portioned, incredibly delicious bite. It’s a testament to how food can evolve, surprise, and bring joy in unexpected ways. This Decadent Chocolate Lava Mooncake Recipe isn’t just a dessert; it’s a conversation starter, a delightful indulgence, and a testament to modern culinary creativity.
Crafting Your Chocolate Masterpiece: Tips for Success
Achieving perfect mooncakes, especially with such a rich filling, benefits from a few expert tips. First, the quality of your golden syrup truly matters for the dough’s texture and overall flavor, so don’t skimp on this traditional ingredient. Next, resisting the urge to skip the dough resting step is paramount. This hour-long rest allows the gluten to relax, which makes the dough significantly easier to handle and ensures a tender crust, not a crumbly one. When you’re pressing your mooncakes into the mold, apply even pressure. This consistency is key for achieving a clear, beautifully defined pattern that will impress everyone. For those looking to intensify the chocolate flavor in the filling, consider using a dark chocolate with a higher percentage cocoa for the chips; it really makes a difference. Lastly, patience is a virtue when it comes to enjoying these chocolate-filled delights. While tempting to devour them warm, allowing them to rest for a day or two truly enhances their texture and melds the flavors beautifully, delivering the full decadent experience.
Frequently Asked Questions About Chocolate Mooncakes
Making a new recipe, especially one with a traditional twist, often sparks a few questions. Let’s tackle some common queries about this Decadent Chocolate Lava Mooncake Recipe to ensure your baking journey is smooth and successful.
What is alkaline water, and can I substitute it?
Alkaline water, also known as lye water or kansui, is a crucial ingredient in traditional mooncake dough. It helps give the crust its characteristic tender texture and contributes to the deep golden-brown color. While it might seem intimidating, it’s widely available in Asian grocery stores. It’s best not to substitute it in this Decadent Chocolate Lava Mooncake Recipe, as it plays a unique role in the dough’s chemistry. Without it, the texture and appearance of your mooncakes might not be quite right.
Can I make the filling or dough ahead of time?
Absolutely! Both the filling and the dough for these chocolate mooncakes can be prepared in advance. The filling balls can be made a day or two ahead and stored in an airtight container in the refrigerator. Just ensure they are well chilled before assembling. The dough also benefits from resting, as mentioned in the instructions, and can be kept covered in the fridge for up to a day if needed, though room temperature resting is ideal for the hour specified.
How do I store these Decadent Chocolate Lava Mooncakes?
Once completely cooled, store your mooncakes in an airtight container at room temperature. They will keep well for up to 5-7 days. As noted in the recipe, the flavor and texture actually improve after a day or two of resting, so don’t be afraid to make them a little in advance for optimum enjoyment.
What if my mooncakes stick to the mold?
This is a common concern! The key is proper flour dusting. Lightly dust the mooncake mold with all-purpose flour and tap out any excess before pressing each mooncake. This creates a thin barrier that prevents sticking. If they still stick, ensure your dough isn’t too sticky (a result of too much oil or not enough flour, though our precise recipe should prevent this). Also, ensure you press down firmly and evenly; a weak press can sometimes lead to sticking.
Decoding Your Decadent Treat: Nutrition Facts
Understanding what goes into your delicious treats is always a good idea, especially when they’re as indulgent as this Decadent Chocolate Lava Mooncake Recipe. Here’s a breakdown of the nutritional information per serving:
- **Servings:** 8-10 mooncakes
- **Calories:** 320 kcal
- **Protein:** 4g
- **Carbs:** 45g
- **Fat:** 15g
These values provide a glimpse into the richness of each chocolate-filled mooncake, perfect for mindful enjoyment.
Why This Chocolate Lava Mooncake Recipe Will Be Your New Favorite
So there you have it, folks – not just a recipe, but a journey into the heart of what makes baking so utterly fulfilling. This Decadent Chocolate Lava Mooncake Recipe isn’t just about combining ingredients; it’s about creating an experience. It’s about the joy of turning simple components into something truly spectacular, something that bridges the gap between traditional craftsmanship and modern cravings. Whether you’re a seasoned baker or someone who usually just admires from afar, this recipe invites you to roll up your sleeves and discover the delight of making these chocolate-filled treasures. Each bite offers a harmonious blend of deep cocoa notes and the comforting sweetness of crushed chocolate sandwich cookies, a smooth, melt-in-your-mouth texture that is simply irresistible. Get ready to impress your friends, delight your family, and perhaps even surprise yourself with your culinary prowess. Go ahead, give this recipe a try; your taste buds (and your inner food blogger) will thank you!
Perfecting the Cooking Process
Always prepare the chocolate Oreo filling first and chill it thoroughly for easy handling. While the filling sets, the mooncake dough can rest, allowing the gluten to relax for a smoother texture. This synchronization ensures both components are perfectly ready for seamless assembly, leading to beautifully shaped lava mooncakes.
Add Your Personal Touch
To personalize your delicious mooncakes, experiment with the dark chocolate chips. Consider using milk chocolate chips for a sweeter filling or white chocolate for a contrasting flavor profile. You could also vary the unsweetened cocoa powder in the dough for a deeper or milder chocolate hue. Stick to the recipe’s core, but play with these subtle delicious shifts!
Storage & Reheating
For the best experience, store your mooncakes in an airtight container at room temperature for 1-2 days post-baking. This crucial resting period allows the crust to soften and the flavors to meld beautifully, creating that signature tender texture. Enjoy them at room temperature; reheating is generally not recommended as it can alter the delicate texture of these exquisite treats.
Helpful Chef Tips
I recall the first time my niece tried a piece of this decadent chocolate lava mooncake. Her eyes lit up with pure joy at the rich chocolatey core, declaring it ‘magical.’ That’s the feeling I hope these delightful treats bring to you.
Final Thoughts
Crafting the Decadent Chocolate Lava Mooncake Recipe at home is more than just baking; it is an experience that culminates in a truly unforgettable dessert. Imagine sinking your teeth into a tender, dark chocolate-infused crust, giving way to a rich, velvety chocolate and Oreo filling that melts in your mouth. This harmonious blend of deep cocoa notes and comforting sweetness, adorned with intricate designs, offers a unique culinary adventure. You will be amazed by the depth of flavor and texture you can achieve. Don’t wait to bring this exquisite treat to your table. Gather your ingredients and create these delightful chocolate creations today!
Print
Decadent Chocolate Lava Mooncake Recipe
- Total Time: 0 hours
- Yield: 8-10 mooncakes 1x
Description
This elegant mooncake features a tender, dark chocolate-infused crust that encases a rich, velvety chocolate and Oreo filling. Each bite offers a harmonious blend of deep cocoa notes and the familiar, comforting sweetness of crushed chocolate sandwich cookies, creating a decadent treat with a smooth, melt-in-your-mouth texture. The intricate design on the exterior adds a touch of traditional artistry to this modern dessert.
Ingredients
- **For the Dough:**
- 100g all-purpose flour
- 15g cocoa powder, unsweetened
- 70g golden syrup
- 1/4 teaspoon alkaline water (lye water)
- 25g vegetable oil
- **For the Chocolate Oreo Filling:**
- 200g Oreo cookies, finely crushed (about 20 cookies, cream filling included)
- 50g unsalted butter, melted
- 60g condensed milk
- 20g cocoa powder, unsweetened
- 50g dark chocolate chips or chopped dark chocolate
- **For Egg Wash (optional, for shine):**
- 1 egg yolk
- 1 tablespoon milk
Instructions
- **Prepare the Filling:** In a medium bowl, combine the finely crushed Oreo cookies, melted butter, condensed milk, and cocoa powder. Mix well until a thick, pliable dough forms. If the mixture is too dry, add a tiny bit more condensed milk; if too wet, add a tablespoon of crushed plain biscuits. Stir in the dark chocolate chips. Divide the filling into 8-10 equal portions (about 40-45g each) and roll them into smooth balls. Place on a plate and chill in the refrigerator for at least 30 minutes.
- **Prepare the Dough:** In a large bowl, combine the golden syrup, alkaline water, and vegetable oil. Whisk until well combined. Sift the all-purpose flour and cocoa powder into the wet ingredients. Mix with a spatula until a soft dough forms. Do not overmix. Cover the dough with plastic wrap and let it rest at room temperature for at least 1 hour.
- **Assemble the Mooncakes:** Divide the rested dough into 8-10 equal portions (about 25-30g each). Flatten one piece of dough into a thin disc, about 3-4 inches in diameter. Place one chilled filling ball in the center of the dough disc. Carefully wrap the dough around the filling, pinching the edges to seal completely. Ensure no filling is exposed.
- **Shape the Mooncakes:** Lightly dust a mooncake mold (50g or 75g size) with a little flour, tapping out any excess. Place a wrapped mooncake ball into the mold. Press down firmly and evenly onto a baking sheet lined with parchment paper to create the desired pattern. Gently release the mooncake from the mold. Repeat with the remaining dough and filling.
- **Bake the Mooncakes:** Preheat your oven to 170°C (340°F). Bake the mooncakes for 5-7 minutes. Remove from the oven and let them cool for 5 minutes.
- **Apply Egg Wash (Optional):** If using, whisk the egg yolk and milk for the egg wash. Lightly brush the tops of the mooncakes with the egg wash. Be careful not to use too much, as it can obscure the pattern.
- **Final Bake:** Return the mooncakes to the oven and bake for another 8-10 minutes, or until they are golden brown and the crust is set.
- **Cool and Rest:** Remove the mooncakes from the oven and transfer them to a wire rack to cool completely. Mooncakes are best enjoyed after resting for 1-2 days at room temperature in an airtight container. This allows the oil from the crust to seep into the filling, resulting in a softer, more tender texture and enhanced flavor.
Notes
Ensure your golden syrup is of good quality for the best dough texture and flavor.
Do not skip the dough resting step; it allows the gluten to relax, making the dough easier to handle.
When pressing the mooncakes, apply even pressure to ensure a clear, well-defined pattern.
Store mooncakes in an airtight container at room temperature for up to 5-7 days.
For a richer chocolate flavor, use a higher percentage dark chocolate for the chips in the filling.
- Prep Time: 60 minutes (including dough rest)
- Cook Time: 15-17 minutes
Nutrition
- Calories: 320 kcal
- Fat: 15g
- Carbohydrates: 45g
- Protein: 4g
FAQs
What is the purpose of resting the dough before assembly?
Resting the mooncake dough is a crucial step that ensures the best texture and workability. After combining the golden syrup, alkaline water, vegetable oil, all-purpose flour, and cocoa powder, the dough needs time to relax. According to the recipe, covering the dough with plastic wrap and letting it rest at room temperature for at least 1 hour allows the gluten to relax. This makes the dough much easier to handle when you divide it into portions and flatten it into discs for wrapping the filling. Skipping this step can result in a tougher dough that is difficult to shape and may crack during assembly.
How should I properly store these chocolate mooncakes?
Proper storage is essential to maintain the freshness and quality of your homemade mooncakes. Once they have cooled completely on a wire rack after baking, transfer them to an airtight container. The recipe specifies that these delightful chocolate treats should be stored at room temperature. When stored correctly, they can maintain their optimal taste and texture for up to 5-7 days. Enjoying them within this timeframe ensures you experience the best of their tender crust and rich filling.
What can I do if my chocolate Oreo filling isn’t the right consistency?
Achieving the perfect consistency for the chocolate Oreo filling is key to successful mooncake assembly. After combining the crushed Oreo cookies, melted butter, condensed milk, cocoa powder, and dark chocolate chips, the mixture should form a thick, pliable dough. If you find the mixture is too dry and crumbly, the recipe suggests adding a tiny bit more condensed milk to achieve the desired texture. Conversely, if your filling appears too wet or sticky, you can incorporate a tablespoon of crushed plain biscuits to help absorb excess moisture and firm it up.
Why is it recommended to rest the mooncakes for 1-2 days after baking?
After the final bake, it might be tempting to immediately enjoy your homemade mooncakes, but the recipe advises a crucial resting period. Removing the mooncakes from the oven and letting them cool completely on a wire rack is just the first part. For optimal results, they are best enjoyed after resting for 1-2 days at room temperature in an airtight container. This allows the oil from the crust to seep into the rich filling, resulting in a softer, more tender texture and significantly enhanced flavor, truly bringing out the decadence of this recipe.