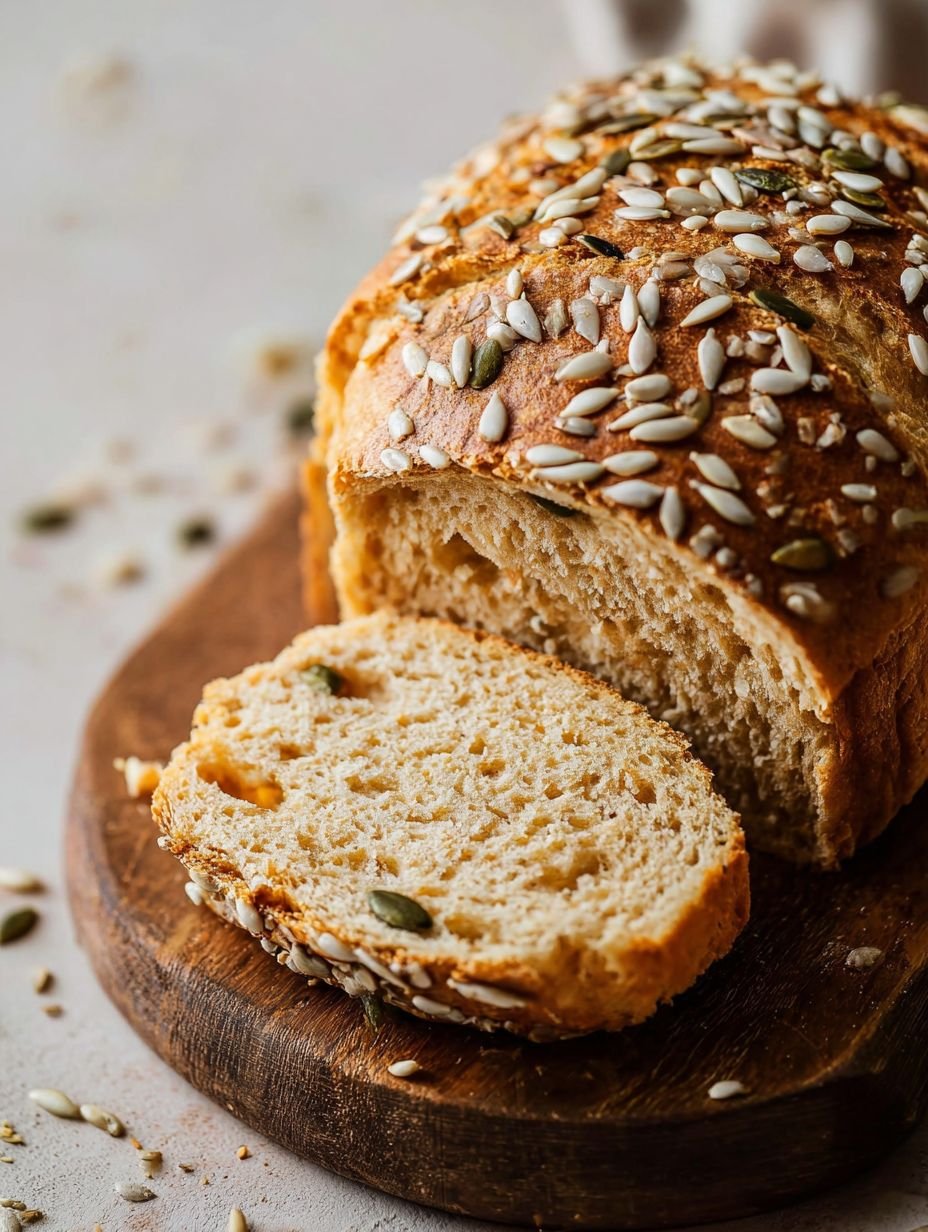
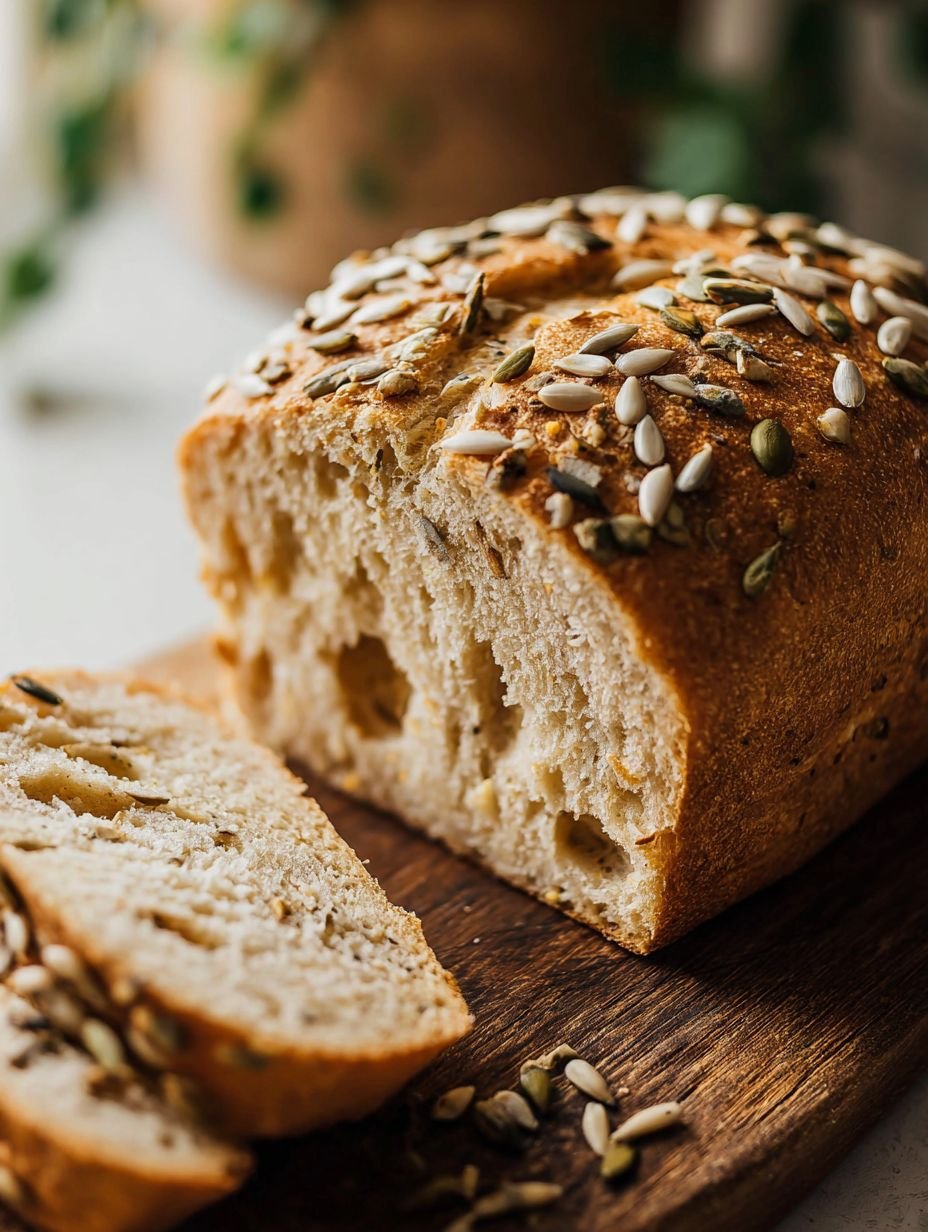
The aroma of warm, tender bread, with its subtle nutty notes and satisfying, golden crust, fills the kitchen, promising pure comfort with every slice. This delightful creation offers a wholesome flavor profile and a delicate crunch from a medley of seeds.
There’s nothing quite like pulling a fresh loaf from the oven. I remember trying my hand at baking bread as a kid, ending up with a brick that could double as a doorstop – a far cry from the fluffy goodness we’re about to make!
This bread transforms simple ingredients into something extraordinary, making it *your new favorite healthy seeded bread recipe* for good reason. Its preparation is surprisingly easy, even for novice bakers, unfolding into a unique flavor profile where earthy seeds meet a soft, airy crumb. Visually, the golden crust, speckled with a beautiful blend of seeds, is utterly stunning, inviting you to slice right in. Plus, it is wonderfully versatile, perfect for everyday sandwiches, toast, or a simple accompaniment to any meal.
Ingredients
Here’s what you need for this delicious dish:
- **1 cup warm water (105-115°F / 40-46°C)**: The perfect temperature for waking up your yeast; think of it as a cozy spa for tiny fungi, ensuring they activate properly to give your loaf its lovely lift.
- **2 teaspoons active dry yeast**: The magic leavening agent that transforms a simple dough into a fluffy, airy bread. Ensure it’s active for optimal rise.
- **2 tablespoons granulated sugar or honey**: This isn’t just for sweetness; it’s vital food for the yeast, helping it to get bubbly and energetic, contributing to the beautiful golden-brown crust.
- **3 cups all-purpose flour, plus more for dusting**: The foundational structure of our bread, providing the gluten needed for elasticity and chewiness. A little extra is helpful for shaping.
- **1 teaspoon salt**: Crucial for flavor, salt also plays a role in controlling yeast activity and strengthening the gluten network, leading to a better texture.
- **2 tablespoons unsalted butter, softened or olive oil**: Adds richness, tenderness, and moisture to the crumb. Softened butter blends seamlessly, while olive oil offers a slightly different depth of flavor.
- **1 large egg, beaten (for egg wash, optional)**: An optional but recommended ingredient that, when brushed on, gives the bread a beautiful, shiny, golden-brown crust and helps the seeds adhere perfectly.
- **1/4 cup mixed seeds (sunflower, pumpkin, sesame, flax)**: These are the stars that make this *your new favorite healthy seeded bread recipe*. This blend of sunflower, pumpkin, sesame, and flax seeds imparts a delightful nutty flavor, a satisfying crunch, and a visually appealing rustic finish, elevating both the taste and texture of every bite.
All exact quantities are provided in the comprehensive list below.
Why Bake Your Own Bread?
Beyond the sheer joy of a freshly baked loaf, there are countless reasons to embrace homemade bread. For starters, you control every single ingredient, ensuring no hidden additives or preservatives sneak their way in. It’s a return to simpler, wholesome eating, and the satisfaction of pulling a warm, aromatic loaf from your own oven is truly unparalleled. This particular recipe emphasizes simplicity and nutrition, making it a fantastic entry point into the world of bread making. Imagine the pride in serving a slice of wholesome bread that you crafted yourself, knowing exactly what went into creating such a comforting staple.
There’s also a meditative quality to the process. Kneading dough can be wonderfully therapeutic, a chance to connect with your food on a deeper level. Plus, the compliments you’ll receive are pretty sweet too! This whole grain goodness isn’t just good for your body; it’s a boost for your spirit, making it an excellent candidate for *your new favorite healthy seeded bread recipe*.
Step-by-Step Instructions
Simply follow these easy steps to prepare this delicious meal:
Step 1: Activate the Yeast
In a large mixing bowl, combine the warm water, active dry yeast, and either granulated sugar or honey. Stir these ingredients gently until they are well combined. Allow this mixture to rest undisturbed for 5 to 10 minutes. During this time, the yeast should become visibly foamy on the surface, which is a clear indication that it is alive and ready to work its magic. If no foam appears, your water might have been too hot or too cold, or your yeast may be expired, and you should start fresh.
Step 2: Form the Dough
Once your yeast is bubbling happily, add the all-purpose flour, salt, and the softened unsalted butter or olive oil directly into the yeast mixture in the bowl. Using a sturdy wooden spoon or the dough hook attachment on a stand mixer, begin to mix these ingredients together. Continue mixing until all the dry ingredients are fully incorporated and a shaggy, somewhat rough-looking dough starts to form.
Step 3: Knead for Elasticity
Turn the shaggy dough out onto a surface that has been lightly dusted with a little extra all-purpose flour. Now, it’s time to knead! Work the dough by hand for 8 to 10 minutes. The goal is to develop the gluten, transforming the dough into a smooth, elastic, and supple mass that springs back when gently pressed. If you are using a stand mixer, knead the dough on a medium-low speed setting for 6 to 8 minutes until it achieves the same smooth and elastic consistency.
Step 4: First Rise
Locate a clean mixing bowl and lightly grease its interior with a small amount of oil. Transfer the kneaded dough into this prepared bowl, turning the dough once to ensure it is fully coated in the oil. This prevents it from sticking as it rises. Cover the bowl securely with plastic wrap or drape a clean kitchen towel over it. Place the bowl in a warm, draft-free spot in your kitchen and let the dough rise for 1 to 1.5 hours, or until it has distinctly doubled in its original size.
Step 5: Punch Down and Shape
Once the dough has completed its glorious first rise and doubled in size, gently punch it down. This action releases the trapped air, which is a crucial step for achieving a fine crumb structure. Turn the dough out onto a lightly floured surface once more. Now, carefully shape the dough into a cohesive loaf, preparing it for its final resting place.
Step 6: Prepare Loaf Pan
Take a standard 9×5-inch loaf pan and grease it thoroughly. This step is essential to prevent the bread from sticking and ensures an easy release after baking. Carefully transfer the shaped dough into the prepared loaf pan, settling it comfortably into its new home.
Step 7: Apply Egg Wash and Seeds
This step adds both flavor and visual appeal, truly defining *your new favorite healthy seeded bread recipe*. If you’ve chosen to use an egg wash, take the beaten large egg and brush it evenly over the entire top surface of the shaped dough in the pan. Immediately after brushing, generously sprinkle the 1/4 cup of mixed seeds (sunflower, pumpkin, sesame, flax) over the top of the loaf, gently pressing them into the dough to ensure they adhere well during baking.
Step 8: Second Rise
Loosely cover the loaf pan with plastic wrap or a clean kitchen towel. Return the pan to a warm place, allowing the dough to undergo its second rise. This usually takes 30 to 45 minutes, or until the dough has nearly doubled in size again and risen noticeably above the rim of the pan. This final rise gives the bread its ultimate volume and texture.
Step 9: Preheat Oven
During the final stages of the second rise, it’s time to preheat your oven. Set the temperature to 375°F (190°C). Allowing the oven to fully preheat ensures that the bread starts baking at the correct temperature from the moment it enters, leading to a consistent rise and a beautiful crust.
Step 10: Bake the Bread
Carefully place the risen loaf pan into the preheated oven. Bake the bread for approximately 30 to 35 minutes. You’ll know it’s ready when the crust turns a rich golden brown color, and an instant-read thermometer inserted into the center of the loaf registers an internal temperature between 200-210°F (93-99°C).
Step 11: Cool Completely
As soon as the bread is done baking, remove the loaf from the oven. Immediately transfer the hot bread from the loaf pan onto a wire rack. This critical step allows air to circulate around the entire loaf, preventing the bottom from becoming soggy and ensuring a perfectly crisp crust. It is incredibly important to let the bread cool *completely* before attempting to slice it. Slicing warm bread can compress the crumb and make it gummy. Once cooled, enjoy a perfect slice!
Tips for Bread Baking Success
Making homemade bread, especially a wholesome loaf like this seeded variety, is incredibly rewarding. To ensure *your new favorite healthy seeded bread recipe* turns out perfectly every time, a few extra pointers can make all the difference. Always ensure your ingredients, especially the flour and yeast, are fresh. Old yeast simply won’t activate effectively, leading to a flat loaf. A small kitchen scale can be invaluable for accurate measurements, particularly for flour, as scooping can pack it down and lead to too much.
Don’t rush the rising process; dough needs its time to develop flavor and texture. A warm spot in your kitchen, perhaps near a sunny window or in a slightly warm (but turned off!) oven, can encourage a good rise. If your home is chilly, simply put the bowl in a warm place like an oven with the light on. Finally, resist the urge to peek too often while baking, as opening the oven can cause temperature fluctuations that impact the bread’s rise. Patience is truly a baker’s best friend.
Storing Your Homemade Loaf
Once you’ve enjoyed the first glorious slices of *your new favorite healthy seeded bread recipe*, proper storage is key to keeping it fresh and delicious. After the bread has cooled completely on a wire rack – and this part is non-negotiable for avoiding a soggy crust – store it in an airtight container at room temperature. A bread box or a large resealable bag works perfectly. Stored this way, your delightful homemade loaf will stay fresh and soft for up to 3 to 4 days, perfect for daily sandwiches or toast.
For longer storage, this bread freezes beautifully. Slice the cooled loaf entirely, then place the slices in a freezer-safe bag or container, removing as much air as possible. You can then grab individual slices as needed, toasting them directly from the freezer for a quick and easy breakfast or snack. This ensures you always have a wholesome, homemade option ready, preserving the incredible flavor and texture you worked hard to achieve.
Nutrition Information (per 12 slices)
Knowing the nutritional value of what you eat can be empowering. Each generous serving (one of 12 slices) of this wholesome bread offers:
- **Calories:** 150
- **Protein:** 5g
- **Carbs:** 28g
- **Fat:** 3g
This bread isn’t just tasty; it’s a great option for a balanced diet, providing satisfying protein and carbohydrates to fuel your day, all while keeping the fat content low.
A Slice of Homemade Joy
Baking your own bread is an incredibly rewarding experience, filling your home with an irresistible aroma and your belly with wholesome goodness. This recipe delivers a tender, airy crumb and a delightfully golden, seeded crust that elevates any meal. From a simple breakfast toast to the foundation of a hearty sandwich, this versatile loaf is bound to become a staple in your kitchen. So go ahead, tie on that apron, and prepare to bake *your new favorite healthy seeded bread recipe* – a true testament to the simple pleasures of homemade food. Enjoy the journey, and savor every single delicious bite!
Mastering the Secrets of Cooking
Achieving this perfect seeded loaf begins with patience. First, ensure your yeast is truly foamy before mixing in dry ingredients, ensuring a robust rise. Knead thoroughly to develop gluten for that signature chewiness. Finally, allow both rises their full, unhurried time for maximum airy deliciousness in this healthy seeded bread.
Make Your Recipe Unique
To personalize this wholesome bread, consider honey instead of granulated sugar for a different sweetness profile. Swap unsalted butter for olive oil if you prefer. While the recipe suggests sunflower, pumpkin, sesame, and flax seeds, feel free to include poppy seeds in your mixed blend for added crunch.
Smart Storage & Reheating
To maintain the tender crumb and subtle crust of your delightful seeded bread, ensure it cools fully on a wire rack before airtight storage. This prevents sogginess. For longer freshness, freeze slices. A brief toast will easily restore its wonderful, just-baked texture when ready to enjoy.
The Chef’s Golden Tips
I remember the first time I made this bread. The aroma filled the house, bringing my family straight to the kitchen, eager for a slice. That warm, seedy goodness was gone in minutes, a true testament to its irresistible charm.
Final Thoughts
The incomparable aroma of warm bread baking fills your kitchen, promising a treat for the senses. This loaf delivers a tender, airy crumb, perfectly complemented by a satisfying golden crust and the delightful crunch of a mixed seed topping. Crafting this wholesome bread at home is a rewarding experience, providing a nutritious option for sandwiches or simply to enjoy with your favorite spread. Its simple ingredients and straightforward steps make creating this staple a joyous occasion. Don’t just imagine that wonderful smell and taste; try out this seeded bread recipe today and discover your new favorite!
Print
Your New Favorite Healthy Seeded Bread Recipe
- Total Time: 0 hours
- Yield: 12 slices
Description
This homemade sandwich bread features a tender, airy crumb and a golden crust generously adorned with a blend of nutritious seeds. The gentle warmth of freshly baked bread is complemented by the subtle nutty notes and delicate crunch from sunflower, pumpkin, and sesame seeds. Baked to perfection, this loaf offers a satisfying texture and a wholesome flavor profile, ideal for everyday sandwiches or as a simple accompaniment to any meal.
Ingredients
- * 1 cup warm water (105-115°F / 40-46°C)
- * 2 teaspoons active dry yeast
- * 2 tablespoons granulated sugar or honey
- * 3 cups all-purpose flour, plus more for dusting
- * 1 teaspoon salt
- * 2 tablespoons unsalted butter, softened or olive oil
- * 1 large egg, beaten (for egg wash, optional)
- * 1/4 cup mixed seeds (sunflower, pumpkin, sesame, flax)
Instructions
- In a large bowl, combine the warm water, yeast, and sugar. Let it sit for 5-10 minutes until foamy, indicating the yeast is active.
- Add the flour, salt, and softened butter or olive oil to the yeast mixture. Mix with a wooden spoon or stand mixer with a dough hook until a shaggy dough forms.
- Turn the dough out onto a lightly floured surface and knead for 8-10 minutes, or until the dough is smooth and elastic. If using a stand mixer, knead on medium-low speed for 6-8 minutes.
- Lightly grease a clean bowl with oil. Place the dough in the bowl, turning once to coat. Cover the bowl with plastic wrap or a clean kitchen towel and let it rise in a warm place for 1 to 1.5 hours, or until doubled in size.
- Gently punch down the risen dough to release air. Turn it out onto a lightly floured surface and shape it into a loaf.
- Grease a 9×5-inch loaf pan. Place the shaped dough into the prepared pan.
- If using an egg wash, brush the top of the loaf with the beaten egg. Sprinkle the mixed seeds evenly over the top, gently pressing them into the dough.
- Cover the loaf pan loosely with plastic wrap or a towel and let it rise again in a warm place for 30-45 minutes, or until it has nearly doubled in size and risen above the rim of the pan.
- Preheat your oven to 375°F (190°C) during the second rise.
- Bake the bread for 30-35 minutes, or until the crust is golden brown and the internal temperature reaches 200-210°F (93-99°C).
- Remove the bread from the oven and immediately transfer it from the pan to a wire rack to cool completely before slicing.
Notes
* Ensure your water temperature is correct for yeast activation; too hot will kill it, too cold will slow it down.
* For a softer crust, brush the warm bread with a little melted butter immediately after removing it from the oven.
* Feel free to customize the seed blend with your favorites, such as poppy seeds or flax seeds.
* Store cooled bread in an airtight container at room temperature for up to 3-4 days, or freeze for longer storage.
- Prep Time: 25 minutes
- Cook Time: 30-35 minutes
Nutrition
- Calories: 150
- Fat: 3g
- Carbohydrates: 28g
- Protein: 5g
FAQs
What is the ideal water temperature for activating the yeast in this bread recipe?
Achieving the correct water temperature is crucial for yeast activation, ensuring your bread rises beautifully. The recipe specifies using warm water between 105-115°F (40-46°C). If the water is too hot, it can kill the active dry yeast, preventing the dough from rising. Conversely, if the water is too cold, the yeast will not activate properly, resulting in a slow or non-existent rise. Always measure the temperature carefully to ensure the yeast is bubbly and foamy after 5-10 minutes, indicating it is active and ready to work its magic in your dough.
Can I change the type of seeds used for the topping in this healthy seeded bread?
Absolutely, you can easily customize the seed blend to suit your preferences for this delicious bread. The recipe calls for a mix of sunflower, pumpkin, sesame, and flax seeds, which contributes to the wholesome flavor and texture. However, the notes explicitly mention that you can feel free to customize the blend with your favorites. Options like poppy seeds or additional flax seeds would also work wonderfully. Simply ensure you use approximately 1/4 cup of your chosen mixed seeds to sprinkle evenly over the top of the loaf before the second rise.
How should I store my freshly baked seeded bread to maintain its freshness?
Proper storage is key to keeping your homemade bread fresh and enjoyable for as long as possible. Once the loaf has completely cooled on a wire rack, transfer it to an airtight container. Storing the bread at room temperature in this manner will help maintain its quality for up to 3-4 days. For longer storage, you can freeze the cooled bread. This method is excellent for preserving its freshness and flavor, allowing you to enjoy a slice of this wholesome creation whenever the craving strikes without it going stale.
What is the best way to achieve a softer crust for this homemade bread?
The baking process in this recipe is designed to create a golden-brown crust with a satisfying texture. However, if you prefer an even softer crust, there’s a simple trick mentioned in the notes. Immediately after removing the bread from the oven, while it is still warm, you can brush the top of the loaf with a little melted unsalted butter. This adds moisture and richness to the crust, yielding a more tender exterior. Ensure you still cool the bread completely on a wire rack after applying the butter for the best results.