
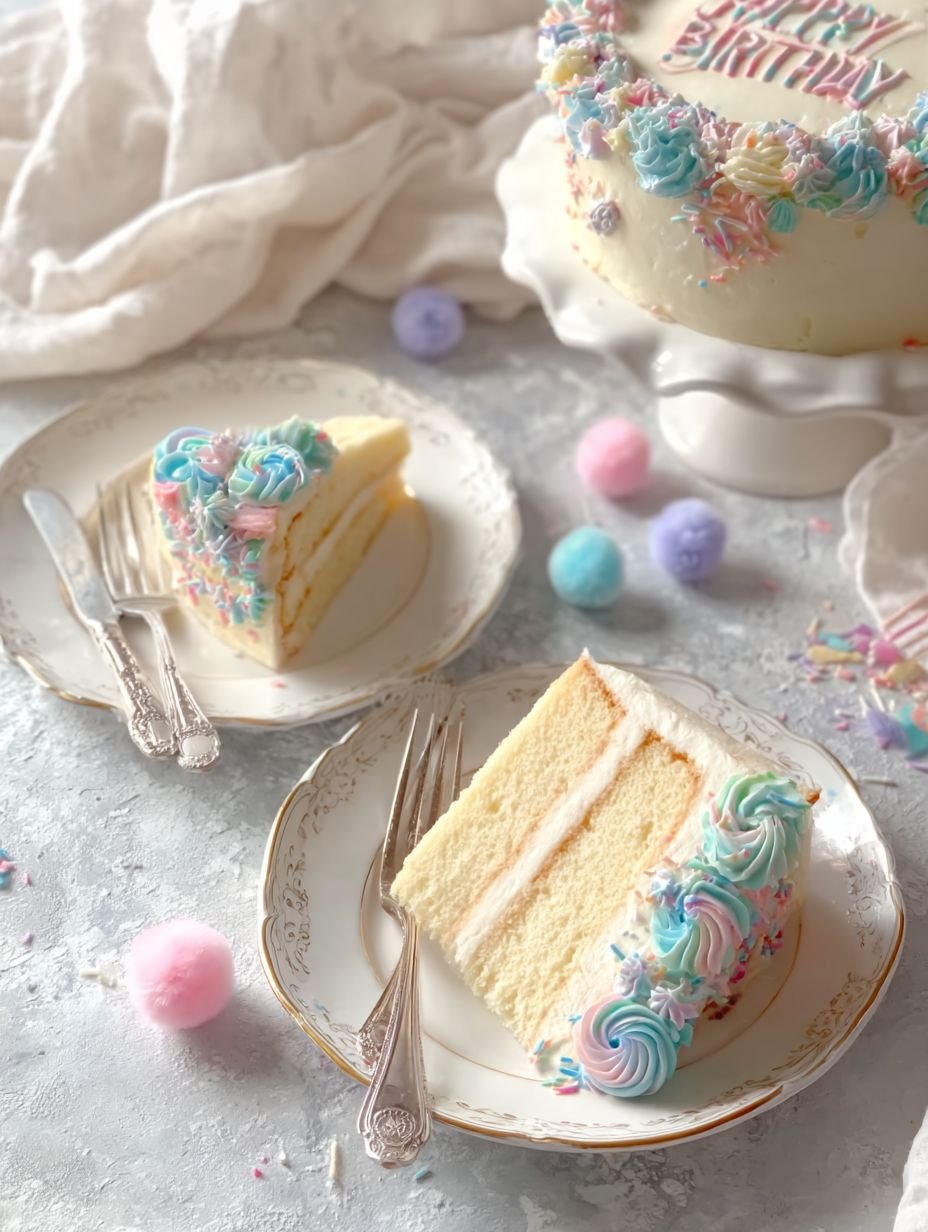
Imagine a slice of pure joy: tender, moist vanilla cake layers embracing a cloud of rich, creamy vanilla buttercream, each bite a symphony of balanced sweetness and delightful texture. This isn’t just any dessert; it’s the kind of cake that takes you back to childhood birthday parties, where the biggest decision was which colorful sprinkle to eat first.
What Makes This Recipe Special
This recipe is a true superstar, combining effortless preparation with a flavor profile that’s simply unmatched. Its stunning appearance, especially when adorned with soft, charming pastel hues from optional gel food coloring, makes it a centerpiece at any celebration. Plus, its versatility means you can easily customize it for any occasion, transforming a simple bake into The Dreamiest Pastel Birthday Cake You’ll Ever Bake, perfect for creating unforgettable memories.
Ingredients
Here’s what you need for this delicious dish:
- **For the Vanilla Cake:**
- **All-purpose flour:** The foundation of our tender cake, providing structure without being heavy.
- **Granulated sugar:** Adds essential sweetness and helps achieve that golden-brown crust.
- **Baking powder:** Our leavening agent, ensuring a beautifully risen, fluffy cake.
- **Salt:** A crucial flavor enhancer, balancing the sweetness and deepening the vanilla notes.
- **Unsalted butter, softened:** The secret to a rich, moist crumb; make sure it’s at room temperature for optimal creaming.
- **Large eggs, room temperature:** Essential for emulsifying the batter, lending richness and structure. Room temperature eggs blend more smoothly.
- **Whole milk, room temperature:** Contributes to the cake’s tender texture and moisture. Like the eggs, room temperature is key for a cohesive batter.
- **Pure vanilla extract:** The star flavor, providing that classic, comforting vanilla aroma and taste, making it truly the dreamiest.
- **For the Vanilla Buttercream Frosting:**
- **Unsalted butter, softened:** Forms the luscious, creamy base of our frosting; softened butter whips up beautifully.
- **Powdered sugar, sifted:** Provides smooth sweetness to the buttercream; sifting is non-negotiable for a lump-free, velvety finish, a hallmark of a truly pastel birthday cake.
- **Whole milk or heavy cream:** Adjusts the frosting’s consistency to be perfectly spreadable and creamy.
- **Pure vanilla extract:** Infuses the buttercream with delightful vanilla flavor, echoing the cake’s essence.
- **Pinch of salt:** Balances the sweetness, just like in the cake, making the vanilla truly sing.
- **Gel food coloring (optional, for decoration):** This is where the “pastel” magic happens! Use a tiny drop to tint your frosting for a subtle, dreamy hue.
All ingredients and quantities can be found directly in the recipe card below.
Step-by-Step Instructions
Simply follow these easy steps to prepare this delicious meal:
Step 1: Prep Your Pans and Dry Mix Your Ingredients
First, let’s set the stage for our baking masterpiece. Preheat your oven to 350°F (175°C) and prepare two 8-inch round cake pans by greasing and flouring them thoroughly, or lining them with parchment paper for easy release. In a large bowl, grab a whisk and combine the all-purpose flour, granulated sugar, baking powder, and salt. Give it a good whisk until everything is uniformly mixed and there are no sneaky lumps.
Step 2: Create the Creamy Wet Foundation
Next, we’ll build the rich, moist heart of our cake. In a separate medium bowl, take your softened unsalted butter and beat it with an electric mixer until it’s light and fluffy, almost like a cloud. Introduce the large eggs one at a time, making sure to beat well after each addition until each egg is fully incorporated into the butter mixture. Once the eggs are happy, stir in the pure vanilla extract, ready to infuse its wonderful aroma.
Step 3: Combine Batter and Bake to Golden Perfection
Now for the exciting part: bringing it all together! Gradually add the dry ingredients from Step 1 to your wet ingredients in three separate additions. Alternate these dry additions with the whole milk, starting and ending with the dry ingredients. Mix gently until the ingredients are just combined; be very careful not to overmix, as that’s the secret to a tender cake. Divide your perfectly mixed batter evenly between the two prepared cake pans. Pop them into your preheated oven and bake for 28-32 minutes, or until a wooden skewer inserted into the center of each cake comes out clean. Let the cakes cool in their pans for 10 minutes before gently inverting them onto a wire rack to cool completely. Patience here is key for perfectly cooled, stable layers.
Step 4: Craft the Dreamy Vanilla Buttercream Frosting
While your cakes are cooling, let’s whip up some magical frosting. In a large bowl, beat the softened unsalted butter with an electric mixer until it’s wonderfully creamy and smooth. Begin gradually adding the sifted powdered sugar, one cup at a time, beating thoroughly after each addition until it’s fully incorporated and the mixture starts to look like a sweet snowdrift. Pour in the whole milk or heavy cream and the pure vanilla extract, and toss in a pinch of salt. Beat this magnificent concoction on medium-high speed for 3-5 minutes until the frosting transforms into a light, fluffy, and impeccably smooth cloud, ready to crown your cake.
Step 5: Tint Your Frosting and Assemble Your Masterpiece
If you’re aiming for that iconic pastel birthday cake look, this is your moment! Divide the fluffy vanilla buttercream into separate bowls if you wish to tint different sections. Add tiny drops of gel food coloring to each bowl, mixing until you achieve your desired soft, dreamy hues. Once your cake layers are completely cool, place one layer on your chosen serving plate or cake stand. Spread about 1 cup of the vanilla buttercream evenly over the top of this first layer. Carefully place the second cake layer on top, creating a beautiful stack.
Step 6: The Grand Frosting Finale and Decoration
With your layers neatly stacked, it’s time for the grand finale. Frost the top and sides of the entire cake with the remaining buttercream, aiming for a smooth, even coating. Now comes the truly fun part! Decorate your masterpiece with piped frosting designs using any tinted frosting you created, or sprinkle generously with your favorite decorative sprinkles. Serve immediately to enjoy the soft crumb and creamy frosting.
Tips for a Perfect Pastel Birthday Cake
Baking The Dreamiest Pastel Birthday Cake You’ll Ever Bake involves a few simple tricks that make all the difference, transforming a good cake into an extraordinary one. Firstly, ensuring all your cold ingredients, like butter, eggs, and milk, are at room temperature is absolutely crucial. Think of it as inviting them to a warm, friendly party where they can mingle and emulsify beautifully, creating a smooth batter and a perfectly creamy frosting. If they’re too cold, they’ll resist blending, leading to a lumpy batter or a split frosting.
Another golden rule: do not overmix the cake batter. Once the wet and dry ingredients are just combined, put down that mixer! Overmixing develops the gluten in the flour too much, resulting in a tough, chewy cake rather than the tender, moist crumb we’re aiming for. We want soft and fluffy, not a workout for your jaw!
For those picture-perfect, level cake layers, a little trimming can go a long way. Once your cakes have cooled completely, you can gently trim any domed tops with a serrated knife. This creates a flat surface for stacking, making your finished cake look incredibly professional and stable. It’s like giving your cake a neat haircut!
And when it comes to the buttercream, sifting that powdered sugar is a step you simply cannot skip. Trust us on this one. Sifting ensures there are no annoying lumps in your frosting, guaranteeing a silky-smooth, dreamy texture that’s a joy to spread and pipe. A smooth frosting is key to achieving that flawless pastel finish.
Lastly, don’t be afraid to adjust your buttercream consistency. If it feels a little too stiff to spread effortlessly, add a tiny bit more milk or cream, a teaspoon at a time, until it loosens up. Conversely, if it seems too thin and runny, a little more sifted powdered sugar will thicken it right up. It’s all about finding that perfect, spreadable sweet spot.
Serving Suggestions and Customization
This beautiful vanilla layer cake is a celebration in itself, but a few touches can elevate it even further, making it truly The Dreamiest Pastel Birthday Cake You’ll Ever Bake. Beyond the optional gel food coloring for beautiful pastel frosting, consider topping your frosted creation with a cascade of colorful sprinkles, edible glitter, or even delicate edible flowers for an extra touch of whimsy. For a personal touch, pipe the birthday person’s name or a special message onto the top of the cake. This cake is wonderfully versatile, making it perfect for not just birthdays, but also baby showers, anniversaries, or simply as a comforting weekend treat. The simple elegance of vanilla allows it to be dressed up or down for any occasion, ensuring it always hits the mark.
Why This Cake is a Crowd-Pleaser
There’s a reason why a classic vanilla cake like this continues to be a favorite across generations. Its universal appeal lies in its comforting familiarity and impeccable balance. The tender, moist layers melt in your mouth, perfectly complemented by the rich, creamy vanilla buttercream that’s not overly sweet. It’s a taste that evokes warmth and happiness, making it the ideal centerpiece for any gathering. Easy enough for a home baker to master, yet impressive enough to wow any crowd, this recipe for The Dreamiest Pastel Birthday Cake You’ll Ever Bake truly delivers on its promise of deliciousness and visual delight, ensuring everyone leaves with a smile. It’s the kind of cake that sparks conversations and creates cherished memories around the table.
The Sweet Science Behind Your Bake
Ever wonder why those room-temperature ingredients are so vital for your cake? It’s a bit of baking magic! Softened butter creams more easily with sugar, trapping air and creating a lighter, fluffier cake. Room temperature eggs and milk emulsify better with the butter mixture, preventing a curdled batter and resulting in a smoother, more uniform crumb. This attention to detail isn’t just baking lore; it’s the sweet science that ensures every slice of this pastel birthday cake is perfectly moist and tender. Similarly, sifting powdered sugar for the buttercream prevents lumps because individual sugar particles are fine and prone to clumping, especially in humid environments. Sifting aerates the sugar, making it light and ensuring a velvety, smooth texture in your frosting.
Nutrition Information
Here’s a quick look at the nutritional breakdown per serving:
- Calories: 450
- Protein: 4g
- Carbs: 65g
- Fat: 20g
Final Thoughts on Your Masterpiece
You’ve done it! You’ve not only baked a cake, but you’ve crafted a delightful experience, a truly unforgettable treat that tastes as good as it looks. The Dreamiest Pastel Birthday Cake You’ll Ever Bake is more than just a recipe; it’s a testament to the joy of homemade goodness and the power of simple, high-quality ingredients. Whether it’s for a grand celebration or a quiet moment of indulgence, this cake promises to bring smiles and sweet memories. So, go ahead, grab a slice, and savor the tender crumb and creamy frosting of your very own masterpiece. Happy baking, my friends!
Mastering the Secrets of Cooking
For a cake as gorgeous as this pastel beauty, timing is everything. Begin by ensuring your butter, eggs, and milk are all at room temperature; this fosters a perfectly emulsified batter. Always alternate dry and wet ingredients slowly, ending with dry, mixing just until combined. This sequence ensures a tender crumb for your exquisite pastel creation.
Make Your Recipe Unique
Ready to make this delightful cake uniquely yours? Instead of whole milk in the cake, try a plant-based milk for a subtle flavor shift. For the buttercream, you could opt for heavy cream for an even richer texture. Experiment with different shades of gel food coloring to match any celebration’s theme, making this beautiful birthday cake truly personal.
Smart Storage & Reheating
To keep your vanilla cake as tender and moist as the day it was baked, store it airtight at room temperature for up to 3 days or in the refrigerator for up to 5 days. For optimal freshness and that soft crumb, wrap individual slices tightly in plastic wrap before placing them in a sealed container.
The Chef’s Golden Tips
I’ll never forget the joy on my niece’s face when she first saw this pastel masterpiece. It wasn’t just cake; it was a pure, edible moment of childhood wonder, sprinkled with magic and a whole lot of vanilla love.
Final Thoughts
You’ve now uncovered the secrets to baking a truly exceptional vanilla layer cake. This recipe guarantees tender, moist layers infused with pure vanilla and crowned with rich, creamy buttercream, promising a delightful sensory experience. The subtle art of achieving a balanced sweetness and that perfect texture makes this creation truly special. If you’re looking to create an unforgettable centerpiece for any occasion, or simply desire a comforting treat that brightens any day, we wholeheartedly encourage you to try your hand at **The Dreamiest Pastel Birthday Cake You’ll Ever Bake**. Gather your ingredients, follow these steps, and prepare to impress everyone with your stunning homemade confection!
Print
The Dreamiest Pastel Birthday Cake You’ll Ever Bake
- Total Time: 1 hour
- Yield: 12-16 1x
Description
This classic vanilla layer cake features tender, moist cake layers infused with pure vanilla, complemented by a rich, creamy vanilla buttercream frosting. Each slice offers a balanced sweetness and a delightful contrast between the soft crumb and smooth frosting, making it suitable for any celebration or a comforting treat. The cake is baked to a golden perfection and then generously frosted, creating a visually appealing dessert.
Ingredients
- **For the Vanilla Cake:**
- 2 ½ cups all-purpose flour
- 1 ½ cups granulated sugar
- 1 tablespoon baking powder
- ½ teaspoon salt
- 1 cup (2 sticks) unsalted butter, softened
- 4 large eggs, room temperature
- 1 cup whole milk, room temperature
- 2 teaspoons pure vanilla extract
- **For the Vanilla Buttercream Frosting:**
- 1 cup (2 sticks) unsalted butter, softened
- 4 cups powdered sugar, sifted
- ¼ cup whole milk or heavy cream
- 2 teaspoons pure vanilla extract
- Pinch of salt
- Gel food coloring (optional, for decoration)
Instructions
- **For the Vanilla Cake:**
- Preheat oven to 350°F (175°C). Grease and flour two 8-inch round cake pans or line with parchment paper.
- In a large bowl, whisk together the flour, granulated sugar, baking powder, and salt.
- In a separate medium bowl, cream the softened butter until light and fluffy.
- Add the eggs one at a time, beating well after each addition until fully incorporated. Stir in the vanilla extract.
- Gradually add the dry ingredients to the wet ingredients in three additions, alternating with the milk, beginning and ending with the dry ingredients. Mix until just combined, being careful not to overmix.
- Divide the batter evenly between the prepared cake pans.
- Bake for 28-32 minutes, or until a wooden skewer inserted into the center comes out clean.
- Let the cakes cool in the pans for 10 minutes before inverting them onto a wire rack to cool completely.
- **For the Vanilla Buttercream Frosting:**
- In a large bowl, beat the softened butter with an electric mixer until creamy and smooth.
- Gradually add the sifted powdered sugar, one cup at a time, beating well after each addition until fully incorporated.
- Pour in the milk or cream and vanilla extract, and add a pinch of salt. Beat on medium-high speed for 3-5 minutes until the frosting is light, fluffy, and smooth.
- If desired, divide the frosting into separate bowls and tint with gel food coloring for decorative piping.
- **Assembly:**
- Once the cake layers are completely cool, place one layer on a serving plate or cake stand.
- Spread about 1 cup of vanilla buttercream evenly over the top of the first layer.
- Carefully place the second cake layer on top.
- Frost the top and sides of the entire cake with the remaining buttercream.
- Decorate with piped frosting designs and sprinkles as desired.
Notes
Ensure all cold ingredients are at room temperature for a smooth, emulsified batter and creamy frosting.
Do not overmix the cake batter; mix until just combined to prevent a tough cake.
For perfectly level cake layers, you can trim the domed tops with a serrated knife once cooled.
Sifting powdered sugar is crucial for a lump-free, smooth buttercream.
If the buttercream becomes too stiff, add a tiny bit more milk or cream; if too thin, add more sifted powdered sugar.
- Prep Time: 30 minutes
- Cook Time: 30 minutes
Nutrition
- Calories: 450
- Fat: 20g
- Carbohydrates: 65g
- Protein: 4g
FAQs
Why is it important for ingredients like eggs and milk to be at room temperature?
Using room temperature ingredients, particularly eggs and milk, is crucial for achieving the best results in your vanilla cake batter and buttercream frosting. When cold ingredients are mixed into a batter, they can cause the butter to seize up, leading to a lumpy mixture and an inconsistent texture. Room temperature ingredients emulsify much more effectively, meaning they combine smoothly and evenly. This results in a cohesive, smooth batter that b bakes into a tender, evenly textured cake. For the buttercream, softened butter creams beautifully with powdered sugar, yielding a light, fluffy, and smooth frosting that’s a joy to work with.
How can I avoid overmixing the cake batter to keep it tender?
Preventing a tough or dry cake texture is all about careful mixing, particularly when incorporating the dry ingredients. After you’ve creamed the butter and added the eggs and vanilla, you’ll alternate adding the whisked dry ingredients with the milk. The key here is to mix until the ingredients are *just* combined. As soon as you no longer see streaks of flour, stop mixing. Overmixing develops the gluten in the flour too much, which can lead to a dense, chewy, and less tender cake. A light hand and careful observation will ensure your vanilla cake layers are perfectly moist and tender.
What is the key to achieving a smooth, lump-free vanilla buttercream?
The secret to a luxuriously smooth vanilla buttercream, free of any gritty or lumpy texture, lies in sifting your powdered sugar. Powdered sugar often contains small clumps, and if these are added directly to your softened butter, they can be incredibly difficult to break down completely, even with vigorous beating. By sifting the powdered sugar before you add it to the creamy butter, you remove these lumps, ensuring a finer, more uniform texture. This simple step makes a significant difference, resulting in a light, airy, and velvety buttercream that spreads beautifully and melts in your mouth.
What should I do if my vanilla buttercream turns out too stiff or too thin?
Adjusting the consistency of your vanilla buttercream is simple and can be done easily. If you find your buttercream is too stiff, meaning it’s hard to spread or pipe, gradually add a tiny bit more whole milk or heavy cream, about a teaspoon at a time, beating after each addition until it reaches your desired consistency. For buttercream that’s too thin or runny, which can happen if too much liquid was added, incorporate more sifted powdered sugar, a tablespoon or two at a time. Beat well after each addition until the frosting thickens to the perfect creamy, pipeable texture.